redirect_uri : OAuth2 provider가 성공적으로 인증을 완료했을 때 redirect 할 URI를 지정한다. (OAuth2의 redirectUri 와는 다르다)
2. endpoint로 인증 요청을 받으면, Spring Security의 OAuth2 클라이언트는 user를 provider가 제공하는 AuthorizationUrl로 redirect 한다. Authorization request와 관련된 state는authorizationRequestRepository에 저장된다 (Security Config에 정의함) provider에서 제공한 AutorizationUrl에서 허용/거부가 정해진다.
이때 만약 유저가 앱에 대한 권한을 모두 허용하면 provider는 사용자를 callback url로 redirect한다. (http://localhost:8080/oauth2/callback/{provider}) 그리고 이때 사용자 인증코드 (authroization code) 도 함께 갖고있다.
만약 거부하면 callbackUrl로 똑같이 redirect 하지만 error가 발생한다.
3. Oauth2 에서의 콜백 결과가 에러이면 Spring Security는oAuth2AuthenticationFailureHanlder를 호출한다. (Security Config에 정의함)
4. Oauth2 에서의 콜백 결과가 성공이고 사용자 인증코드 (authorization code)도 포함하고 있다면 Spring Security는 access_token 에 대한 authroization code를 교환하고, customOAuth2UserService 를 호출한다 (Security Config에 정의함)
5. customOAuth2UserService 는 인증된 사용자의 세부사항을 검색한 후에 데이터베이스에 Create를 하거나 동일 Email로 Update 하는 로직을 작성한다.
6. 마지막으로 oAuth2AuthenticationSuccessHandler 이 불리고 그것이 JWT authentication token을 만들고 queryString에서의 redirect_uri로 간다 (1번에서 client가 정의한 ) 이때 JWT token과 함께!
@Configuration
@EnableWebSecurity
@EnableGlobalMethodSecurity(
        securedEnabled = true,
        jsr250Enabled = true,
        prePostEnabled = true
)
public class SecurityConfig extends WebSecurityConfigurerAdapter {

    @Autowired
    private CustomUserDetailsService customUserDetailsService;

    @Autowired
    private CustomOAuth2UserService customOAuth2UserService;

    @Autowired
    private OAuth2AuthenticationSuccessHandler oAuth2AuthenticationSuccessHandler;

    @Autowired
    private OAuth2AuthenticationFailureHandler oAuth2AuthenticationFailureHandler;

    @Autowired
    private HttpCookieOAuth2AuthorizationRequestRepository httpCookieOAuth2AuthorizationRequestRepository;

    @Bean
    public TokenAuthenticationFilter tokenAuthenticationFilter() {
        return new TokenAuthenticationFilter();
    }

    /*
      By default, Spring OAuth2 uses HttpSessionOAuth2AuthorizationRequestRepository to save
      the authorization request. But, since our service is stateless, we can't save it in
      the session. We'll save the request in a Base64 encoded cookie instead.
    */
    @Bean
    public HttpCookieOAuth2AuthorizationRequestRepository cookieAuthorizationRequestRepository() {
        return new HttpCookieOAuth2AuthorizationRequestRepository();
    }

    @Override
    public void configure(AuthenticationManagerBuilder authenticationManagerBuilder) throws Exception {
        authenticationManagerBuilder
                .userDetailsService(customUserDetailsService)
                .passwordEncoder(passwordEncoder());
    }

    @Bean
    public PasswordEncoder passwordEncoder() {
        return new BCryptPasswordEncoder();
    }


    @Bean(BeanIds.AUTHENTICATION_MANAGER)
    @Override
    public AuthenticationManager authenticationManagerBean() throws Exception {
        return super.authenticationManagerBean();
    }

    @Override
    protected void configure(HttpSecurity http) throws Exception {
        http
                .cors()
                    .and()
                .sessionManagement()
                    .sessionCreationPolicy(SessionCreationPolicy.STATELESS)
                    .and()
                .csrf()
                    .disable()
                .formLogin()
                    .disable()
                .httpBasic()
                    .disable()
                .exceptionHandling()
                    .authenticationEntryPoint(new RestAuthenticationEntryPoint())
                    .and()
                .authorizeRequests()
                    .antMatchers("/",
                        "/error",
                        "/favicon.ico",
                        "/**/*.png",
                        "/**/*.gif",
                        "/**/*.svg",
                        "/**/*.jpg",
                        "/**/*.html",
                        "/**/*.css",
                        "/**/*.js")
                        .permitAll()
                    .antMatchers("/auth/**", "/oauth2/**")
                        .permitAll()
                    .anyRequest()
                        .authenticated()
                    .and()
                .oauth2Login()
                    .authorizationEndpoint()
                        .baseUri("/oauth2/authorize")
                        .authorizationRequestRepository(cookieAuthorizationRequestRepository())
                        .and()
                    .redirectionEndpoint()
                        .baseUri("/oauth2/callback/*")
                        .and()
                    .userInfoEndpoint()
                        .userService(customOAuth2UserService)
                        .and()
                    .successHandler(oAuth2AuthenticationSuccessHandler)
                    .failureHandler(oAuth2AuthenticationFailureHandler);

        // Add our custom Token based authentication filter
        http.addFilterBefore(tokenAuthenticationFilter(), UsernamePasswordAuthenticationFilter.class);
    }
}
redirect_uri: Specifies the URI to redirect to when the OAuth2 provider successfully completes authentication. (This is different from OAuth2's redirectUri)
2. When the authentication request is received at the endpoint, Spring Security's OAuth2 client redirects the user to the AuthorizationUrl provided by the provider. The state related to the authorization request is stored in the authorizationRequestRepository (defined in Security Config). The allow/deny decision is made at the AuthorizationUrl provided by the provider.
If the user grants all permissions to the app, the provider redirects the user to the callback URL (http://localhost:8080/oauth2/callback/{provider}) along with the user's authorization code.
If the user denies, they are redirected to the same callbackUrl, but with an error.
3. If the OAuth2 callback result is an error, Spring Security invokes the oAuth2AuthenticationFailureHanlder (defined in Security Config).
4. If the OAuth2 callback result is successful and includes the authorization code, Spring Security exchanges the authorization code for an access_token and invokes the customOAuth2UserService (defined in Security Config).
5. The customOAuth2UserService retrieves the authenticated user's details and then either creates a new entry in the database or updates the existing one with the same email.
6. Finally, the oAuth2AuthenticationSuccessHandler is called, which creates a JWT authentication token and redirects to the redirect_uri from the queryString (the one defined by the client in step 1) — along with the JWT token!
@Configuration
@EnableWebSecurity
@EnableGlobalMethodSecurity(
        securedEnabled = true,
        jsr250Enabled = true,
        prePostEnabled = true
)
public class SecurityConfig extends WebSecurityConfigurerAdapter {

    @Autowired
    private CustomUserDetailsService customUserDetailsService;

    @Autowired
    private CustomOAuth2UserService customOAuth2UserService;

    @Autowired
    private OAuth2AuthenticationSuccessHandler oAuth2AuthenticationSuccessHandler;

    @Autowired
    private OAuth2AuthenticationFailureHandler oAuth2AuthenticationFailureHandler;

    @Autowired
    private HttpCookieOAuth2AuthorizationRequestRepository httpCookieOAuth2AuthorizationRequestRepository;

    @Bean
    public TokenAuthenticationFilter tokenAuthenticationFilter() {
        return new TokenAuthenticationFilter();
    }

    /*
      By default, Spring OAuth2 uses HttpSessionOAuth2AuthorizationRequestRepository to save
      the authorization request. But, since our service is stateless, we can't save it in
      the session. We'll save the request in a Base64 encoded cookie instead.
    */
    @Bean
    public HttpCookieOAuth2AuthorizationRequestRepository cookieAuthorizationRequestRepository() {
        return new HttpCookieOAuth2AuthorizationRequestRepository();
    }

    @Override
    public void configure(AuthenticationManagerBuilder authenticationManagerBuilder) throws Exception {
        authenticationManagerBuilder
                .userDetailsService(customUserDetailsService)
                .passwordEncoder(passwordEncoder());
    }

    @Bean
    public PasswordEncoder passwordEncoder() {
        return new BCryptPasswordEncoder();
    }


    @Bean(BeanIds.AUTHENTICATION_MANAGER)
    @Override
    public AuthenticationManager authenticationManagerBean() throws Exception {
        return super.authenticationManagerBean();
    }

    @Override
    protected void configure(HttpSecurity http) throws Exception {
        http
                .cors()
                    .and()
                .sessionManagement()
                    .sessionCreationPolicy(SessionCreationPolicy.STATELESS)
                    .and()
                .csrf()
                    .disable()
                .formLogin()
                    .disable()
                .httpBasic()
                    .disable()
                .exceptionHandling()
                    .authenticationEntryPoint(new RestAuthenticationEntryPoint())
                    .and()
                .authorizeRequests()
                    .antMatchers("/",
                        "/error",
                        "/favicon.ico",
                        "/**/*.png",
                        "/**/*.gif",
                        "/**/*.svg",
                        "/**/*.jpg",
                        "/**/*.html",
                        "/**/*.css",
                        "/**/*.js")
                        .permitAll()
                    .antMatchers("/auth/**", "/oauth2/**")
                        .permitAll()
                    .anyRequest()
                        .authenticated()
                    .and()
                .oauth2Login()
                    .authorizationEndpoint()
                        .baseUri("/oauth2/authorize")
                        .authorizationRequestRepository(cookieAuthorizationRequestRepository())
                        .and()
                    .redirectionEndpoint()
                        .baseUri("/oauth2/callback/*")
                        .and()
                    .userInfoEndpoint()
                        .userService(customOAuth2UserService)
                        .and()
                    .successHandler(oAuth2AuthenticationSuccessHandler)
                    .failureHandler(oAuth2AuthenticationFailureHandler);

        // Add our custom Token based authentication filter
        http.addFilterBefore(tokenAuthenticationFilter(), UsernamePasswordAuthenticationFilter.class);
    }
}
@Valid 를 이용해 @RequestBody 객체 검증하기 | Validating @RequestBody Objects Using @Valid
쟈 미
728x90
Springboot를 이용해서 어노테이션을 이용한 validation을 하는 방법을 적으려 한다. RestController를 이용하여 @RequestBody 객체를 사용자로부터 가져올 때, 들어오는 값들을 검증할 수 있는 방법을 소개한다.
Jakarata Bean Validation API Packages에 있는 javax.validation.constraints package에 있는 기본적인 검증 어노테이션을 이용한다. @Valid를 이용하면, service 단이 아닌 객체 안에서, 들어오는 값에 대해 검증을 할 수 있다.
javax.validation.constraints 패키지를 보면 많은 어노테이션들이 존재한다. @Valid를 이용한 객체 검증 시 기본적으로 이 어노테이션을 이용한다. 사실 이름만 봐도 각각의 용도를 이해할 수 있다.
추가 : springboot가 버전업을 하면서 web 의존성안에 있던 constraints packeage가 아예 모듈로 빠졌다.
@Valid로 requestBody로 들어온 객체의 검증이 이루어지면서 위와 같이 BadRequest가 나가는 경우에 custom 한 errorhandling도 할 수 있다.
위에서 잘못된 객체 값이 나갔을 때 Springboot에 올라온 Log를 살펴보면 MethodArgumentNotValidException이 발생했음을 알 수 있어, 이 Exception을 사용하여 custom한 ErrorMessage를 response로 내보낼 수도 있다.
@ControllerAdvice를 이용한 전역 에러 핸들링, 혹은 @Controller단에서의 지역 에러 핸들링을 사용하면 된다. MethodArgumentNotValidException에 대한 @ExceptionHandler 어노테이션을 지정하여 커스텀 에러 핸들링을 해보자
@RestControllerAdvice
public class ApiControllerAdvice {
@ExceptionHandler(MethodArgumentNotValidException.class)
public ResponseEntity<Map<String, String>> handleValidationExceptions(MethodArgumentNotValidException ex){
Map<String, String> errors = new HashMap<>();
ex.getBindingResult().getAllErrors()
.forEach(c -> errors.put(((FieldError) c).getField(), c.getDefaultMessage()));
return ResponseEntity.badRequest().body(errors);
}
}
ResponseEntity 값으로, error가 난 field 값과, 에러 메시지를 Map 형태로 만들어서, Response로 넣어주었다. 이때 Map으로 선언하여 forEach를 한 이유는 @Valid를 사용할 때, 해당 객체에서 valid에 실패한 내용을 모두 리턴해주기 때문에, 모든 error 값을 수용하기 위해서이다.
이 상태로 다시 서버를 Run 시켜서 Postman으로 확인을 해본다. 이때는 @NotNull, @Email 모두 validation이 안되도록 requestBody를 작성하였다.
Response값을 살펴보면, BadRequest인 status값, @Valid를 통과하지 못한 모든 필드 값에 대한 어려와, 에러 내용을 커스텀하게 내려준 것이 잘 반영되었음을 알 수 있다.
@NotEmpty - Type :CharSequence(length of character)Collection(collection size)Map(map sizeArray(array length) -null 이거나 empty(빈 문자열)가 아니어야 한다.
@NotNull - Type : 어떤 타입이든 수용한다. -null 이 아닌 값이다.
@Null - Type :어떤 타입이든 수용한다. -null 값이다.
이 부분은 헷갈리는 부분이라 DTO와 Contoller를 만들어서 확인해보자.
@NoArgsConstructor
@Getter
@ToString
public class NotDto {
@NotNull
private String notNull;
@NotEmpty
private String notEmpty;
@NotBlank
private String notBlank;
}
결과는 아래와 같다. 각각의 error message를 통해 각 validation 방법을 확인 할 수 있다.
@NotNull : 반드시 값이 있어야 한다.
@NotEmpty : 반드시 값이 존재하고 길이 혹은 크기가 0보다 커야한다.
@NotBrank : 반드시 값이 존재하고 공백 문자를 제외한 길이가 0보다 커야 한다.
null
""
" "
@NotNull
Invalid
Valid
Valid
@NotEmpty
Invalid
Invalid
Valid
@NotBlank
Invalid
Invalid
Invalid
용도에 맞게 validation을 할 수 있도록 확인하자.
2. 최대 최소에 대한 검증
suppportType - BigDecimalBigIntegerCharSequencebyte, short, int, long, 이에 대응하는 Wrapper 클래스 - double, float는 rounding error 때문에 지원하지 않는다. - null도 valid로 간주된다.
Validation - @DecimalMax : 지정된 최대 값보다 작거나 같아야 한다. Require : String value => max 값을 지정한다. - @DecimalMin : 지정된 최소 값보다 크거나 같아야 한다. Require : String value => min 값을 지정한다. - @Max : 지정된 최대 값보다 작거나 같아야 한다. Require : int value => max 값을 지정한다. - @Min : 지정된 최소 값보다 크거나 같아야 한다. Require : int value => min 값을 지정한다.
suppportType - java.util.Datejava.util.Calendarjava.time.Instantjava.time.LocalDatejava.time.LocalDateTimejava.time.LocalTimejava.time.MonthDayjava.time.OffsetDateTimejava.time.OffsetTimejava.time.Yearjava.time.YearMonthjava.time.ZonedDateTimejava.time.chrono.HijrahDatejava.time.chrono.JapaneseDatejava.time.chrono.MinguoDatejava.time.chrono.ThaiBuddhistDate - null도 valid로 간주된다.
Validation - @Future : Now 보다 미래의 날짜, 시간이어야 한다. - @FutureOrPresent : Now 거나 미래의 날짜, 시간이어야 한다. - @Past : Now 보다 과거 의의 날짜, 시간이어야 한다. - @PastOrPresent: Now 거나 과거의 날짜, 시간이어야 한다.
Now의 기준 : ClockProvider의 가상 머신에 따라 현재 시간을 정의하며 필요한 경우 default time zone을 적용한다.
Usage
@NoArgsConstructor
@Getter
@ToString
public class TimeDto {
@Future
private Date future;
@FutureOrPresent
private Date futureOrPresent;
@Past
private Date past;
@PastOrPresent
private Date pastOrPresent;
}
4. 이메일 검증
suppportType - null도 valid로 간주된다.
Validation - @Email : 올바른 형식의 이메일 주소여야 한다. (@가 들어가야한다.)
Usage
@NoArgsConstructor
@Getter
@ToString
public class EmailDto {
@Email
private String email;
}
5. 자릿수 범위 검증
suppportType - BigDecimalBigIntegerCharSequencebyte, short, int, long, 이에 대응하는 Wrapper 클래스 - null도 valid로 간주된다.
Validation - @Digits : 허용된 범위 내의 숫자이다. Require : int integer => 이 숫자에 허용되는 최대 정수 자릿수 Require : int fraction =>이 숫자에 허용되는 최대 소수 자릿수
Usage
@NoArgsConstructor
@Getter
@ToString
@Builder
@AllArgsConstructor
public class DigitsDto {
@Digits(integer = 5, fraction = 5)
private Integer digits;
}
6. Boolean 값에 대한 검증
suppportType - Boolean, boolean
Validation - @AssertTrue : 값이 항상 True 여야 한다. - @AssertFalse : 값이 항상 False 여야 한다.
Usage
@NoArgsConstructor
@Getter
@ToString
public class BooleanDto {
@AssertTrue
private boolean assertTrue;
@AssertFalse
private boolean assertFalse;
}
7. 크기 검증
suppportType - CharSequence (length of character sequence) Collection (collection size) Map (map size) Array (array length) - null도 valid로 간주된다.
Validation - @Size : 이 크기가 지정된 경계(포함) 사이에 있어야 한다. Require : int max => element의 크기가 작거나 같다. Require : int min =>element의 크기가 크거나 같다.
Usage
@NoArgsConstructor
@Getter
@ToString
public class SizeDto {
@Size(max = 5, min = 3)
private String size;
}
@NoArgsConstructor
@Getter
@ToString
public class PatternDto {
//yyyy-mm-dd 형태를 가지는 패턴 조사
@Pattern(regexp = "^(19|20)\\d{2}-(0[1-9]|1[012])-(0[1-9]|[12][0-9]|3[0-1])$")
private String pattern;
}
4. @Valid 정리 표
@AssertTrue
Boolean, boolean
값이 항상 True 여야 한다.
@DecimalMax
실수 제외 숫자 클래스.
지정된 최대 값보다 작거나 같아야 하는 숫자이다.
String : value (max 값을 지정한다.)
@DecimalMin
실수 제외 숫자 클래스.
지정된 최소 값보다 크거나 같아야하는 숫자이다.
String : value (min 값을 지정한다.)
@Digits
BigDecimalBigIntegerCharSequencebyte, short, int, long, 이에 대응하는 Wrapper 클래스
허용된 범위 내의 숫자이다.
int : integer (이 숫자에 허용되는 최대 정수 자릿수) int : fraction (이 숫자에 허용되는 최대 소수 자릿수)
@Email
null도 valid로 간주된다.
올바른 형식의 이메일 주소여야한다.
@Future
시간 클래스
Now 보다 미래의 날짜, 시간
@FutureOrPresent
시간 클래스
Now의 시간이거나 미래의 날짜, 시간
@Max
실수 제외 숫자 클래스.
지정된 최대 값보다 작거나 같은 숫자이다.
long : value (max 값을 지정한다)
@Min
실수 제외 숫자 클래스.
지정된 최소 값보다 크거나 같은 숫자이다.
long : value (min 값을 지정한다)
@Negative
숫자 클래스
음수인 값이다.
@NegativeOrZero
숫자 클래스
0이거나 음수인 값이다
@NotBlank
null 이 아닌 값이다.공백이 아닌 문자를 하나 이상 포함한다
@NotEmpty
CharSequence,Collection, Map, Array
null이거나 empty(빈 문자열)가 아니어야 한다.
@NotNull
어떤 타입이든 수용한다.
null 이 아닌 값이다.
@Null
어떤 타입이든 수용한다.
null 값이다.
@Past
시간 클래스
Now보다 과거의 날짜, 시간
@PastOrPresent
시간클래스
Now의 시간이거나 과거의 날짜, 시간
@Pattern
문자열
지정한 정규식과 대응되는 문자열이어야한다. Java의 Pattern 패키지의 컨벤션을 따른다
String : regexp (정규식 문자열을 지정한다)
@Positive
숫자 클래스
양수인 값이다
@PositiveOrZero
숫자 클래스
0이거나 양수인 값이다.
@Size
CharSequence,Collection, Map, Array
이 크기가 지정된 경계(포함) 사이에 있어야한다.
int : max (element의 크기가 작거나 같다) int : min (element의 크기가 크거나 같다)
[@ValidAnnotation].List : 동일한 요소에 여러개의 @ValidAnnotation[] 제약조건을 정의한다.
I'm going to write about how to perform annotation-based validation using Spring Boot. This post introduces how to validate incoming values when receiving a @RequestBody object from the user via a RestController.
We'll use the basic validation annotations from the javax.validation.constraints package in the Jakarta Bean Validation API Packages. By using @Valid, you can validate incoming values within the object itself, rather than at the service layer.
If you look at the javax.validation.constraints package, there are many annotations available. These annotations are used by default when performing object validation with @Valid. Honestly, you can understand what each one does just by looking at the name.
Update: As Spring Boot has been upgraded, the constraints package that used to be inside the web dependency has been separated into its own module.
@RestController
@Slf4j
public class TestController {

    @PostMapping("/user")
    public ResponseEntity<String> savePost(final @Valid @RequestBody UserDto userDto) {
        log.info(userDto.toString());
        return ResponseEntity.ok().body("postDto 객체 검증 성공");
    }
}
By writing @Valid next to the @RequestBody annotation in the parameter, validation is performed on the incoming object from the RequestBody. The specific details of this validation must be defined inside the object.
@ToString
@Getter
@NoArgsConstructor
@AllArgsConstructor
@Builder
public class UserDto {

    @NotNull
    private String name;

    @Email
    private String email;
}
After defining the UserDto object as above, you simply use the appropriate annotation for each field.
@NotNull: Does not allow null values for the incoming field. @Email: The incoming value must be in a valid email format. For a detailed explanation of field annotations, scroll down to: 3. Understanding javax.constraint Annotations
To actually verify that validation is working using PostMan, let's try sending an invalid email value:
The response automatically goes out following the error template generated by Spring Boot in a certain format. In other words, just by using @Valid along with the validation annotations properly, you can catch errors at the object level.
You can verify whether the @Valid annotation works using a simple Controller test. The test code below assumes the case where name is set to null, according to the @NotNull annotation.
When validation is performed on the incoming requestBody object with @Valid and a BadRequest is returned as shown above, you can also do custom error handling.
If you look at the log in Spring Boot when an invalid object value was sent, you can see that a MethodArgumentNotValidException was thrown. You can use this Exception to send a custom ErrorMessage as the response.
You can use global error handling with @ControllerAdvice, or local error handling at the @Controller level. Let's try custom error handling by specifying the @ExceptionHandler annotation for MethodArgumentNotValidException.
@RestControllerAdvice
public class ApiControllerAdvice {

    @ExceptionHandler(MethodArgumentNotValidException.class)
    public ResponseEntity<Map<String, String>> handleValidationExceptions(MethodArgumentNotValidException ex){
        Map<String, String> errors = new HashMap<>();
        ex.getBindingResult().getAllErrors()
                .forEach(c -> errors.put(((FieldError) c).getField(), c.getDefaultMessage()));
        return ResponseEntity.badRequest().body(errors);
    }

}
As the ResponseEntity value, we created a Map containing the field that caused the error and the error message, and put it into the Response. The reason we declared a Map and used forEach is that when using @Valid, it returns all the contents that failed validation in the object, so we need to accommodate all error values.
Let's run the server again and check with Postman. This time, I wrote the requestBody so that both @NotNull and @Email validation would fail.
Looking at the Response, you can see that the BadRequest status value, the errors for all field values that failed @Valid, and the custom error content are all properly reflected.
3. Understanding javax.constraint Annotations
I've included a reference table at the very bottom. Refer to it when needed.
1. String Presence Validation (Differences between @NotBlank, @NotEmpty, and @NotNull)
@NotBlank -The value must not be null. - Must contain at least one non-whitespace character.
@NotEmpty - Type:CharSequence(length of character)Collection(collection size)Map(map sizeArray(array length) -Must not be null or empty (empty string).
@NotNull - Type: Accepts any type. -The value must not be null.
@Null - Type:Accepts any type. -The value must be null.
This part can be confusing, so let's create a DTO and Controller to verify.
@NoArgsConstructor
@Getter
@ToString
public class NotDto {
    @NotNull
    private String notNull;
    @NotEmpty
    private String notEmpty;
    @NotBlank
    private String notBlank;
}
The results are as follows. You can understand each validation method through their respective error messages.
@NotNull: A value must be present.
@NotEmpty: A value must exist and its length or size must be greater than 0.
@NotBlank: A value must exist and its length, excluding whitespace characters, must be greater than 0.
null
""
" "
@NotNull
Invalid
Valid
Valid
@NotEmpty
Invalid
Invalid
Valid
@NotBlank
Invalid
Invalid
Invalid
Make sure to use the appropriate validation for your use case.
2. Min/Max Value Validation
supportType - BigDecimalBigIntegerCharSequencebyte, short, int, long, and their corresponding Wrapper classes - double, float are not supported due to rounding errors. - null is also considered valid.
Validation - @DecimalMax: Must be less than or equal to the specified maximum value. Require: String value => Specifies the max value. - @DecimalMin: Must be greater than or equal to the specified minimum value. Require: String value => Specifies the min value. - @Max: Must be less than or equal to the specified maximum value. Require: int value => Specifies the max value. - @Min: Must be greater than or equal to the specified minimum value. Require: int value => Specifies the min value.
The difference between DecimalMax/Min and Max/Min is in the range of values. The range differs significantly depending on whether you use String or Integer.
3. Range Value Validation
supportType -BigDecimalBigIntegerCharSequencebyte,short,int,long, double,float and their corresponding Wrapper classes - null is also considered valid.
Validation - @Positive: The value must be positive. - @PositiveOrZero: The value must be zero or positive. - @Negative: The value must be negative. - @NegativeOrZero: The value must be zero or negative.
supportType - java.util.Datejava.util.Calendarjava.time.Instantjava.time.LocalDatejava.time.LocalDateTimejava.time.LocalTimejava.time.MonthDayjava.time.OffsetDateTimejava.time.OffsetTimejava.time.Yearjava.time.YearMonthjava.time.ZonedDateTimejava.time.chrono.HijrahDatejava.time.chrono.JapaneseDatejava.time.chrono.MinguoDatejava.time.chrono.ThaiBuddhistDate - null is also considered valid.
Validation - @Future: Must be a date/time in the future compared to Now. - @FutureOrPresent: Must be Now or a date/time in the future. - @Past: Must be a date/time in the past compared to Now. - @PastOrPresent: Must be Now or a date/time in the past.
Definition of Now: The current time is defined according to the virtual machine of the ClockProvider, and the default time zone is applied if necessary.
Usage
@NoArgsConstructor
@Getter
@ToString
public class TimeDto {
    @Future
    private Date future;
    @FutureOrPresent
    private Date futureOrPresent;
    @Past
    private Date past;
    @PastOrPresent
    private Date pastOrPresent;
}
4. Email Validation
supportType - null is also considered valid.
Validation - @Email: Must be a properly formatted email address (must contain @).
Usage
@NoArgsConstructor
@Getter
@ToString
public class EmailDto {
    @Email
    private String email;
}
5. Digit Range Validation
supportType - BigDecimalBigIntegerCharSequencebyte, short, int, long, and their corresponding Wrapper classes - null is also considered valid.
Validation - @Digits: Must be a number within the allowed range. Require: int integer => Maximum number of integer digits allowed for this number. Require: int fraction =>Maximum number of fractional digits allowed for this number.
Usage
@NoArgsConstructor
@Getter
@ToString
@Builder
@AllArgsConstructor
public class DigitsDto {
    @Digits(integer = 5, fraction = 5)
    private Integer digits;
}
6. Boolean Value Validation
supportType - Boolean, boolean
Validation - @AssertTrue: The value must always be True. - @AssertFalse: The value must always be False.
Usage
@NoArgsConstructor
@Getter
@ToString
public class BooleanDto {
    @AssertTrue
    private boolean assertTrue;
    @AssertFalse
    private boolean assertFalse;
}
7. Size Validation
supportType - CharSequence (length of character sequence) Collection (collection size) Map (map size) Array (array length) - null is also considered valid.
Validation - @Size: The size must be between the specified boundaries (inclusive). Require: int max => The element size must be less than or equal to this value. Require: int min =>The element size must be greater than or equal to this value.
Usage
@NoArgsConstructor
@Getter
@ToString
public class SizeDto {
    @Size(max = 5, min = 3)
    private String size;
}
8. Regex Validation
supportType - CharSequence - null is also considered valid.
Validation - @Pattern:The string must match the specified regular expression. It follows the conventions of Java's Pattern package. Require: String regexp =>Specifies the regex string.
Usage
@NoArgsConstructor
@Getter
@ToString
public class PatternDto {
    //yyyy-mm-dd 형태를 가지는 패턴 조사
    @Pattern(regexp = "^(19|20)\\d{2}-(0[1-9]|1[012])-(0[1-9]|[12][0-9]|3[0-1])$")
    private String pattern;
}
4. @Valid Summary Table
@AssertTrue
Boolean, boolean
The value must always be True.
@DecimalMax
Numeric classes excluding floating-point types.
The number must be less than or equal to the specified maximum value.
String : value (specifies the max value.)
@DecimalMin
Numeric classes excluding floating-point types.
The number must be greater than or equal to the specified minimum value.
String : value (specifies the min value.)
@Digits
BigDecimal, BigInteger, CharSequence, byte, short, int, long, and their corresponding Wrapper classes
The number must be within the allowed range.
int : integer (maximum number of integer digits allowed for this number) int : fraction (maximum number of fractional digits allowed for this number)
@Email
null is also considered valid.
Must be a properly formatted email address.
@Future
Date/time classes
A date or time in the future relative to Now
@FutureOrPresent
Date/time classes
A date or time that is Now or in the future
@Max
Numeric classes excluding floating-point types.
The number must be less than or equal to the specified maximum value.
long : value (specifies the max value)
@Min
Numeric classes excluding floating-point types.
The number must be greater than or equal to the specified minimum value.
long : value (specifies the min value)
@Negative
Numeric classes
The value must be negative.
@NegativeOrZero
Numeric classes
The value must be 0 or negative.
@NotBlank
The value must not be null. Must contain at least one non-whitespace character.
@NotEmpty
CharSequence, Collection, Map, Array
Must not be null or empty (empty string).
@NotNull
Accepts any type.
The value must not be null.
@Null
Accepts any type.
The value must be null.
@Past
Date/time classes
A date or time in the past relative to Now
@PastOrPresent
Date/time classes
A date or time that is Now or in the past
@Pattern
String
The string must match the specified regular expression. Follows the conventions of Java's Pattern package.
String : regexp (specifies the regex string)
@Positive
Numeric classes
The value must be positive.
@PositiveOrZero
Numeric classes
The value must be 0 or positive.
@Size
CharSequence, Collection, Map, Array
The size must be between the specified boundaries (inclusive).
int : max (the element size must be less than or equal to this) int : min (the element size must be greater than or equal to this)
[@ValidAnnotation].List : Defines multiple @ValidAnnotation[] constraints on the same element.
In practice, this doesn't seem to be used very often.
[Related Blog]
I've also uploaded the same content to our team blog.
test {
    useJUnitPlatform()
}

dependencies {
    testImplementation 'org.springframework.boot:spring-boot-starter-test'
    testCompile("org.assertj:assertj-core:3.11.1")
}
1. assertAll
User user = new User();
assertAll(
    () -> asssertThat(user.getId()).isEqualTo(1L),    //1
    () -> asssertThat(user.getName()).isEqualTo("jyami"),    //2
    () -> asssertThat(user.getEmail()).isEqualTo("mor222293@gmail.com")    //3
);
이전의 Junit4에서는 assertEquals을 검증할 때, 위에부터 하나씩 실행하는데, 위에서 실패하면 아래에있는 assertEquals를 실행하지 않는다.즉, 주석의 1번의 assertEquals에서 실패했으면 2, 3번의 assertEquals는 실행하지 않는다. 그러나 assertAll을 사용하면, 1번에서 실패했어도 2번 3번도 실행한다.
2. @DisplayName
@DisplayName("유저 테스트")
public class UserTest {

    @DisplayName("유저의 이름을 테스트 해보자!")
    @Test
    void someTest() {
        User user = new User();
        assertThat(user.getName()).isEqualTo("jyami");
    }
이렇게 할 경우에는, DisplayName을 이용해서 test의 목적을 명확히 명시할 수 있다.
contains는 순서와 상관 없이 실제 그룹이 주어진 값들을 포함하고 있는지를 테스트한다. 그래서 위 두 줄의 테스트는 모두 통과한다.
2. containsExactly()
@Test
void containsExactlyTest() {
	List<Integer> integers = Arrays.asList(1, 2, 3);
	assertThat(integers).containsExactly(1, 2, 3);	//테스트 통과
	assertThat(integers).containsExactly(2, 1, 3);	//테스트 통과 X
	assertThat(integers).containsExactly(1, 2);	//테스트 통과 X
}
contains는 순서까지 고려해서 실제 그룹이 주어진 값들을 포함하고 있는지를 테스트한다 그래서 첫번째 줄의 테스트는 통과하지만, 두번째 줄의 테스트는 통과하지 못한다.
이때 주의할 점은 원소 하나라도 빠지면 테스트를 통과하지 못한다. 정말로 정확하게 일치하는 list여야 하는 것!
업데이트 예정인 게시글 입니다.
0. build.gradle
test {
    useJUnitPlatform()
}

dependencies {
    testImplementation 'org.springframework.boot:spring-boot-starter-test'
    testCompile("org.assertj:assertj-core:3.11.1")
}
1. assertAll
User user = new User();
assertAll(
    () -> asssertThat(user.getId()).isEqualTo(1L),    //1
    () -> asssertThat(user.getName()).isEqualTo("jyami"),    //2
    () -> asssertThat(user.getEmail()).isEqualTo("mor222293@gmail.com")    //3
);
In the previous JUnit4, when verifying with assertEquals, it executes them one by one from the top, and if one fails, it doesn't execute the ones below it. In other words, if assertEquals #1 in the comments fails, assertEquals #2 and #3 won't run. However, if you use assertAll, even if #1 fails, #2 and #3 still get executed.
2. @DisplayName
@DisplayName("유저 테스트")
public class UserTest {

    @DisplayName("유저의 이름을 테스트 해보자!")
    @Test
    void someTest() {
        User user = new User();
        assertThat(user.getName()).isEqualTo("jyami");
    }
By doing this, you can use DisplayName to clearly state the purpose of each test.
contains tests whether the actual group contains the given values regardless of order. So both lines of tests above will pass.
2. containsExactly()
@Test
void containsExactlyTest() {
	List<Integer> integers = Arrays.asList(1, 2, 3);
	assertThat(integers).containsExactly(1, 2, 3);	//테스트 통과
	assertThat(integers).containsExactly(2, 1, 3);	//테스트 통과 X
	assertThat(integers).containsExactly(1, 2);	//테스트 통과 X
}
containsExactly tests whether the actual group contains the given values while also considering the order. So the first line's test passes, but the second line's test does not.
One thing to note here is that if even a single element is missing, the test will fail. The list really has to match exactly!
This is a post that will be updated in the future.
평소에 Spring Data JPA 를 썼는데, 김영한님은 JPA 자체를 강의하시더라구요.
김영한님 강의 바탕으로 Spring Data JPA로 강의 소스를 테스트해보고 개념을 기록하기 위해 포스팅을 하게되었습니다.
고급 매핑
1. 상속관계 매핑
관계형 데이터베이스는 상속 관계X
슈퍼타입 서브타입 관계라는 모델링 기법이 객체 상속과 유사
상속관계 매핑: 객체의 상속과 구조와 DB의 슈퍼타입 서브타입 관계를 매핑
슈퍼타입 서브타입 논리 모델을 실제 물리 모델로 구현하는 방법
각각 테이블로 변환 -> 조인 전략
통합 테이블로 변환 -> 단일 테이블 전략
서브타입 테이블로 변환 -> 구현 클래스마다 테이블 전략
테이블은 여러개의 모델링이 나오지만, 객체는 상속관계라는 1개의 개념이다.
객체관계는 같지만 DB설계를 다르게 할 수 있음
관계형 데이터베이스는 상속 관계 X
슈퍼타입 서브타입 관계라는 모델링 기법이 객체 상속과 유사
상속관계 매핑 : 객체의 상속, 구조와 DB의 슈퍼타입 서브타입 관계를 매핑
@Entity
@Inheritance(strategy = InheritanceType.JOINED)
@NoArgsConstructor(access = AccessLevel.PROTECTED)
@DiscriminatorColumn
@Getter
public abstract class Item {

    @Id
    @GeneratedValue(strategy = GenerationType.IDENTITY)
    private Long id;
    private String name;
    private int price;

    public Item(String name, int price) {
        this.name = name;
        this.price = price;
    }
}

@Entity
@Getter
@NoArgsConstructor(access = AccessLevel.PROTECTED)
@DiscriminatorValue("Book")
public class Book extends Item {
    private String author;
    private String isbn;

    @Builder
    public Book(String name, int price, String author, String isbn) {
        super(name, price);
        this.author = author;
        this.isbn = isbn;
    }
}

@Entity
@Getter
@NoArgsConstructor(access = AccessLevel.PROTECTED)
@DiscriminatorValue("Album")
public class Album extends Item{
    private String artist;

    @Builder
    public Album(String name, int price, String artist) {
        super(name, price);
        this.artist = artist;
    }
}

@Entity
@Getter
@NoArgsConstructor(access = AccessLevel.PROTECTED)
@DiscriminatorValue("Movie")
public class Movie extends Item {
    private String actor;
    private String director;

    @Builder
    public Movie(String name, int price, String actor, String director) {
        super(name, price);
        this.actor = actor;
        this.director = director;
    }
}
[Repository 코드]
public interface ItemRepository<T extends Item> extends JpaRepository<T, Long> {}
public interface BookRepository extends JpaRepository<Book, Long> {}
public interface AlbumRepository extends JpaRepository<Album, Long> {}
public interface MovieRepository extends JpaRepository<Movie, Long> {}
이때 ItemRepository extends 를 꼭 기억하자!! [abstract class jpaRepository 상속법]
ItemRepository만 사용해도 Book, Album, Movie를 모두 가져올 수 있다. (type casting 사용해서)
[테스트 코드]
@RunWith(SpringRunner.class)
@DataJpaTest
@AutoConfigureTestDatabase(replace = AutoConfigureTestDatabase.Replace.NONE)
public class ItemTest {

    @Autowired
    ItemRepository itemRepository;

    @Autowired
    EntityManager entityManager;

    @Before
    public void setUp() throws Exception {
        Movie movie = Movie.builder()
                .actor("맷데이먼")
                .director("리들리스콧")
                .name("마션")
                .price(10000)
                .build();

        Book book = Book.builder()
                .author("조영호")
                .isbn("isbn")
                .name("객체지향의 사실과 오해")
                .price(10000)
                .build();

        Album album = Album.builder()
                .artist("엔플라잉")
                .name("야호")
                .price(30000)
                .build();

        itemRepository.save(movie);
        itemRepository.save(book);
        itemRepository.save(album);

        entityManager.clear();
    }

    @Test
    public void Item의_서브클래스_객체들_casting으로_가져오기() {
        Movie movie = (Movie) itemRepository.findAll().get(0);
        Book book = (Book) itemRepository.findAll().get(1);
        Album album = (Album) itemRepository.findAll().get(2);

        assertThat(movie.getName()).isEqualTo("마션");
        assertThat(book.getName()).isEqualTo("객체지향의 사실과 오해");
        assertThat(album.getArtist()).isEqualTo("엔플라잉");

    }
}
@DiscriminatorColumn(name = "DTYPE") = default: DTYPE DTYPE이라는 Column이 super class의 table에 생기고, DTYPE의 값은 sub class의 이름으로 지정된다. SingleTable 전략에서 없어도 DTYPE 이생성되기도 하는데, 그래도 운영상 써주자
@DiscriminatorValue("XXX") = default: classname
[예시]
@Inheritance(strategy = InheritanceType.JOIN)
@DiscriminatorColumn(name = "DTYPE")
public abstract class Item{}

@DiscriminatorValue("ALBUM_TYPE")
public class Album extends Item{}

@DiscriminatorValue("BOOK_TYPE")
public class Book extends Item{}

@DiscriminatorValue("MOVIE_TYPE")
public class Movie extends Item{}
DB 설계를 바꿨는데도 코드를 많이 수정하지 않아도 된다!! : JPA의 큰 장점!!
Join이 성능이 안나오네 -> singletable로 고치자!! : query를 사용하면 코드를 많이 바꿔야함 근데 JPA사용하면 바꾸는게 엄청 쉽다.
1-1. 조인전략
데이터를 가져올 때 JOIN을 이용해서 가져온다.
insert는 두번 ITEAM ALBUM
select는 PK, FK를 이용해서 JOIN해서 가져온다.
abstract class에는 type을 컬럼을 두어서 구분한다.
@Inheritance(strategy = InheritanceType.JOIN)
@DiscriminatorColumn
public abstract class Item{}
1-1-1. 장점
테이블 정규화
외래 키 참조 무결성 제약조건 활용 가능
저장공간 효율화
1-1-2. 단점
조회시 조인을 많이 사용, 성능 저하
조회 쿼리가 복잡함
데이터 저장시 INSERT SQL 2번 호출
조인 성능이 생각보다 치명적이진 않고, 오히려 저장공간이 더 효율적일 수도 있음
그래도 단일 테이블 전략과 비교했을 때 단점이다!
조인이 정규화도 되고 객체랑도 잘 맞고 설계 입장에서 잘 맞아 떨어진다.
1-2. 단일 테이블 전략 - 기본 전략
subclass 의 모든 멤버변수를 테이블의 컬럼으로 가져온다.
insert도 한번에 되고, select도 한번에 되니까 아무래도 성능이 나오지!
@Inheritance(strategy = InheritanceType.SINGLE_TABLE)
@DiscriminatorColumn
public abstract class Item{}
1-2-1. 장점
조인이 필요 없으므로 일반적으로 조회 성능이 빠름
조회 쿼리가 단순함
1-2-2. 단점
자식 엔티티가 매핑한 컬럼은 모두 null 허용
단일 테이블에 모든 것을 저장하므로 테이블이 커질 수 있고 상황에 따라서 조회 성능이 오히려 느려질 수 있다. NULL 조건이 데이터 무결성 입장에서 애매하다. ALBUM 저장하면 > Book, Movie 관련 column이 모두 null이 되어야한다. 조회 성능을 문제시 하려면 임계점을 넘어야하는데 보통은 없음
1-3. 구현 클래스마다 테이블 전략
subclass 자체를 테이블로 만든다 + superclass의 멤버변수도 포함해서!
superclass를 아예 없애버리고, table을 subclass 기준으로 만든 후, superclass의 멤버변수도 같이 포함하게 한다.
Item table 자체가 존재하지 않고, Movie, Book, Album table만 존재한다.
@DiscriminatorColumn의 의미가 없다! (없어도 된다.)
단순하게 값을 넣고 뺄 때는 좋은데, 이외의 경우에는 세 개 테이블을 모두 찾아봐서 쿼리가 복잡하게 나간다.
ex ) Item id가 5번이라고 할 때!
@Inheritance(strategy = InheritanceType.TABLE_PER_CLASS)
public abstract class Item{}
이 전략은 데이터베이스 설계자와 ORM 전문가 둘 다 싫어하는 전략임!
1-3-1. 장점
서브 타입을 명확하게 구분해서 처리할 때 효과적
Not Null 제약조건 사용가능
1-3-2. 단점
여러 자식 테이블을 함께 조회할 때 성능이 느림 (UNION SQL)
자식 테이블을 통합해서 쿼리하기 어려움
2. @MappedSuperclass - 매핑 정보 상속
공통 매핑 정보가 필요할 때 사용한다. (ex : baseTimeEntity 같은 것)
위에서 말한 상속 관계 매핑에서 테이블까지 고민하기 싫음. DB는 따로 쓰되, 객체입장에서 속성만 상속 받아서 쓰고 싶을때!
@MappedSuperclass
public abstract class BaseEntity {
    private String createdBy;
    private LocalDateTime createdDate;
    private String lastModifedBy;
    private LocalDateTime lastModifiedDate;
}

@Entity
public class Member extends BaseEntity{ ... }

@Entity
public class Team extends BaseEntity{ ... }
매핑 정보만 받는 슈퍼 클래스로 하고싶다면
extends 로 클래스 설정하기
@MappedSuperclass 어노테이션 추가하기.
그냥 속성을 같이 쓰고 싶을 때 사용한다!!
@Column(name = "CREATED_BY") // 이런식으로 column 설정도 충분히 가능하다.
private String createdBy;
JPA의 이벤트 기능으로 아예 어노테이션으로 시간, auth 정보를 편리하게 만들어 버릴 수 있다.
상속관계 매핑 X
엔티티X, 테이블과 매핑X (@Entity 안붙였다.)
부모 클래스를 상속 받는 자식 클래스에 매핑 정보만 제공
조회, 검색 불가(em.find(BaseEntity)불가) em.find(BaseEntity.class, 1L); 불가능
직접 생성해서 사용할 일이 없으므로 추상 클래스 권장
테이블과 관계 없고, 단순히 엔티티가 공통으로 사용하는 매핑 정보를 모으는 역할
주로 등록일, 수정일, 등록자, 수정자 같은 전체 엔티티에서 공통으로 적용하는 정보를 모을 때 사용
참고 : @Entity 클래스는 엔티티나 @MappedSuperclass로 지정한 클래스만 상속가능하다.
@MappedSuperclass //매핑 정보 상속
public abstract class BaseEntity{...}

@Entity //상속 관계 매핑
public abstract class Item extends BaseEntity{...}

@Entity
public class Album extends Item{...}
This is a summary post written after taking Kim Young-han's Java ORM Standard JPA Programming - Basics course on Inflearn.
I've been using Spring Data JPA, but Kim Young-han actually teaches JPA itself.
Based on his lectures, I'm writing this post to document concepts while testing the course source code with Spring Data JPA.
Advanced Mapping
1. Inheritance Mapping
Relational databases do NOT have inheritance
The supertype-subtype modeling technique is similar to object inheritance
Inheritance mapping: Mapping between object inheritance structure and DB supertype-subtype relationships
Ways to implement a supertype-subtype logical model into a physical model:
Convert to separate tables -> Joined strategy
Convert to a single table -> Single table strategy
Convert to subtype tables -> Table-per-class strategy
Tables can result in multiple modeling approaches, but on the object side, there's only one concept: inheritance.
The object relationships stay the same, but the DB design can vary.
Relational databases do NOT have inheritance
The supertype-subtype modeling technique is similar to object inheritance
Inheritance mapping: Mapping between object inheritance/structure and DB supertype-subtype relationships
@Entity
@Inheritance(strategy = InheritanceType.JOINED)
@NoArgsConstructor(access = AccessLevel.PROTECTED)
@DiscriminatorColumn
@Getter
public abstract class Item {

    @Id
    @GeneratedValue(strategy = GenerationType.IDENTITY)
    private Long id;
    private String name;
    private int price;

    public Item(String name, int price) {
        this.name = name;
        this.price = price;
    }
}

@Entity
@Getter
@NoArgsConstructor(access = AccessLevel.PROTECTED)
@DiscriminatorValue("Book")
public class Book extends Item {
    private String author;
    private String isbn;

    @Builder
    public Book(String name, int price, String author, String isbn) {
        super(name, price);
        this.author = author;
        this.isbn = isbn;
    }
}

@Entity
@Getter
@NoArgsConstructor(access = AccessLevel.PROTECTED)
@DiscriminatorValue("Album")
public class Album extends Item{
    private String artist;

    @Builder
    public Album(String name, int price, String artist) {
        super(name, price);
        this.artist = artist;
    }
}

@Entity
@Getter
@NoArgsConstructor(access = AccessLevel.PROTECTED)
@DiscriminatorValue("Movie")
public class Movie extends Item {
    private String actor;
    private String director;

    @Builder
    public Movie(String name, int price, String actor, String director) {
        super(name, price);
        this.actor = actor;
        this.director = director;
    }
}
[Repository Code]
public interface ItemRepository<T extends Item> extends JpaRepository<T, Long> {}
public interface BookRepository extends JpaRepository<Book, Long> {}
public interface AlbumRepository extends JpaRepository<Album, Long> {}
public interface MovieRepository extends JpaRepository<Movie, Long> {}
Make sure to remember the ItemRepository extends part!! [How to extend JpaRepository for an abstract class]
You can retrieve Book, Album, and Movie all through ItemRepository alone. (using type casting)
[Test Code]
@RunWith(SpringRunner.class)
@DataJpaTest
@AutoConfigureTestDatabase(replace = AutoConfigureTestDatabase.Replace.NONE)
public class ItemTest {

    @Autowired
    ItemRepository itemRepository;

    @Autowired
    EntityManager entityManager;

    @Before
    public void setUp() throws Exception {
        Movie movie = Movie.builder()
                .actor("맷데이먼")
                .director("리들리스콧")
                .name("마션")
                .price(10000)
                .build();

        Book book = Book.builder()
                .author("조영호")
                .isbn("isbn")
                .name("객체지향의 사실과 오해")
                .price(10000)
                .build();

        Album album = Album.builder()
                .artist("엔플라잉")
                .name("야호")
                .price(30000)
                .build();

        itemRepository.save(movie);
        itemRepository.save(book);
        itemRepository.save(album);

        entityManager.clear();
    }

    @Test
    public void Item의_서브클래스_객체들_casting으로_가져오기() {
        Movie movie = (Movie) itemRepository.findAll().get(0);
        Book book = (Book) itemRepository.findAll().get(1);
        Album album = (Album) itemRepository.findAll().get(2);

        assertThat(movie.getName()).isEqualTo("마션");
        assertThat(book.getName()).isEqualTo("객체지향의 사실과 오해");
        assertThat(album.getArtist()).isEqualTo("엔플라잉");

    }
}
@DiscriminatorColumn(name = "DTYPE") = default: DTYPE A column called DTYPE is created in the superclass table, and the DTYPE value is set to the subclass name. In the SingleTable strategy, DTYPE may be generated even without this annotation, but you should still include it for production use.
@DiscriminatorValue("XXX") = default: classname
[Example]
@Inheritance(strategy = InheritanceType.JOIN)
@DiscriminatorColumn(name = "DTYPE")
public abstract class Item{}

@DiscriminatorValue("ALBUM_TYPE")
public class Album extends Item{}

@DiscriminatorValue("BOOK_TYPE")
public class Book extends Item{}

@DiscriminatorValue("MOVIE_TYPE")
public class Movie extends Item{}
Even when the DB design changes, you barely need to modify the code!! This is a huge advantage of JPA!!
Join performance isn't cutting it -> Let's switch to single table!! With raw queries, you'd have to change a lot of code, but with JPA it's super easy to switch.
1-1. Joined Strategy
When fetching data, it uses JOINs to retrieve it.
Insert happens twice — once for ITEM, once for ALBUM.
Select uses PK and FK to JOIN and fetch the data.
The abstract class has a type column to distinguish between subtypes.
@Inheritance(strategy = InheritanceType.JOIN)
@DiscriminatorColumn
public abstract class Item{}
1-1-1. Pros
Table normalization
Can leverage foreign key referential integrity constraints
Efficient storage space
1-1-2. Cons
Heavy use of joins during queries, potential performance degradation
Complex query statements
INSERT SQL is called twice when saving data
Join performance isn't as fatal as you might think, and it can actually be more storage-efficient.
Still, these are disadvantages compared to the single table strategy!
Joins provide normalization, align well with objects, and fit nicely from a design perspective.
1-2. Single Table Strategy - Default Strategy
All member variables of subclasses become columns in a single table.
Insert happens in one shot, select happens in one shot — so naturally the performance is better!
@Inheritance(strategy = InheritanceType.SINGLE_TABLE)
@DiscriminatorColumn
public abstract class Item{}
1-2-1. Pros
No joins needed, so query performance is generally fast
Simple query statements
1-2-2. Cons
All columns mapped by child entities must allow null
Since everything is stored in a single table, the table can get large and in some cases query performance may actually get slower. NULL conditions are awkward from a data integrity standpoint. When you save an ALBUM > all Book and Movie related columns must be null. For query performance to become a real problem, you'd need to cross a threshold, which usually doesn't happen.
1-3. Table-per-Class Strategy
Each subclass becomes its own table — including the superclass's member variables!
The superclass table is completely eliminated, tables are created based on subclasses, and they include the superclass's member variables as well.
The Item table itself doesn't exist — only Movie, Book, and Album tables exist.
@DiscriminatorColumn has no meaning here! (You don't need it.)
It's fine for simple inserts and retrieves, but for anything else, it has to search all three tables resulting in complex queries.
e.g.) When the Item id is 5!
@Inheritance(strategy = InheritanceType.TABLE_PER_CLASS)
public abstract class Item{}
This is a strategy that both database designers and ORM experts dislike!
1-3-1. Pros
Effective when you need to clearly distinguish and handle subtypes
Can use NOT NULL constraints
1-3-2. Cons
Slow performance when querying multiple child tables together (UNION SQL)
Difficult to write unified queries across child tables
2. @MappedSuperclass - Inheriting Mapping Information
Used when common mapping information is needed. (e.g., something like BaseTimeEntity)
You don't want to think about table design like in inheritance mapping above. You want the DB tables to be separate, but from the object perspective, you just want to inherit the attributes!
@MappedSuperclass
public abstract class BaseEntity {
    private String createdBy;
    private LocalDateTime createdDate;
    private String lastModifedBy;
    private LocalDateTime lastModifiedDate;
}

@Entity
public class Member extends BaseEntity{ ... }

@Entity
public class Team extends BaseEntity{ ... }
If you want a superclass that only provides mapping information:
Set up the class with extends
Add the @MappedSuperclass annotation.
Use it when you simply want to share attributes!!
@Column(name = "CREATED_BY") // 이런식으로 column 설정도 충분히 가능하다.
private String createdBy;
With JPA's event features, you can conveniently create time and auth information using annotations alone.
NOT inheritance mapping
NOT an entity, NOT mapped to a table (@Entity is not applied.)
Only provides mapping information to child classes that inherit from the parent class
Cannot be queried or searched (em.find(BaseEntity) is not possible) em.find(BaseEntity.class, 1L); is not possible
Since you'll never instantiate it directly, abstract class is recommended
Has no relation to tables — it simply gathers mapping information commonly used by entities
Mainly used to collect information like created date, modified date, created by, modified by that applies commonly across all entities
Note: @Entity classes can only extend entities or classes annotated with @MappedSuperclass.
@MappedSuperclass //매핑 정보 상속
public abstract class BaseEntity{...}

@Entity //상속 관계 매핑
public abstract class Item extends BaseEntity{...}

@Entity
public class Album extends Item{...}
select
    member0_.member_id as member_i1_0_0_,
    member0_.team_id as team_id3_0_0_,
    member0_.username as username2_0_0_,
    team1_.member_id as member_i1_1_1_,
    team1_.name as name2_1_1_
from
    member member0_
left outer join
    team team1_
        on member0_.team_id=team1_.member_id
where member0_.member_id=?
자동적으로 Member를 조회하는데 Team도 join이 되서 같이 조회가된다.
@Test
public void 멤버만_조회() {
    Member findMember = entityManager.getReference(Member.class, 1L);
}
before findMember = class com.jyami.jpalab.domain.Member$HibernateProxy$EYDMo7wU
Hibernate: [select query]
findMember.username = member1
after findMember = class com.jyami.jpalab.domain.Member$HibernateProxy$EYDMo7wU
프록시 객체는 원본 엔티티를 상속 받음, 따라서 타입 체크시 주의해야함 (== 비교 실패, instance of 사용) => 프록시로 넘어올지, 원래 객체 타입으로 넘어올지 모른다
프록시 클래스 확인 방법 entity.getClass().getName() 출력 (..javasist.. or HibernateProxy..)
System.out.println("refMember = " + refMember.getClass()); //클래스 확인
System.out.println(refMember.getUsername()); //강제 호출
프록시 강제 초기화
System.out.println("refMember = " + refMember.getClass());
Hibernate.initialize(refMember); // 강제 초기화
참고: JPA 표준은 강제 초기화 없음 강제 호출: member.getName()
2. 즉시로딩과 지연로딩
2-1. 지연로딩 LAZY를 사용해서 프록시로 조회
멤버 클래스만 DB에서 조회한다.
@ManyToOne(fetch = FetchType.LAZY) ///fecth 설정을 해준다.
@JoinColumn(name = "TEAM_ID")
private Team team;
@Test
public void 지연로딩() {
Member member = memberRepository.findById(1L).get();
assertThat(member.getUsername()).isEqualTo("MemberDefault");
System.out.println("m = " + member.getTeam().getClass());
//getTeam()은 프록시 가져오는 것
}
Hibernate: select
member0_.member_id as member_i1_0_0_,
member0_.team_id as team_id3_0_0_,
member0_.username as username2_0_0_
from
member member0_
where
member0_.member_id=?
m = class com.jyami.jpalab.domain.Team$HibernateProxy$gs0vf0Qv
select
team0_.member_id as member_i1_1_0_,
team0_.name as name2_1_0_
from
team team0_
where
team0_.member_id=?
그래서 위와 같이 영속성 컨텍스트 초기화를 하게 될 때 그때 쿼리가 나간다.
Member에서 Team을 가져올 때 Lazy로 설정해두었기 때문에, Team 객체 안에는 프록시 객체를 넣어둔다. 실제 team을 사용하는 시점에 영속성 컨텍스트 초기화를 한다.
BM 상에서 Member조회시 Team을 같이 조회하지 않을 때 LAZY를 사용하면!
2-2. 즉시로딩 EAGER를 사용해서 함께 조회
@ManyToOne(fetch = FetchType.EAGER) ///fecth 설정을 해준다.
@JoinColumn(name = "TEAM_ID")
private Team team;
Hibernate: insert into team (member_id, name) values (null, ?)
Hibernate: insert into member (member_id, team_id, username) values (null, ?, ?)
Hibernate: select
member0_.member_id as member_i1_0_0_,
member0_.team_id as team_id3_0_0_,
member0_.username as username2_0_0_,
team1_.member_id as member_i1_1_1_,
team1_.name as name2_1_1_
from
member member0_
left outer join
team team1_ on member0_.team_id=team1_.member_id
where
member0_.member_id=?
m = class com.jyami.jpalab.domain.Team
즉시 로딩이기 때문에 Proxy를 가져올 필요가 없어서 getClass() 를 했을 때 실제 객체가 나온다!
proxy를 가져오지 않으니까 영속성 컨텍스트 초기화를 해줄 필요가 없다.
BM 상에서 Mebmer를 쓸때 항상 Team도 조회할 경우!
JPA 구현체는 가능하면 조인을 사용해서 SQL 한번에 함께 조회
2-3. 프록시와 즉시로딩 주의
가급적 지연 로딩만 사용(특히 실무에서) 만약 관련 링크객체가 N개면 N개만큼 Join이 발생해서 나간다.
즉시 로딩을 적용하면 예상하지 못한 SQL이 발생
즉시로딩을 JPQL에서 N+1 문제를 일으킨다.
@ManyToOne, @OneToOne은 기본이 즉시로딩 -> LAZY로 설정 (X To One 시리즈)
@OneToMany, @ManyToMany는 기본이 지연 로딩
2-3-1. JPQL N+1 문제 preview
@Test
public void JPQL의_N_플러스_1_문제() {
List<Member> members = entityManager.createQuery("select m from Member m", Member.class)
.getResultList();
}
Hibernate: select
member0_.member_id as member_i1_0_,
member0_.team_id as team_id3_0_,
member0_.username as username2_0_
from
member member0_
Hibernate: select
team0_.member_id as member_i1_1_0_,
team0_.name as name2_1_0_
from
team team0_
where
team0_.member_id=?
쿼리가 두번나간다!!
JPQL : 1번째 파라미터가 sql query로 그대로 읽힌다. 따라서 쿼리대로 Member를 가져온다. 근데 Team이 즉시로딩이 되어있음! 즉시로딩이라 무조껀 그안에 값이 들어가 있어야 하기 때문에 Team도 가져온다. 따라서 Team 쿼리를 또 따로 보낸다.
쿼리가 N+1 나간다
1 : 처음에 내보낸 쿼리 (N개의 Member 리턴)
N : EAGER 설정이 되어있어 참조 객체를 가져오기 위한 추가 쿼리 (N개의 Member 각각의 Team 값을 채우기 위해 각 Team을 찾기위해 N개의 쿼리가 나간다.)
Hibernate: insert into parent (id, name) values (null, ?)
Hibernate: insert into child (id, name, parent_id) values (null, ?, ?)
Hibernate: insert into child (id, name, parent_id) values (null, ?, ?)
---
Hibernate: select parent0_.id as id1_2_0_, parent0_.name as name2_2_0_ from parent parent0_ where parent0_.id=?
Hibernate: select childlist0_.parent_id as parent_i3_0_0_, childlist0_.id as id1_0_0_, childlist0_.id as id1_0_1_, childlist0_.name as name2_0_1_, childlist0_.parent_id as parent_i3_0_1_ from child childlist0_ where childlist0_.parent_id=?
심플하게 Parent를 저장할 때, Parent안에 있는 객체인 Child도 같이 저장할 때
3-1. CASCADE의 종류
ALL : 모두 적용
PERSIST : 영속 - 저장할 때만 lifecycle을 맞출래
REMOVE : 삭제
MERGE : 병합
REFERESH : refresh
DETACH : detach
하나의 부모가 자식들을 관리할 때는 의미가 있다. ex ) 게시판에 댓글, 첨부파일의 경로 등이 들어갈 때 : 의미 있음
그러나 여러 엔티티에서 관리한다면 쓰면 안된다.
소유자가 하나일 때는 써도 된다.
단일 엔티티에 완전히 종속적일 때 사용하자
Child와 Parent의 lifecycle이 완전히 비슷할 때 사용하자
4. 고아객체
고아 객체 제거 : 부모 엔티티와 연관관계가 끊어진 자식 엔티티를 자동으로 삭제 JPA는 부모 엔티티와 연관관계가 끊어진 자식 엔티티를 자동으로 삭제하는 기능을 제공하는데 이것을 고아 객체 제거라 한다. 이 기능을 사용해서 부모 엔티티의 컬렉션에서 자식 엔티티의 참조만 제거하면 자식 엔티티가 자동으로 삭제 된다.
select
member0_.member_id as member_i1_0_0_,
member0_.team_id as team_id3_0_0_,
member0_.username as username2_0_0_,
team1_.member_id as member_i1_1_1_,
team1_.name as name2_1_1_
from
member member0_
left outer join
team team1_
on member0_.team_id=team1_.member_id
where member0_.member_id=?
When querying Member, Team is automatically joined and fetched together.
@Test
public void 멤버만_조회() {
Member findMember = entityManager.getReference(Member.class, 1L);
}
findMember = class com.jyami.jpalab.domain.Member$HibernateProxy$injSwDL2
The name isn't Member! HibernateProxy: it's a forcibly created fake class — a proxy class
1-2. Proxy Characteristics
Created by inheriting the actual class
Looks the same as the actual class on the outside
From the user's perspective, you don't need to distinguish between the real object and the proxy object (in theory)
The proxy object holds a reference (target) to the actual object
When you call the proxy object, it delegates the call to the actual object's method
em.getReference(Member.class, 1L); //프록시객체 가져온다.
getName() > The Member target has no value > Requests the persistence context to fetch the actual value > The DB fetches that value and links the real object to the Proxy object. So it gets the name via target.getName().
Initialization request to the persistence context: when the proxy has no value, ask the DB for the real value.
1-3. Proxy Object Mechanism
The proxy object is initialized only once, on first use
@Test
public void 프록시_테스트() {
    Member findMember = entityManager.getReference(Member.class, 1L);
    System.out.println("1st = " + findMember.getUsername());
        //1st에서는 query가 나간다.
    System.out.println("2nd = " + findMember.getUsername());
        //2nd에서는 query가 나가지 않는다.
}
When a proxy object is initialized, it doesn't turn into the actual entity — once initialized, you can access the actual entity through the proxy object
before findMember = class com.jyami.jpalab.domain.Member$HibernateProxy$EYDMo7wU
Hibernate: [select query]
findMember.username = member1
after findMember = class com.jyami.jpalab.domain.Member$HibernateProxy$EYDMo7wU
The proxy object inherits the original entity, so be careful with type checking (== comparison fails, use instanceof) => You never know if it'll come as a proxy or the original object type
How to check the proxy class: print entity.getClass().getName() (..javasist.. or HibernateProxy..)
System.out.println("refMember = " + refMember.getClass()); //클래스 확인
System.out.println(refMember.getUsername()); //강제 호출
Force initialize a proxy
System.out.println("refMember = " + refMember.getClass());
Hibernate.initialize(refMember); // 강제 초기화
Note: The JPA standard does not have forced initialization Forced invocation: member.getName()
2. Eager Loading and Lazy Loading
2-1. Using Lazy Loading (LAZY) to Fetch via Proxy
Only the Member class is fetched from the DB.
@ManyToOne(fetch = FetchType.LAZY)  ///fecth 설정을 해준다.
@JoinColumn(name = "TEAM_ID")
private Team team;
@Test
public void 지연로딩() {
    Member member = memberRepository.findById(1L).get();
    assertThat(member.getUsername()).isEqualTo("MemberDefault");
    System.out.println("m = " + member.getTeam().getClass());
    //getTeam()은 프록시 가져오는 것
}
Hibernate: select
    member0_.member_id as member_i1_0_0_,
    member0_.team_id as team_id3_0_0_,
    member0_.username as username2_0_0_
from
    member member0_
where
    member0_.member_id=?
m = class com.jyami.jpalab.domain.Team$HibernateProxy$gs0vf0Qv
You can see that only Member is queried! And Team returns a proxy object.
select
    team0_.member_id as member_i1_1_0_,
    team0_.name as name2_1_0_
from
    team team0_
where
    team0_.member_id=?
So the query is only fired when the persistence context initialization happens, like above.
Since fetching Team from Member is set to Lazy, a proxy object is placed inside the Team object. The persistence context initialization happens at the point when Team is actually used.
When you don't need to fetch Team together when querying Member in your business model, use LAZY!
2-2. Using Eager Loading (EAGER) to Fetch Together
@ManyToOne(fetch = FetchType.EAGER)  ///fecth 설정을 해준다.
@JoinColumn(name = "TEAM_ID")
private Team team;
Hibernate: insert into team (member_id, name) values (null, ?)
Hibernate: insert into member (member_id, team_id, username) values (null, ?, ?)
Hibernate: select
    member0_.member_id as member_i1_0_0_,
    member0_.team_id as team_id3_0_0_,
    member0_.username as username2_0_0_,
    team1_.member_id as member_i1_1_1_,
    team1_.name as name2_1_1_
from
    member member0_
left outer join
    team team1_ on member0_.team_id=team1_.member_id
where
    member0_.member_id=?
m = class com.jyami.jpalab.domain.Team
Since it's eager loading, there's no need to fetch a Proxy, so when you call getClass(), the actual object is returned!
Since it doesn't fetch a proxy, there's no need for persistence context initialization.
Use this when you always need to fetch Team whenever you use Member in your business model!
The JPA implementation tries to use joins to fetch everything in a single SQL query
2-3. Cautions with Proxy and Eager Loading
Use lazy loading as much as possible (especially in production) If there are N related linked objects, N joins will be executed.
Applying eager loading can cause unexpected SQL queries
Eager loading causes the N+1 problem in JPQL
@ManyToOne and @OneToOne default to eager loading -> Set them to LAZY (the X-To-One series)
@OneToMany and @ManyToMany default to lazy loading
2-3-1. JPQL N+1 Problem Preview
  @Test
  public void JPQL의_N_플러스_1_문제() {
      List<Member> members = entityManager.createQuery("select m from Member m", Member.class)
          .getResultList();
  }
  Hibernate: select
      member0_.member_id as member_i1_0_,
      member0_.team_id as team_id3_0_,
      member0_.username as username2_0_
  from
      member member0_
  Hibernate: select
      team0_.member_id as member_i1_1_0_,
      team0_.name as name2_1_0_
     from
     team team0_
     where
         team0_.member_id=?
Two queries are fired!!
JPQL: The first parameter is read directly as an SQL query. So it fetches Member as the query specifies. But Team is set to eager loading! Since it's eager, the values must always be populated, so it fetches Team too. Therefore, it sends a separate query for Team.
N+1 queries are fired
1: The initial query (returns N Members)
N: Additional queries to fetch referenced objects due to EAGER setting (N queries are fired to fill in each Team value for each of the N Members)
If you set this to LAZY, it just fetches Member, and since Team is a proxy object, only 1 query is fired.
The basic solution is fetch join: it dynamically selects and fetches only what you want at runtime. Since within the application there are times when you only need Member vs. times when you need Member + Team:
List<Member> members = entityManager.createQuery("select m from Member m join fecth m.team", Member.class).getResultList();
Everything is included in this single query.
2-4. Lazy Loading in Practice
This is all very theoretical for now — in practice, you should just use LAZY for everything.
Member and Team are frequently used together: Eager loading
Member and Order are occasionally used together: Lazy loading
Order and Product are frequently used together: Eager loading
3. Cascade (Persistence Propagation)
When making a specific entity persistent, you may want to make its associated entities persistent as well
Example: Saving child entities together when saving a parent entity
Cascade has nothing to do with mapping relationships
It simply provides the convenience of persisting associated entities together when persisting an entity
@Entity
@NoArgsConstructor
@Getter
public class Parent {
    @Id
    @GeneratedValue(strategy = GenerationType.IDENTITY)
    private Long id;

    private String name;

    //cascade 옵션 : Parent를 저장할 때 child도 같이 저장하고 싶다.
    @OneToMany(mappedBy = "parent", cascade = CascadeType.ALL)
    private List<Child> childList = new ArrayList<>();

    @Builder
    public Parent(String name) {
        this.name = name;
    }
}
@Entity
@Getter
@NoArgsConstructor
public class Child {
    @Id
    @GeneratedValue(strategy = GenerationType.IDENTITY)
    private Long id;

    private String name;

    @ManyToOne
    @JoinColumn
    private Parent parent;

    @Builder
    public Child(String name, Parent parent) {
        this.name = name;
        this.parent = parent;
        parent.getChildList().add(this); //양방향 위해 추가함!
    }
}
Hibernate: insert into parent (id, name) values (null, ?)
Hibernate: insert into child (id, name, parent_id) values (null, ?, ?)
Hibernate: insert into child (id, name, parent_id) values (null, ?, ?)
---
Hibernate: select parent0_.id as id1_2_0_, parent0_.name as name2_2_0_ from parent parent0_ where parent0_.id=?
Hibernate: select childlist0_.parent_id as parent_i3_0_0_, childlist0_.id as id1_0_0_, childlist0_.id as id1_0_1_, childlist0_.name as name2_0_1_, childlist0_.parent_id as parent_i3_0_1_ from child childlist0_ where childlist0_.parent_id=?
Simply put, when saving a Parent, you also want to save the Child objects inside the Parent.
3-1. Types of CASCADE
ALL: Apply all
PERSIST: Persistence — only sync the lifecycle when saving
REMOVE: Delete
MERGE: Merge
REFERESH: Refresh
DETACH: Detach
It's meaningful when a single parent manages its children. e.g.) When a board post has comments, attachment file paths, etc.: meaningful
However, you should NOT use it when multiple entities manage the same thing.
It's fine to use when there's a single owner.
Use it when something is completely dependent on a single entity.
Use it when the lifecycles of Child and Parent are completely aligned.
4. Orphan Objects
Orphan removal: Automatically deletes child entities whose relationship with the parent entity is severed. JPA provides a feature that automatically deletes child entities that are disconnected from their parent entity — this is called orphan removal. Using this feature, if you simply remove the reference to a child entity from the parent entity's collection, the child entity is automatically deleted.
The relationship is severed > a DELETE is executed.
public class Parent{
    @OneToMany(mappedBy = "parent", orphanRemoval = true) // orphanRemoval 옵션 추가
    private List<Child> childList = new ArrayList<>();
}
It treats entities whose references have been removed as orphan objects that are not referenced anywhere else, and deletes them
Should only be used when there is exactly one place referencing it!!
Use when a specific entity has sole ownership
Only available for @OneToOne and @OneToMany
Note: Conceptually, when a parent is removed, the children become orphans. Therefore, when orphan removal is enabled, removing the parent also removes the children. This behaves like CascadeType.REMOVE.
Hmm, but why isn't it working for me 😭 I should ask about this.
5. Cascade + Orphan Removal, Lifecycle
public class Parent{
    @OneToMany(mappedBy = "parent", cascade = CascadeType=ALL, orphanRemoval = true)
    private List<Child> childList = new ArrayList<>();
}
CascadeType.ALL + orphanRemoval = true
Entities that manage their own lifecycle use em.persist() to persist and em.remove() to remove
When both options are enabled, you can manage the child's lifecycle through the parent entity. The child repository becomes unnecessary.
Useful when implementing the Aggregate Root concept from Domain-Driven Design (DDD)
I've been using Spring Data JPA, but Kim Young-han actually teaches JPA itself.
Based on his lectures, I decided to write this post to test the course material with Spring Data JPA and document the concepts.
Various Association Mappings
1. Three Things to Consider When Mapping Associations
1-1. Multiplicity
Many-to-One [N:1] : @ManyToOne
One-to-Many [1:N] : @OneToMany
One-to-One [1:1] : @OneToOne
Many-to-Many [N:M] : @ManyToMany
1-2. Unidirectional vs. Bidirectional
1-3. Owner of the Association
Tables establish an association between two tables with a single foreign key
In a bidirectional object relationship, there are two references: A→B and B→A
Since there are two references in a bidirectional object relationship, you need to designate which side manages the foreign key When you change A, should B also change? / When you change B, should A also change?
Owner of the association: the reference that manages the foreign key
Inverse side: does not affect the foreign key
2. Many-to-One [N:1]
Owner of the association: N side
2-1. Many-to-One Unidirectional
Member : N - Team : 1
Member references Team.
@Entity
@Getter
@Setter
public class Member {
    @Id
    @GeneratedValue(strategy = GenerationType.IDENTITY)
    @Column(name = "MEMBER_ID")
    private Long id;

    @Column(name = "USERNAME")
    private String username;

    @ManyToOne
    @JoinColumn(name = "TEAM_ID") // 외래키
    private Team team;

}
@Entity
@Getter
@Setter
public class Team {
    @Id
    @GeneratedValue(strategy = GenerationType.IDENTITY)
    @Column(name = "MEMBER_ID")
    private Long id;
    private String name;
}
You place the reference and map the association where the foreign key exists.
From the DB's perspective, the FK naturally belongs on the N side.
If it were on the Team side instead, you'd need a list, and the design wouldn't make sense.
This is the most commonly used mapping
The inverse of Many-to-One is One-to-Many
2-2. Many-to-One Bidirectional
Member : N - Team : 1
Member references Team. And Team also references Member!
The owner of the association manages the FK. Since the inverse side can only read anyway, you just need to add a List to Team.
Here, it's important to specify with mappedBy that this side reads from the association owner
// Team 클래스
    @OneToMany(mappedBy = "team") //참조를 당하는 쪽에서 읽기만 가능!
    private List<Member> members = new ArrayList<>();
The side with the foreign key is the owner of the association
Develop so that both sides reference each other
3. One-to-Many [1:N]
3-1. One-to-Many Unidirectional
This is not recommended.
Centered around Team: Team manages the foreign key
Team wants to know about Member, but Member doesn't want to know about Team.
From the DB's perspective: the FK must be on the Member table.
When you modify Team's List, you have to update the TEAM_ID of some row in the Member table in the DB.
@Entity
@Getter
@Setter
public class Member {
    @Id
    @GeneratedValue(strategy = GenerationType.IDENTITY)
    @Column(name = "MEMBER_ID")
    private Long id;

    @Column(name = "USERNAME")
    private String username;

}
@Entity
@Getter
@Setter
public class Team {
    @Id
    @GeneratedValue(strategy = GenerationType.IDENTITY)
    @Column(name = "MEMBER_ID")
    private Long id;
    private String name;

    @OneToMany
    @JoinColumn(name = "TEAM_ID")
    private List<Member> members = new ArrayList<>();
}
The data goes into the DB fine, but extra queries like UPDATE queries are fired.
When saving the Member list from Team, the team_id in the Member table also needs to be updated.
You touched Team, but it affects the Member table — this makes it a bit harder to understand and trace.
In One-to-Many unidirectional, the One (1) side is the owner of the association
In a One-to-Many table relationship, the foreign key is always on the Many (N) side
Due to the mismatch between objects and tables, this results in an unusual structure where you manage the foreign key of the opposite table
You must use @JoinColumn. Otherwise, it uses a join table strategy (adds an intermediate table) — a middle table like team_member gets created with team_id and member_id. The downside: having one extra table makes operations harder.
Downsides of One-to-Many unidirectional mapping
The foreign key managed by the entity is in a different table
Additional UPDATE SQL is executed to manage the association
Use Many-to-One bidirectional mapping instead of One-to-Many unidirectional — sacrifice a bit on the object relationship side!
3-2. One-to-Many Bidirectional
This kinda works as a hacky workaround lol
// Member 클래스
    @ManyToOne
    @JoinColumn(name="TEAM_ID", insertable = false, updatable = false) //중요!!
    private Team team;
But this way, both Team and Member have @JoinColumn, making both of them owners of the association.
So you use JoinColumn options — the mapping exists and values are all there, but you block insertable and updatable to make it read-only.
Management is done through Team, and Member only reads.
This mapping doesn't officially exist
@JoinColumn(insertable=false, updatable=false)
A way to use it like bidirectional by using a read-only field
@RunWith(SpringRunner.class)
@DataJpaTest
@AutoConfigureTestDatabase(replace = AutoConfigureTestDatabase.Replace.NONE)
public class MemberTest {
@Autowired
MemberRepository memberRepository;
@Autowired
TeamRepository teamRepository;
@Before
public void setUp() throws Exception {
Team team = Team.builder()
.name("TeamA")
.build();
// teamRepository.save(team);
Member member = Member.builder()
.username("member1")
.team(team)
.build();
memberRepository.save(member);
}
@Test
public void 잘_저장되었는지_불러오기() {
Member member = memberRepository.findAll().get(0);
String username = member.getUsername();
assertThat(username).isEqualTo("member1");
Team team = member.getTeam();
assertThat(team.getName()).isEqualTo("TeamA");
List<Member> members = team.getMembers();
for (Member m : members) {
assertThat(m.getUsername()).startsWith("member");
}
}
강좌랑 cascade 부분만 달라서 왜 그런가 하고 생각해 봤는데 강좌에서는 save를 두번 했었다. 강좌코드 대로 코딩하고 테스트한 결과는 아래
@Entity
@Getter
@NoArgsConstructor
public class Member {
@Id
@GeneratedValue(strategy = GenerationType.IDENTITY)
@Column(name = "MEMBER_ID")
private Long id;
@Column(name = "USERNAME")
private String username;
// @ManyToOne(cascade = CascadeType.ALL)
@ManyToOne
@JoinColumn(name = "TEAM_ID")
private Team team;
@Builder
private Member(String username, Team team) {
this.username = username;
this.team = team;
}
}
@Entity
@Getter
@NoArgsConstructor
public class Team {
    @Id
    @GeneratedValue(strategy = GenerationType.IDENTITY)
    @Column(name = "MEMBER_ID")
    private Long id;
    private String name;

    @OneToMany(mappedBy = "team")
    private List<Member> members = new ArrayList<>();

    @Builder
    private Team(String name) { //여기 그냥 members도 param으로 넣었다가 에러 팡!
        this.name = name;
    }
}
테스트코드
@RunWith(SpringRunner.class)
@DataJpaTest
@AutoConfigureTestDatabase(replace = AutoConfigureTestDatabase.Replace.NONE)
public class MemberTest {
@Autowired
MemberRepository memberRepository;
@Autowired
TeamRepository teamRepository;
@Before
public void setUp() throws Exception {
Team team = Team.builder()
.name("TeamA")
.build();
teamRepository.save(team);
Member member = Member.builder()
.username("member1")
.team(team)
.build();
memberRepository.save(member);
}
@Test
public void 잘_저장되었는지_불러오기() {
Member member = memberRepository.findAll().get(0);
String username = member.getUsername();
assertThat(username).isEqualTo("member1");
Team team = member.getTeam();
assertThat(team.getName()).isEqualTo("TeamA");
List<Member> members = team.getMembers();
for (Member m : members) {
assertThat(m.getUsername()).startsWith("member");
}
}
}
Member 저장할 때 Team을 저장하도록 cascade 설정을 하지 않고,
TestCode 작성시에 Member save , Team save를 각각 해줬다
Team이 이미 save가 된 상태에서 Member를 save할 경우인데,
어차피 DB에서는 Member에 FK가 있기 때문에 매핑이 가능해진다!
객체에서의 매핑은 이미 Team, Member 모두 각자의 참조객체를 갖고있기 때문에 가능하고!
내가 처음에 작성한 코드의 경우에는 member만 저장해서 team도 같이 저장하는 것이었기 때문에 Member를 저장할 때 cascade 옵션을 줘야했다.
따라서 Member repository에 저장하더라도, Team의 Insert를 먼저 실행 후에, Member insert를 진행하여 Member Table의 FK에 Team을 저장해준다.
Hibernate: insert into team (member_id, name) values (null, ?)
Hibernate: insert into member (member_id, team_id, username) values (null, ?, ?)
Hibernate: select member0_.member_id as member_i1_0_, member0_.team_id as team_id3_0_, member0_.username as username2_0_ from member member0_
Q. 양방향 매핑이 좋은가?
A. 객체는 사실 단방향이 좋다! -> 신경쓸게 많음
2-3. 객체와 테이블이 관계를 맺는 차이
2-3-1. 객체의 연관관계 - 2개
Member -> Team 연관관계 1개 (단방향) - Team 레퍼런스 객체
Team -> Member 연관관계 1개 (단방향) - Member 레퍼런스 객체
객체의 양방향 관계는 사실 양방향 관계가 아니라 서로 다른 단방향 관계 2개다
객체를 양방향으로 참조하려면 단방향 연관 관계를 2개 만들어야 한다.
class Member{
Team team; // TEAM -> Member (team.getMember())
}
class Team{
Member member; // MEMBER -> TEAM (member.getTeam())
}
2-3-2. 테이블의 연관관계 - 1개
Team <-> Member 연관관계 1개 (양방향) - FK하나로 양쪽의 연관관계 알 수 있음 (join)
테이블은 외래 키 하나로 두 테이블의 연관관계를 관리
MEMBER.TEAM_ID 외래 키 하나로 양방향 연관관계 가짐 (양쪽으로 조인할 수 있다.)
SELECT *
FROM MEMBER M
JOIN TEAM T ON M.TEAM_ID = T.TEAM_ID
SELECT *
FROM TEAM T
JOIN MEMBER M ON T.TEAM_ID = M.TEAM_ID
2-4. 연관관계의 주인
딜레마가 생긴다 > solution : 둘중 하나로 외래키를 관리한다!
Team에 있는 List 로 FK를 관리할지
Member에 있는 Team으로 FK를 관리할지
2-4-1. 양방향 매핑 규칙
객체의 두 관계중 하나를 연관관계의 주인으로 지정
연관관계의 주인만이 외래 키를 관리 (등록, 수정)
주인이 아닌쪽은 읽기만 가능
주인은 mappedBy 속성 사용X
주인이 아니면 mappedBy 속성으로 주인 지정
mappedBy : 나는 누군가에 의해서 매핑이 되었어! 나는 주인이 아니야!
public class Team {
@OneToMany(mappedBy = "team")
private List<Member> members = new ArrayList<>();
}
public class Member {
@ManyToOne
@JoinColumn(name = "TEAM_ID")
private Team team;
}
mappedBy : 나는 team에 의해서 관리가 된다 : Member 객체의 team 변수에 의해서 관리된다.
@JoinColumn의 Team: 나는 앞으로 Team을 관리할꺼야
2-4-2. 누구를 주인으로?
외래키가 있는 곳을 주인으로 정해라
여기서는 Member.team이 연관관계의 주인!
성능 이슈!
Member의 경우에는 insert 쿼리 하나인데
Team의 경우에는 insert 쿼리 + update 쿼리
DB 입장에서 외래키가 있는 곳이 무조건 N
= N 이 있는 곳이 무조건 주인
= @ManyToOne 이 무조건 주인
3. 양방향 연관관계와 연관관계의 주인 : 주의점, 정리
3-1. 양방향 매핑시 가장 많이 하는 실수
연관관계의 주인에 값을 입력하지 않음
@RunWith(SpringRunner.class)
@DataJpaTest
@AutoConfigureTestDatabase(replace = AutoConfigureTestDatabase.Replace.NONE)
public class FailTest {
@Autowired
MemberRepository memberRepository;
@Autowired
TeamRepository teamRepository;
@Autowired
EntityManager entityManager;
@Test
public void 일차캐싱에_따른_저장_테스트() {
Team team = Team.builder()
.name("TeamA")
.build();
teamRepository.save(team);
Member member = Member.builder()
.username("member1")
.team(team)
.build();
// team.getMembers().add(member);
memberRepository.save(member);
// 주인(Member)이 연관관계를 설정하지 않음!!
// 역방향(주인이 아닌 방향)만 연관관계 설정
// entityManager.clear();
Team findTeam = teamRepository.findAll().get(0);
List<Member> members = findTeam.getMembers();
assertThat(members).isEmpty();
}
}
entityManager.clear(); 을 안했을 경우 : 1차 캐시를 해서 영속성 컨텍스트가 되어있는 상태 값 세팅 연관관계가 되어있는걸 그냥 가져온다. 이렇게 실행하면 DB에서 select 쿼리가 안 나간다.
Team이 그냥 영속성 컨텍스트에 들어가있어서, team에는 현재 member가 없는상태. 그러다보니 1차 캐싱으로 인해 아무것도 안들어가 있음!
Team team = Team.builder()
.name("TeamA")
.build();
teamRepository.save(team);
Member member = Member.builder()
.username("member1")
.team(team)
.build();
team.getMembers().add(member);
이런식으로 Member에 한줄을 넣어주기 보다! 연관관계 편의 메소드를 생성하자
Member에서 team을 set 해줄때 설정해버린다. - 하나면 세팅해도 두개가 같이 세팅이 되게!
I've been using Spring Data JPA, but Kim Young-han actually teaches JPA itself.
Based on his lectures, I decided to write this post to test the course material using Spring Data JPA and document the concepts.
Association Mapping Basics
1. Unidirectional Association
<Haven't watched this part yet>
2. Bidirectional Association and the Owner of the Relationship: Basics
Bidirectional association -> references go both ways.
Object: uses references Table: uses FK joins
We need to look at the paradigm difference between objects and tables.
2-1. Table Associations
There's no difference between unidirectional and bidirectional.
Whether you want to know TEAM->MEMBER or MEMBER->TEAM, you can find out by joining with the Foreign Key. Regardless of whether it's bidirectional or unidirectional, you can figure out all associations with just the FK.
2-2. Object Associations
If Member has a Team variable, it can navigate to Team. Team needs to have a List to navigate to Member.
Objects need to hold references to each other as member variables to be able to access one another.
[Note]: When using a List member variable, always initialize it with new ArrayList<>()! This prevents NullPointerError when calling add()!
@Entity
@Getter
@NoArgsConstructor
public class Team {
@Id
@GeneratedValue(strategy = GenerationType.IDENTITY)
@Column(name = "MEMBER_ID")
private Long id;
private String name;
@OneToMany(mappedBy = "team")
private List<Member> members = new ArrayList<>();
@Builder
private Team(String name) { //여기 그냥 members도 param으로 넣었다가 에러 팡!
this.name = name;
}
}
@Entity
@Getter
@NoArgsConstructor
public class Member {
    @Id
    @GeneratedValue(strategy = GenerationType.IDENTITY)
    @Column(name = "MEMBER_ID")
    private Long id;

    @Column(name = "USERNAME")
    private String username;

    @ManyToOne(cascade = CascadeType.ALL)
    @JoinColumn(name= "TEAM_ID")
    private Team team;

    @Builder
    private Member(String username, Team team) {
        this.username = username;
        this.team = team;
    }
}
Now graph traversal is possible in the reverse direction as well.
@RunWith(SpringRunner.class)
@DataJpaTest
@AutoConfigureTestDatabase(replace = AutoConfigureTestDatabase.Replace.NONE)
public class MemberTest {
    @Autowired
    MemberRepository memberRepository;

    @Autowired
    TeamRepository teamRepository;

    @Before
    public void setUp() throws Exception {
        Team team = Team.builder()
                .name("TeamA")
                .build();

//        teamRepository.save(team);

        Member member = Member.builder()
                .username("member1")
                .team(team)
                .build();

        memberRepository.save(member);
    }

    @Test
    public void 잘_저장되었는지_불러오기() {
        Member member = memberRepository.findAll().get(0);
        String username = member.getUsername();
        assertThat(username).isEqualTo("member1");

        Team team = member.getTeam();
        assertThat(team.getName()).isEqualTo("TeamA");

        List<Member> members = team.getMembers();
        for (Member m : members) {
            assertThat(m.getUsername()).startsWith("member");
        }

    }
The only difference from the course was the cascade part, and when I thought about why, it's because the course called save twice. Here's the test result after coding it exactly like the course:
@Entity
@Getter
@NoArgsConstructor
public class Member {
    @Id
    @GeneratedValue(strategy = GenerationType.IDENTITY)
    @Column(name = "MEMBER_ID")
    private Long id;

    @Column(name = "USERNAME")
    private String username;

//    @ManyToOne(cascade = CascadeType.ALL)
    @ManyToOne
    @JoinColumn(name = "TEAM_ID")
    private Team team;

    @Builder
    private Member(String username, Team team) {
        this.username = username;
        this.team = team;
    }
}
@Entity
@Getter
@NoArgsConstructor
public class Team {
    @Id
    @GeneratedValue(strategy = GenerationType.IDENTITY)
    @Column(name = "MEMBER_ID")
    private Long id;
    private String name;

    @OneToMany(mappedBy = "team")
    private List<Member> members = new ArrayList<>();

    @Builder
    private Team(String name) { //여기 그냥 members도 param으로 넣었다가 에러 팡!
        this.name = name;
    }
}
Test code
@RunWith(SpringRunner.class)
@DataJpaTest
@AutoConfigureTestDatabase(replace = AutoConfigureTestDatabase.Replace.NONE)
public class MemberTest {
    @Autowired
    MemberRepository memberRepository;

    @Autowired
    TeamRepository teamRepository;

    @Before
    public void setUp() throws Exception {
        Team team = Team.builder()
                .name("TeamA")
                .build();

        teamRepository.save(team);

        Member member = Member.builder()
                .username("member1")
                .team(team)
                .build();

        memberRepository.save(member);
    }

    @Test
    public void 잘_저장되었는지_불러오기() {
        Member member = memberRepository.findAll().get(0);
        String username = member.getUsername();
        assertThat(username).isEqualTo("member1");

        Team team = member.getTeam();
        assertThat(team.getName()).isEqualTo("TeamA");

        List<Member> members = team.getMembers();
        for (Member m : members) {
            assertThat(m.getUsername()).startsWith("member");
        }

    }
}
Without setting cascade on Member to also save Team,
I called save separately for both Member and Team in the test code.
Since Team is already saved before saving Member,
the mapping works because the FK exists in the Member table in the DB!
On the object side, the mapping works because both Team and Member already hold their own reference objects!
In my original code, I was saving only member and having team saved along with it, so I needed the cascade option on Member.
Therefore, even though we're saving through the Member repository, it executes the Team's INSERT first, then proceeds with the Member INSERT, storing the Team in the Member table's FK.
Hibernate: insert into team (member_id, name) values (null, ?)
Hibernate: insert into member (member_id, team_id, username) values (null, ?, ?)

Hibernate: select member0_.member_id as member_i1_0_, member0_.team_id as team_id3_0_, member0_.username as username2_0_ from member member0_
Q. Is bidirectional mapping better?
A. Actually, unidirectional is better for objects! -> There's a lot more to worry about
2-3. Differences in How Objects and Tables Form Relationships
2-3-1. Object Associations - 2
Member -> Team: 1 association (unidirectional) - Team reference object
Team -> Member: 1 association (unidirectional) - Member reference object
A bidirectional relationship in objects is not truly bidirectional — it's actually two separate unidirectional relationships
To reference objects bidirectionally, you need to create two unidirectional associations.
class Member{
    Team team;    // TEAM -> Member (team.getMember())
}
class Team{
    Member member;    // MEMBER -> TEAM (member.getTeam())
}
2-3-2. Table Associations - 1
Team <-> Member: 1 association (bidirectional) - A single FK lets you know both sides of the relationship (join)
Tables manage the association between two tables with a single foreign key
The MEMBER.TEAM_ID foreign key alone provides a bidirectional association (you can join from either side.)
SELECT *
FROM MEMBER M
JOIN TEAM T ON M.TEAM_ID = T.TEAM_ID

SELECT *
FROM TEAM T
JOIN MEMBER M ON T.TEAM_ID = M.TEAM_ID
2-4. The Owner of the Relationship
A dilemma arises > solution: manage the foreign key from one side!
Should we manage the FK through the List in Team?
Or through the Team in Member?
2-4-1. Bidirectional Mapping Rules
Designate one of the two object relationships as the owner of the relationship
Only the owner of the relationship can manage the foreign key (create, update)
The non-owner side can only read
The owner does NOT use the mappedBy attribute
The non-owner uses mappedBy to specify the owner
mappedBy: "I'm mapped by someone else! I'm not the owner!"
public class Team {
    @OneToMany(mappedBy = "team")
    private List<Member> members = new ArrayList<>();
}

public class Member {
    @ManyToOne
    @JoinColumn(name = "TEAM_ID")
    private Team team;
}
mappedBy: "I'm managed by team" — meaning it's managed by the team variable in the Member object.
@JoinColumn's Team: "I'm going to manage Team from now on"
2-4-2. Who Should Be the Owner?
Make the side where the foreign key exists the owner
In this case, Member.team is the owner of the relationship!
Performance issue!
For Member, it's just one INSERT query,
but for Team, it's an INSERT query + an UPDATE query
From the DB's perspective, the side with the foreign key is always the N (many) side
= The N side is always the owner
= @ManyToOne is always the owner
3. Bidirectional Association and the Owner of the Relationship: Pitfalls and Summary
3-1. The Most Common Mistake in Bidirectional Mapping
Not setting a value on the owner of the relationship
@RunWith(SpringRunner.class)
@DataJpaTest
@AutoConfigureTestDatabase(replace = AutoConfigureTestDatabase.Replace.NONE)
public class FailTest {
    @Autowired
    MemberRepository memberRepository;

    @Autowired
    TeamRepository teamRepository;

    @Autowired
    EntityManager entityManager;

    @Test
    public void 일차캐싱에_따른_저장_테스트() {

        Team team = Team.builder()
                .name("TeamA")
                .build();

        teamRepository.save(team);

        Member member = Member.builder()
                .username("member1")
                .team(team)
                .build();

//        team.getMembers().add(member);

        memberRepository.save(member);

        // 주인(Member)이 연관관계를 설정하지 않음!!
        // 역방향(주인이 아닌 방향)만 연관관계 설정
//        entityManager.clear();

        Team findTeam = teamRepository.findAll().get(0);
        List<Member> members = findTeam.getMembers();

        assertThat(members).isEmpty();
    }
}
When entityManager.clear() is not called: Since first-level caching is active and the persistence context still holds the values, it just fetches the existing association state. When executed this way, no SELECT query is actually sent to the DB.
Team is just sitting in the persistence context, and at this point, it has no members. Because of first-level caching, nothing is populated!
From an object-oriented perspective, you should set values on both sides!
3-2. Bidirectional Association Precautions
Always set values on both sides, considering the pure object state
Create convenience methods for managing associations
Watch out for infinite loops in bidirectional mapping e.g.) toString(), Lombok, JSON serialization libraries
Team team = Team.builder()
    .name("TeamA")
    .build();

teamRepository.save(team);

Member member = Member.builder()
    .username("member1")
    .team(team)
    .build();

team.getMembers().add(member);
Rather than adding a separate line for Member like this, create a convenience method for the association!
Set it up when setting the team on Member — so that setting one side automatically sets both!
Spring platform에 대한 기본 설정 뿐만아니라 다른 library에 대한 설정(tomcat)도 기본적으로 해준다
목표
모든 스프링 개발을 할 때 더 빠르고 더 폭넓은 사용성을 제공한다.
일일히 설정하지 않아도 convention으로 정해져있는 설정을 제공한다. 하지만 우리의 요구사항에 맞게 이런 설정을 쉽고 빠르게 바꿀 수 있다.(스프링 부트를 사용하는 이유)
non-fucntional 설정도 제공해 준다. 비즈니스로직 구현에 필요한 기능 외에도 non-functional feature도!
XML 사용하지 않고, code generation도 하지 않는다.
Spring 루 : 독특하게 code generation을 해주는데 지금은 잘 사용되지 않는다. generation을 안해서 더 쉽고 명확하고 커스터마이징하기 쉽다. > spring boot의 bb
System Requirements
Spring boot 는 java 8 이상을 필요로 한다.
지원하는 servletContainer로는 tomcat, jetty Undertow가 있다.
2. Spring Boot 시작하기
Intellij ultimate를 사용하면 Spring boot initializer가 있으나, community 버전은 없다. 따라서 자신이 원하는 build tool을 이용해서 만들어 주면된다 Spring boot initializer를 이용하지 않고, 프로젝트 생성하는 법 을 공부 할 것이다.
2-1. gradle project에서 시작
auto import OK (build.gradle 파일 변경할 때 마다 바로바로 변경 : dependency 추가 등)
원하는 build 형태의 spring boot project를 생성해준다. (dir 형태로!)
3. 스프링 프로젝트의 구조
gradle java 기본 프로젝트 구조와 동일하다
저장 파일
파일 경로
설명
소스 코드
src/main/java
-
소스 리소스
src/main/resource
java application에서 resources 기준으로 아래 것들을 참조 가능 (classpath)
테스트 코드
src/test/java
-
테스트 리소스
src/test/resource
test 관련 리소스를 만들 수 있다
메인 애플리케이션 위치 (@SpringBootApplication) : 기본 패키지 package com.jyami 프로젝트가 쓰고있는 가장 최상위 패키지! > why? 컴포넌트 스캔을 하기 때문
com.jyami에서부터 시작을 해서, 그 아래에 있는 파일들을 스캔해서 bean으로 등록한다.
src/main/java 위치에 넣으면 모든 패키지를 스캔하므로
만약 java>com.hello 패키지가 있고, 그안에 메인 애플리케이션이 아닌 java파일이 있으면, 그 java파일은 component 스캔이 이루어지지 않는다.
1. Introduction to Spring Boot
1-1. Spring Boot Start
Features
It's a tool that helps you build production-level applications, not just toy projects.
opinated view : This refers to the conventions that Spring Boot has (widely used configurations)
It provides default configurations not only for the Spring platform but also for other libraries (like tomcat) out of the box.
Goals
Provides faster and broader usability for all Spring development.
Provides convention-based configurations without having to set everything up manually. But you can easily and quickly change these settings to match your requirements. (This is the reason to use Spring Boot)
Provides non-functional configurations as well. Beyond features needed for business logic, it also covers non-functional features!
Does not use XML and does not do code generation.
Spring Roo : It uniquely does code generation, but it's not widely used anymore. By not doing generation, things are easier, clearer, and simpler to customize. > The predecessor of Spring Boot
System Requirements
Spring Boot requires Java 8 or higher.
Supported servlet containers include Tomcat, Jetty, and Undertow.
2. Getting Started with Spring Boot
If you use IntelliJ Ultimate, it has a Spring Boot Initializer built in, but the Community edition does not. So you can create one using whichever build tool you prefer. We'll learn how to create a project without using the Spring Boot Initializer.
2-1. Starting from a Gradle Project
auto import OK (Applies changes immediately whenever the build.gradle file is modified: adding dependencies, etc.)
Typically, a project declares dependencies on one or more "starters". Spring Boot simplifies dependency declarations and provides a useful Gradle plugin for generating jars.
package com.jyami;

import org.springframework.boot.SpringApplication;
import org.springframework.boot.autoconfigure.SpringBootApplication;

@SpringBootApplication
public class Application {
    public static void main(String args[]){
        SpringApplication.run(Application.class, args);
    }

}
Using the SpringBootApplication annotation to call the method that runs SpringApplication
Spring MVC requires many dependencies to run — so how did all those dependencies get pulled in?
We need to configure the MVC app (bean, tomcat, etc.)
: This is all configured in @SpringBootApplication. > EnableAutoConfiguration
In IntelliJ settings, go to Build, Execution, Deployment > Compiler > Annotation Processors and check Enable annotation processing to be able to use annotations built with Gradle.
Run
When you run the application and check the logs, you can see that Tomcat is already running on port 8080. If you open http://localhost:8080, you can confirm that the Tomcat web application is working. (Even though it shows an error page)
Build
gradle build
This builds the package. Since it's a Java project, a jar file is generated.
It generates a Spring Boot project in your desired build format. (As a directory structure!)
3. Spring Project Structure
It follows the same structure as a standard Gradle Java project.
File Type
File Path
Description
Source Code
src/main/java
-
Source Resources
src/main/resource
In a Java application, files below the resources directory can be referenced (classpath)
Test Code
src/test/java
-
Test Resources
src/test/resource
You can create test-related resources here
Main Application Location (@SpringBootApplication) : Default package package com.jyami This should be in the topmost package of the project! > Why? Because of component scanning.
Starting from com.jyami, it scans files underneath and registers them as beans.
If you place it directly under src/main/java, it would scan all packages.
If there's a package java>com.hello with a Java file that isn't the main application, that Java file will not be picked up by component scanning.


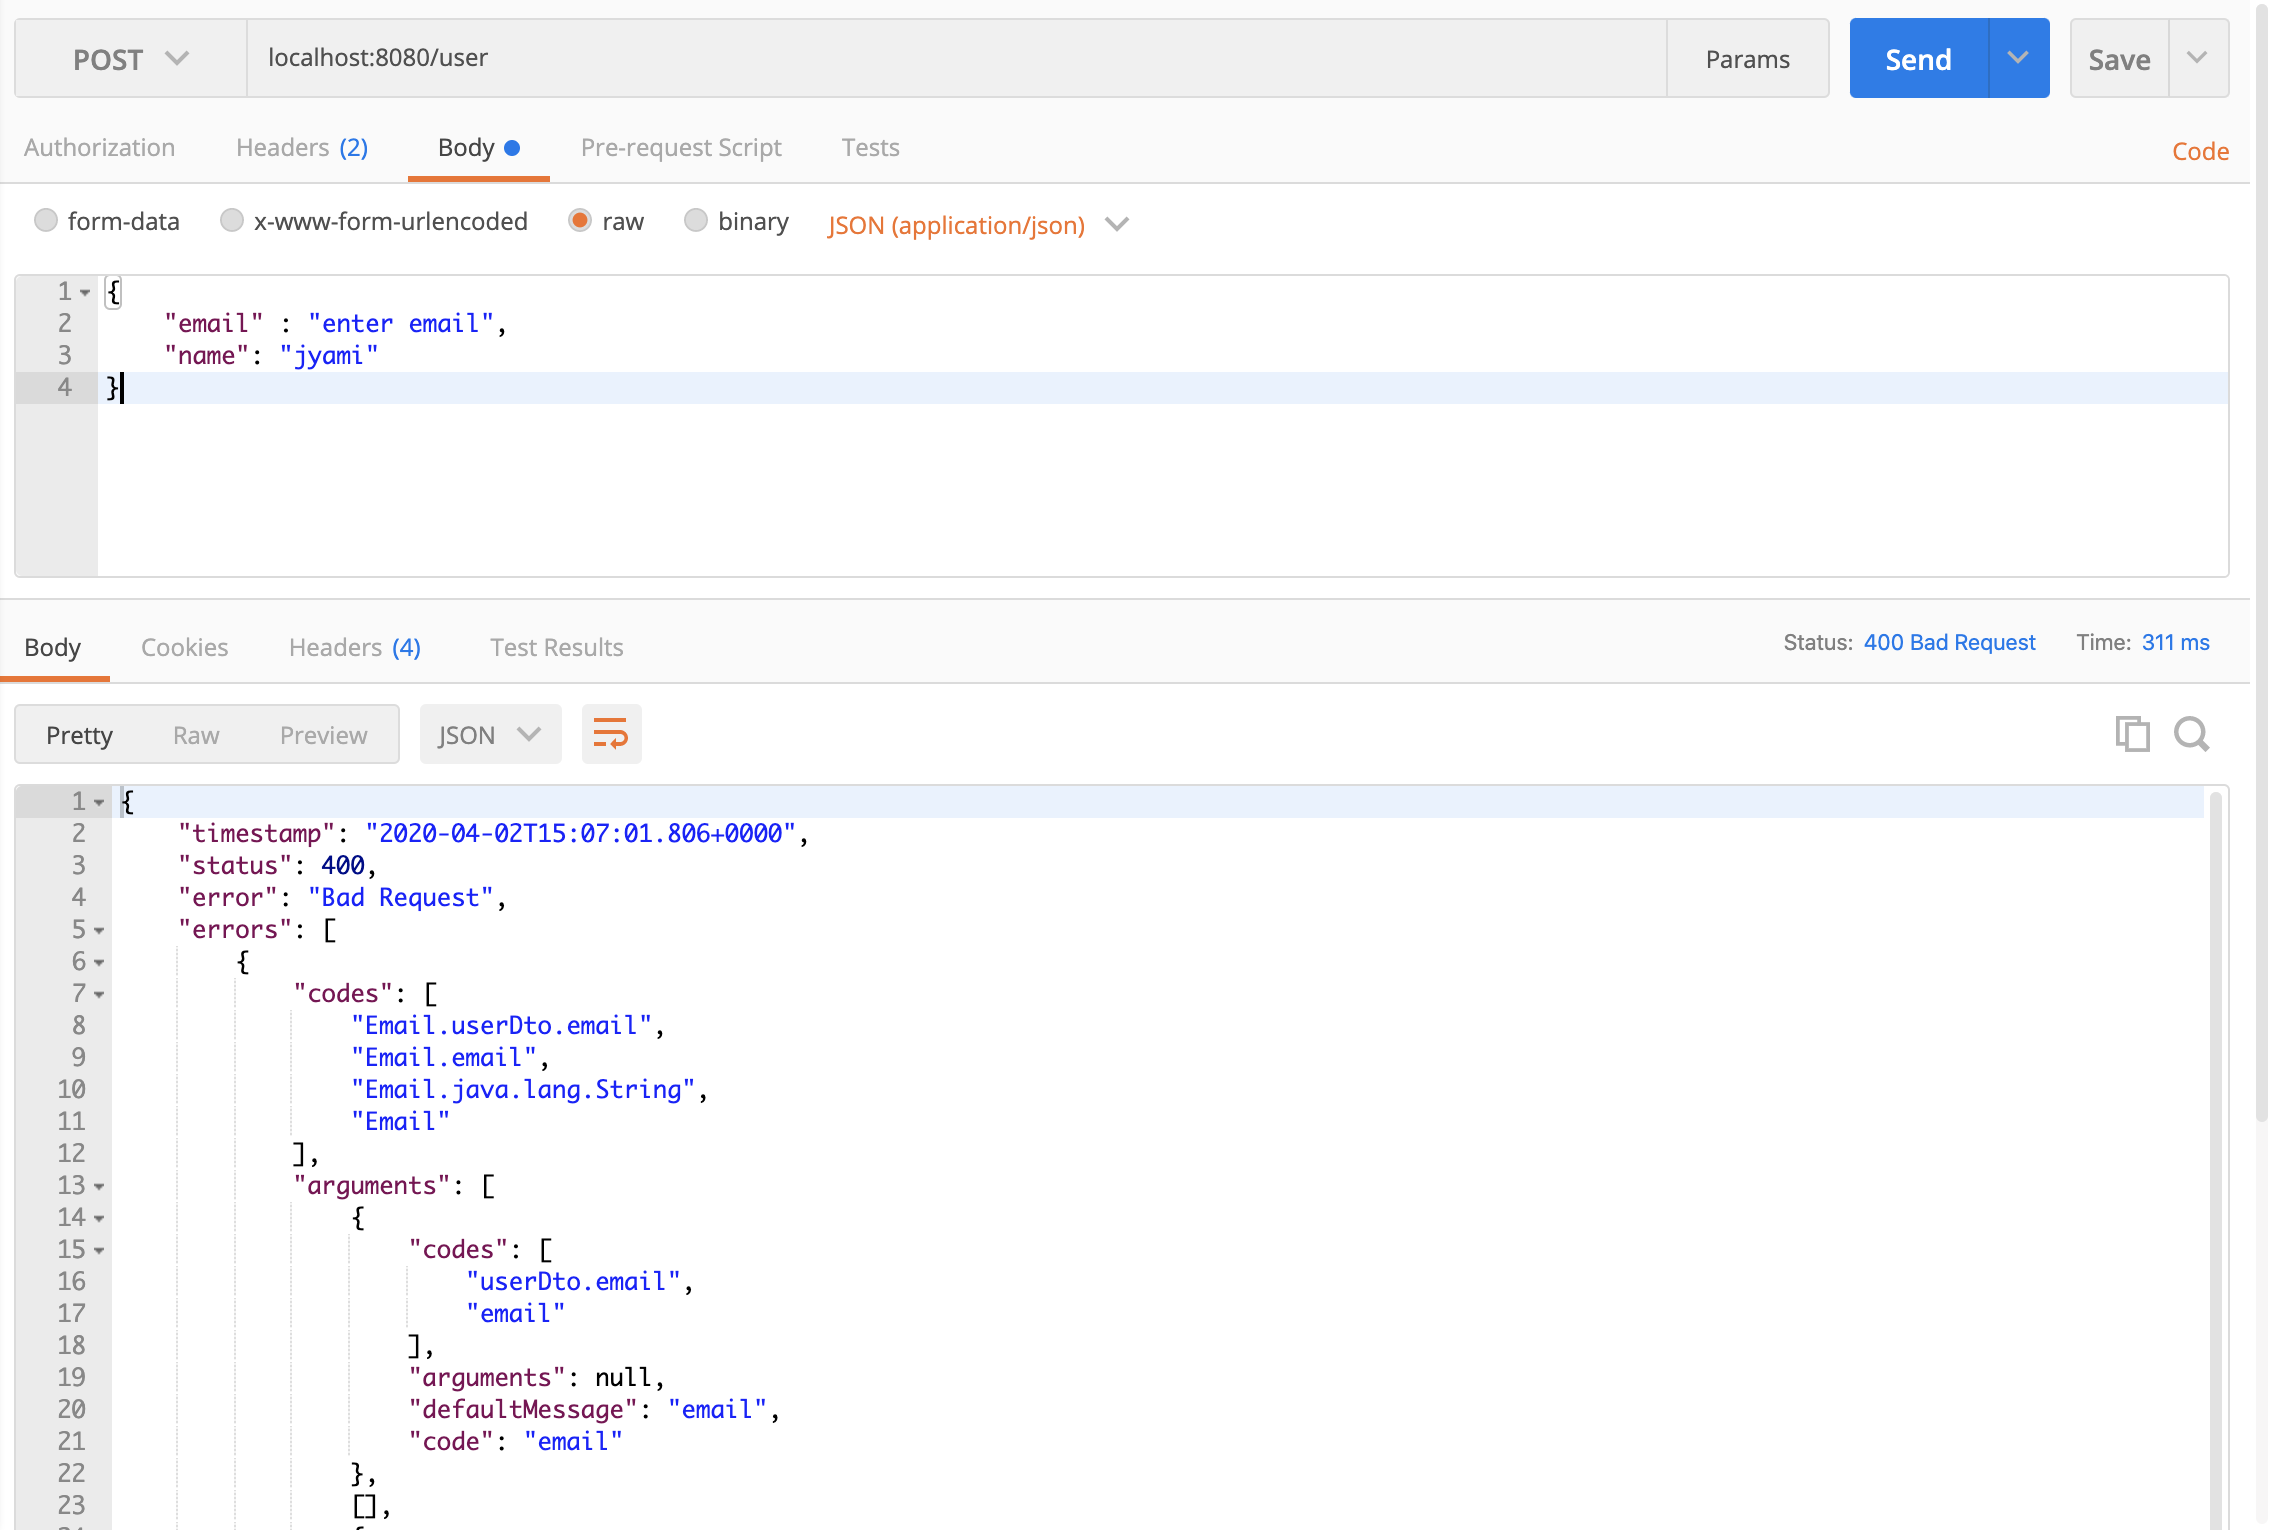


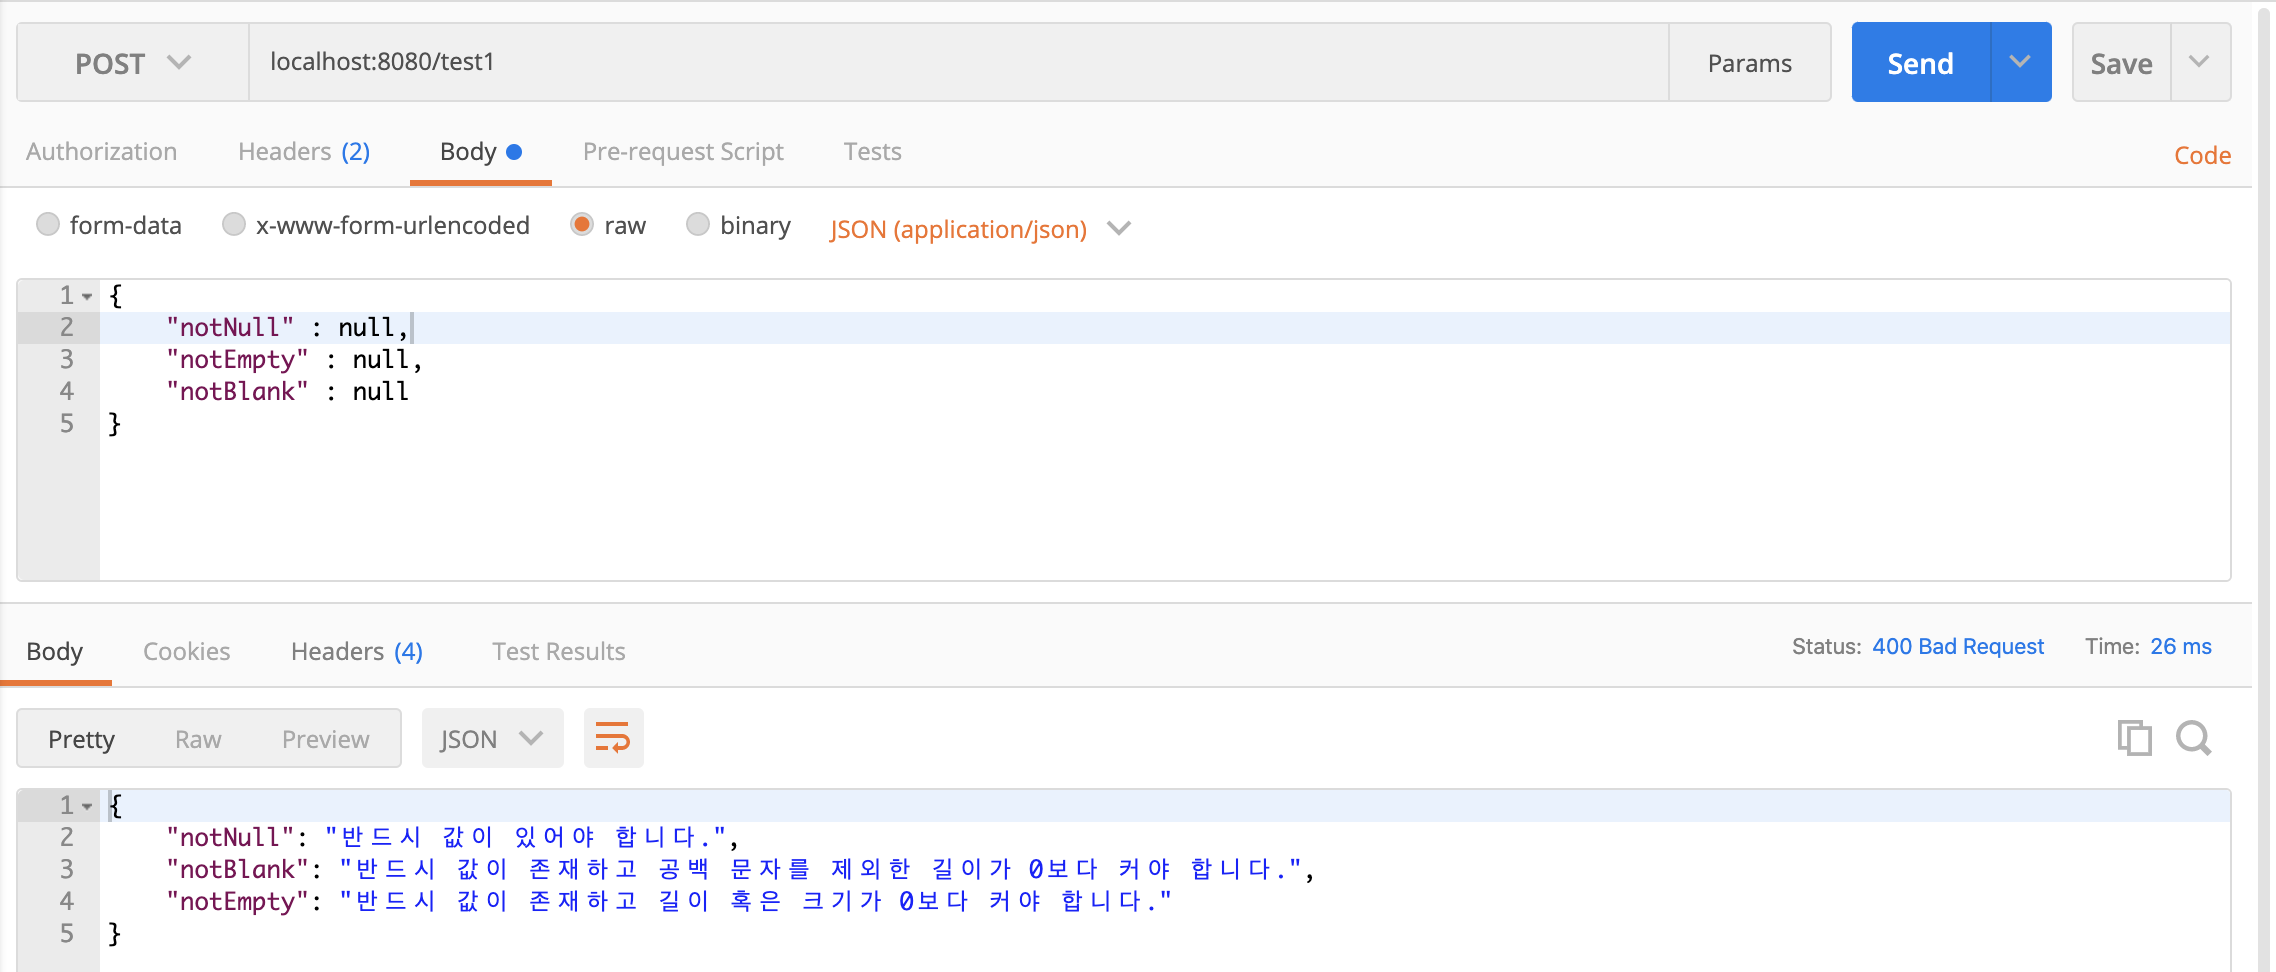

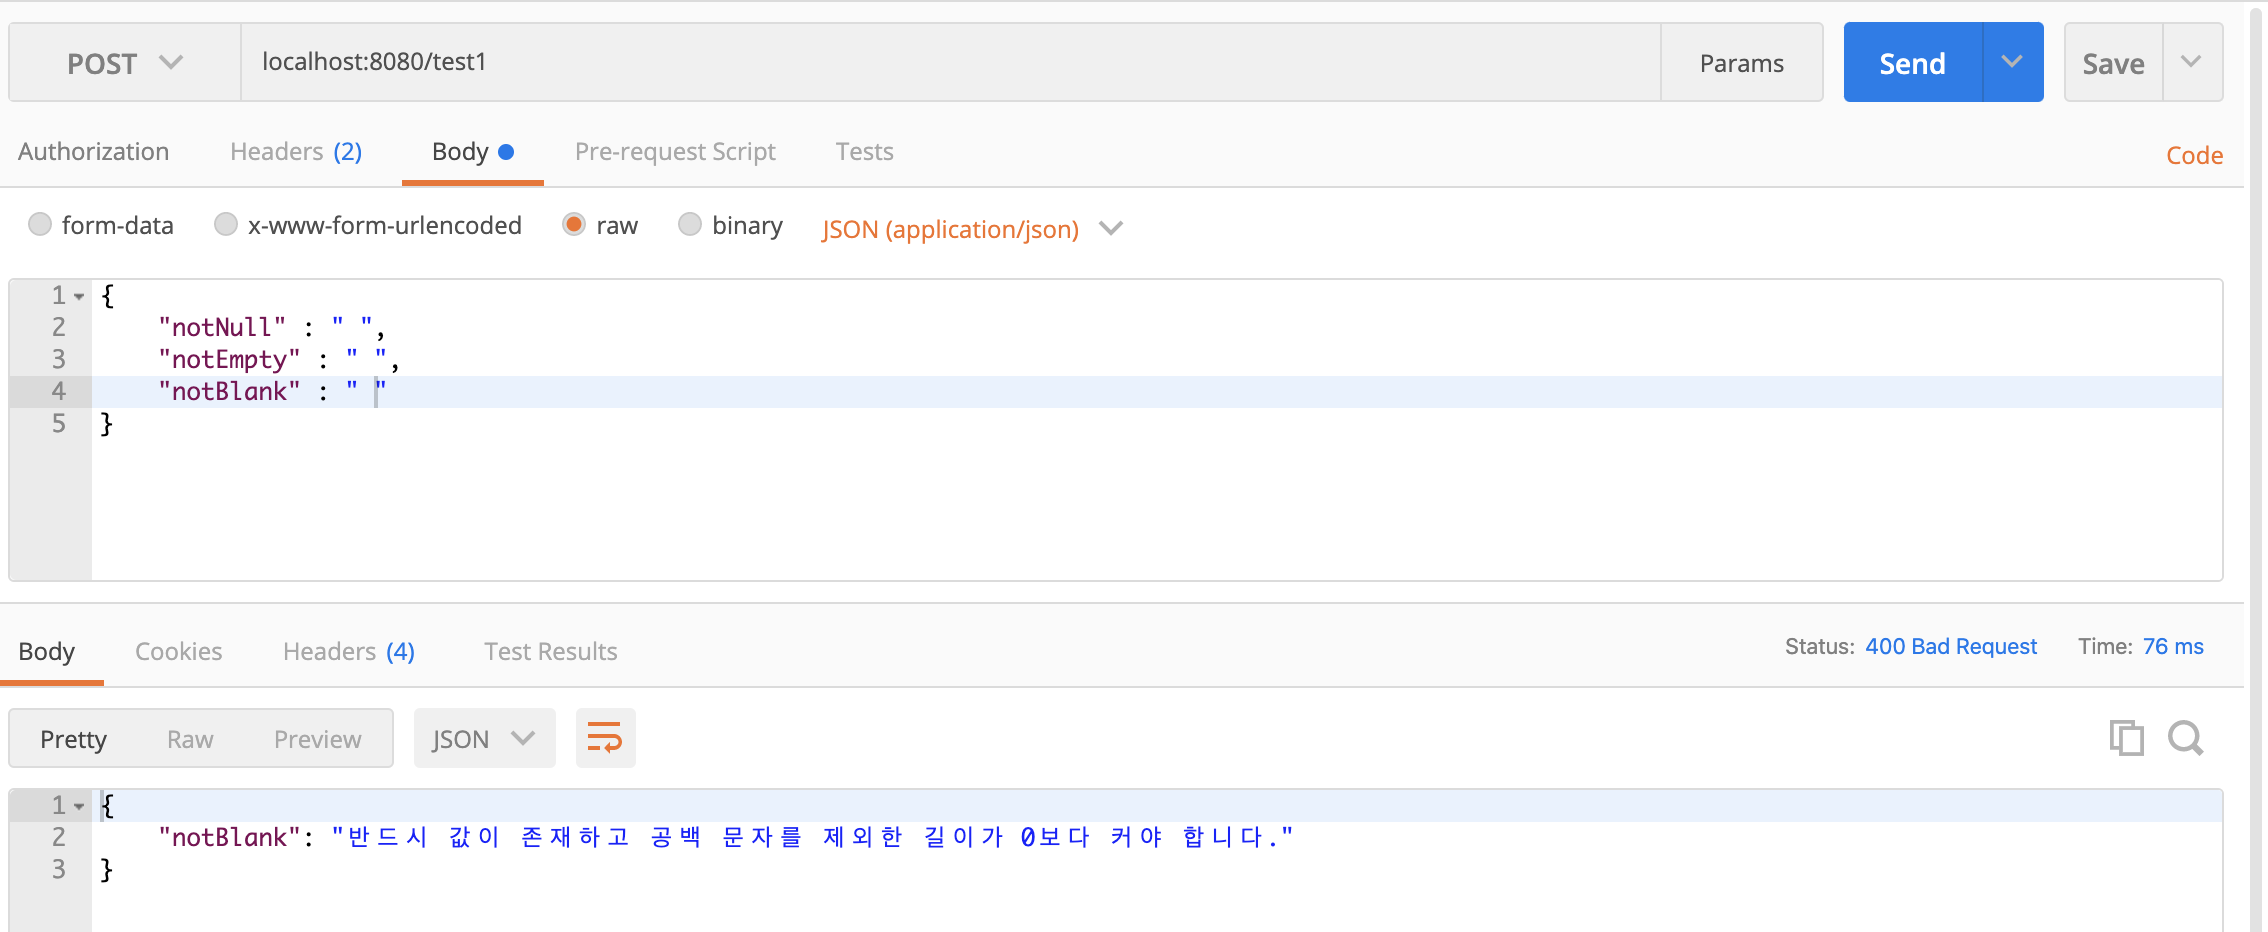


댓글
Comments