public interface UserRepositoryCustom {
    Optional<User> findByUserId(Long userId);
}
@RequiredArgsConstructor
public class UserRepositoryImpl implements UserRepositoryCustom {

    private final JPAQueryFactory jpaQueryFactory;

    @Override
    public Optional<User> findByUserId(Long userId) {
        User user = jpaQueryFactory.selectFrom(QUser.user)
                .where(QUser.user.userId.eq(userId))
                .fetchOne();
        return Optional.ofNullable(user);
    }
}
이렇게 짠 Querydsl 코드를 테스트하기 위한 테스트코드를 짤 때 @SpringBootTest를 하면 모든 빈이 주입되기 때문에 상관이 없지만,
아래 코드와 같이 DataJpaTest와 같은 슬라이싱 테스트를 하고싶을 때 문제가 발생한다.
@DataJpaTest
@ActiveProfiles("test")
class UserRepositoryTest {

    @Autowired
    private EntityManager entityManager;

    @Autowired
    private UserRepository userRepository;

    private User settingUser() {
        User settingUser = User.builder()
                .email("jyami@ewhain.net")
                .name("jyami")
                .build();

        return userRepository.save(settingUser);
    }

    @Test
    void test() {
        settingUser();
        entityManager.clear();
        User user = userRepository.findByUserId(1L)
                .orElseThrow(() -> new ResourceNotFoundException("user", "userId", 1L));
    }


}
Error creating bean with name 'userRepositoryImpl' defined in file [/Users/jyami/Documents/commiters/commiters-ewha/commiters-ewha-api/build/classes/java/main/com/jyami/commitersewha/domain/user/UserRepositoryImpl.class]: Unsatisfied dependency expressed through constructor parameter 0; nested exception is org.springframework.beans.factory.NoSuchBeanDefinitionException: No qualifying bean of type 'com.querydsl.jpa.impl.JPAQueryFactory'
결국 이유는 JpaQueryFactory가 persistenceLayer가 아니어서 빈등록이 되지않아 발생하는 문제인데, 이때 테스트 시 특정부분의 빈만 등록해주는 방법이 있었다!
@TestConfiguration
public class TestConfig {

    @PersistenceContext
    private EntityManager entityManager;

    @Bean
    public JPAQueryFactory jpaQueryFactory() {
        return new JPAQueryFactory(entityManager);
    }
}
테스트에서만 사용할 용도의 @TestConfiguration을 이용해 JPAQueryFactory 만 Bean으로 생성해준다.
@DataJpaTest
@ActiveProfiles("test")
@Import(TestConfig.class)
public class UserRepositoryTest {
}
이후 @Import 어노테이션을 사용해 해당 테스트용 빈을 주입해주면, JpaQueryFactory에 대한 빈도 생성되므로, Querydsl의 슬라이싱 테스트가 가능해진다 :)
public interface UserRepositoryCustom {
    Optional<User> findByUserId(Long userId);
}
@RequiredArgsConstructor
public class UserRepositoryImpl implements UserRepositoryCustom {

    private final JPAQueryFactory jpaQueryFactory;

    @Override
    public Optional<User> findByUserId(Long userId) {
        User user = jpaQueryFactory.selectFrom(QUser.user)
                .where(QUser.user.userId.eq(userId))
                .fetchOne();
        return Optional.ofNullable(user);
    }
}
When writing test code for Querydsl code like this, using @SpringBootTest would be fine since all beans get injected,
but a problem occurs when you want to do a slicing test like @DataJpaTest as shown in the code below.
@DataJpaTest
@ActiveProfiles("test")
class UserRepositoryTest {

    @Autowired
    private EntityManager entityManager;

    @Autowired
    private UserRepository userRepository;

    private User settingUser() {
        User settingUser = User.builder()
                .email("jyami@ewhain.net")
                .name("jyami")
                .build();

        return userRepository.save(settingUser);
    }

    @Test
    void test() {
        settingUser();
        entityManager.clear();
        User user = userRepository.findByUserId(1L)
                .orElseThrow(() -> new ResourceNotFoundException("user", "userId", 1L));
    }


}
Error creating bean with name 'userRepositoryImpl' defined in file [/Users/jyami/Documents/commiters/commiters-ewha/commiters-ewha-api/build/classes/java/main/com/jyami/commitersewha/domain/user/UserRepositoryImpl.class]: Unsatisfied dependency expressed through constructor parameter 0; nested exception is org.springframework.beans.factory.NoSuchBeanDefinitionException: No qualifying bean of type 'com.querydsl.jpa.impl.JPAQueryFactory'
The reason is that JpaQueryFactory isn't part of the persistence layer, so it doesn't get registered as a bean. But there's a way to register only specific beans during testing!
@TestConfiguration
public class TestConfig {

    @PersistenceContext
    private EntityManager entityManager;

    @Bean
    public JPAQueryFactory jpaQueryFactory() {
        return new JPAQueryFactory(entityManager);
    }
}
Using @TestConfiguration, which is meant only for tests, we create just the JPAQueryFactory as a Bean.
@DataJpaTest
@ActiveProfiles("test")
@Import(TestConfig.class)
public class UserRepositoryTest {
}
Then, by using the @Import annotation to inject the test-specific bean, the JpaQueryFactory bean also gets created, making slicing tests with Querydsl possible :)
redirect_uri : OAuth2 provider가 성공적으로 인증을 완료했을 때 redirect 할 URI를 지정한다. (OAuth2의 redirectUri 와는 다르다)
2. endpoint로 인증 요청을 받으면, Spring Security의 OAuth2 클라이언트는 user를 provider가 제공하는 AuthorizationUrl로 redirect 한다. Authorization request와 관련된 state는authorizationRequestRepository에 저장된다 (Security Config에 정의함) provider에서 제공한 AutorizationUrl에서 허용/거부가 정해진다.
이때 만약 유저가 앱에 대한 권한을 모두 허용하면 provider는 사용자를 callback url로 redirect한다. (http://localhost:8080/oauth2/callback/{provider}) 그리고 이때 사용자 인증코드 (authroization code) 도 함께 갖고있다.
만약 거부하면 callbackUrl로 똑같이 redirect 하지만 error가 발생한다.
3. Oauth2 에서의 콜백 결과가 에러이면 Spring Security는oAuth2AuthenticationFailureHanlder를 호출한다. (Security Config에 정의함)
4. Oauth2 에서의 콜백 결과가 성공이고 사용자 인증코드 (authorization code)도 포함하고 있다면 Spring Security는 access_token 에 대한 authroization code를 교환하고, customOAuth2UserService 를 호출한다 (Security Config에 정의함)
5. customOAuth2UserService 는 인증된 사용자의 세부사항을 검색한 후에 데이터베이스에 Create를 하거나 동일 Email로 Update 하는 로직을 작성한다.
6. 마지막으로 oAuth2AuthenticationSuccessHandler 이 불리고 그것이 JWT authentication token을 만들고 queryString에서의 redirect_uri로 간다 (1번에서 client가 정의한 ) 이때 JWT token과 함께!
@Configuration
@EnableWebSecurity
@EnableGlobalMethodSecurity(
        securedEnabled = true,
        jsr250Enabled = true,
        prePostEnabled = true
)
public class SecurityConfig extends WebSecurityConfigurerAdapter {

    @Autowired
    private CustomUserDetailsService customUserDetailsService;

    @Autowired
    private CustomOAuth2UserService customOAuth2UserService;

    @Autowired
    private OAuth2AuthenticationSuccessHandler oAuth2AuthenticationSuccessHandler;

    @Autowired
    private OAuth2AuthenticationFailureHandler oAuth2AuthenticationFailureHandler;

    @Autowired
    private HttpCookieOAuth2AuthorizationRequestRepository httpCookieOAuth2AuthorizationRequestRepository;

    @Bean
    public TokenAuthenticationFilter tokenAuthenticationFilter() {
        return new TokenAuthenticationFilter();
    }

    /*
      By default, Spring OAuth2 uses HttpSessionOAuth2AuthorizationRequestRepository to save
      the authorization request. But, since our service is stateless, we can't save it in
      the session. We'll save the request in a Base64 encoded cookie instead.
    */
    @Bean
    public HttpCookieOAuth2AuthorizationRequestRepository cookieAuthorizationRequestRepository() {
        return new HttpCookieOAuth2AuthorizationRequestRepository();
    }

    @Override
    public void configure(AuthenticationManagerBuilder authenticationManagerBuilder) throws Exception {
        authenticationManagerBuilder
                .userDetailsService(customUserDetailsService)
                .passwordEncoder(passwordEncoder());
    }

    @Bean
    public PasswordEncoder passwordEncoder() {
        return new BCryptPasswordEncoder();
    }


    @Bean(BeanIds.AUTHENTICATION_MANAGER)
    @Override
    public AuthenticationManager authenticationManagerBean() throws Exception {
        return super.authenticationManagerBean();
    }

    @Override
    protected void configure(HttpSecurity http) throws Exception {
        http
                .cors()
                    .and()
                .sessionManagement()
                    .sessionCreationPolicy(SessionCreationPolicy.STATELESS)
                    .and()
                .csrf()
                    .disable()
                .formLogin()
                    .disable()
                .httpBasic()
                    .disable()
                .exceptionHandling()
                    .authenticationEntryPoint(new RestAuthenticationEntryPoint())
                    .and()
                .authorizeRequests()
                    .antMatchers("/",
                        "/error",
                        "/favicon.ico",
                        "/**/*.png",
                        "/**/*.gif",
                        "/**/*.svg",
                        "/**/*.jpg",
                        "/**/*.html",
                        "/**/*.css",
                        "/**/*.js")
                        .permitAll()
                    .antMatchers("/auth/**", "/oauth2/**")
                        .permitAll()
                    .anyRequest()
                        .authenticated()
                    .and()
                .oauth2Login()
                    .authorizationEndpoint()
                        .baseUri("/oauth2/authorize")
                        .authorizationRequestRepository(cookieAuthorizationRequestRepository())
                        .and()
                    .redirectionEndpoint()
                        .baseUri("/oauth2/callback/*")
                        .and()
                    .userInfoEndpoint()
                        .userService(customOAuth2UserService)
                        .and()
                    .successHandler(oAuth2AuthenticationSuccessHandler)
                    .failureHandler(oAuth2AuthenticationFailureHandler);

        // Add our custom Token based authentication filter
        http.addFilterBefore(tokenAuthenticationFilter(), UsernamePasswordAuthenticationFilter.class);
    }
}
redirect_uri: Specifies the URI to redirect to when the OAuth2 provider successfully completes authentication. (This is different from OAuth2's redirectUri)
2. When the authentication request is received at the endpoint, Spring Security's OAuth2 client redirects the user to the AuthorizationUrl provided by the provider. The state related to the authorization request is stored in the authorizationRequestRepository (defined in Security Config). The allow/deny decision is made at the AuthorizationUrl provided by the provider.
If the user grants all permissions to the app, the provider redirects the user to the callback URL (http://localhost:8080/oauth2/callback/{provider}) along with the user's authorization code.
If the user denies, they are redirected to the same callbackUrl, but with an error.
3. If the OAuth2 callback result is an error, Spring Security invokes the oAuth2AuthenticationFailureHanlder (defined in Security Config).
4. If the OAuth2 callback result is successful and includes the authorization code, Spring Security exchanges the authorization code for an access_token and invokes the customOAuth2UserService (defined in Security Config).
5. The customOAuth2UserService retrieves the authenticated user's details and then either creates a new entry in the database or updates the existing one with the same email.
6. Finally, the oAuth2AuthenticationSuccessHandler is called, which creates a JWT authentication token and redirects to the redirect_uri from the queryString (the one defined by the client in step 1) — along with the JWT token!
@Configuration
@EnableWebSecurity
@EnableGlobalMethodSecurity(
        securedEnabled = true,
        jsr250Enabled = true,
        prePostEnabled = true
)
public class SecurityConfig extends WebSecurityConfigurerAdapter {

    @Autowired
    private CustomUserDetailsService customUserDetailsService;

    @Autowired
    private CustomOAuth2UserService customOAuth2UserService;

    @Autowired
    private OAuth2AuthenticationSuccessHandler oAuth2AuthenticationSuccessHandler;

    @Autowired
    private OAuth2AuthenticationFailureHandler oAuth2AuthenticationFailureHandler;

    @Autowired
    private HttpCookieOAuth2AuthorizationRequestRepository httpCookieOAuth2AuthorizationRequestRepository;

    @Bean
    public TokenAuthenticationFilter tokenAuthenticationFilter() {
        return new TokenAuthenticationFilter();
    }

    /*
      By default, Spring OAuth2 uses HttpSessionOAuth2AuthorizationRequestRepository to save
      the authorization request. But, since our service is stateless, we can't save it in
      the session. We'll save the request in a Base64 encoded cookie instead.
    */
    @Bean
    public HttpCookieOAuth2AuthorizationRequestRepository cookieAuthorizationRequestRepository() {
        return new HttpCookieOAuth2AuthorizationRequestRepository();
    }

    @Override
    public void configure(AuthenticationManagerBuilder authenticationManagerBuilder) throws Exception {
        authenticationManagerBuilder
                .userDetailsService(customUserDetailsService)
                .passwordEncoder(passwordEncoder());
    }

    @Bean
    public PasswordEncoder passwordEncoder() {
        return new BCryptPasswordEncoder();
    }


    @Bean(BeanIds.AUTHENTICATION_MANAGER)
    @Override
    public AuthenticationManager authenticationManagerBean() throws Exception {
        return super.authenticationManagerBean();
    }

    @Override
    protected void configure(HttpSecurity http) throws Exception {
        http
                .cors()
                    .and()
                .sessionManagement()
                    .sessionCreationPolicy(SessionCreationPolicy.STATELESS)
                    .and()
                .csrf()
                    .disable()
                .formLogin()
                    .disable()
                .httpBasic()
                    .disable()
                .exceptionHandling()
                    .authenticationEntryPoint(new RestAuthenticationEntryPoint())
                    .and()
                .authorizeRequests()
                    .antMatchers("/",
                        "/error",
                        "/favicon.ico",
                        "/**/*.png",
                        "/**/*.gif",
                        "/**/*.svg",
                        "/**/*.jpg",
                        "/**/*.html",
                        "/**/*.css",
                        "/**/*.js")
                        .permitAll()
                    .antMatchers("/auth/**", "/oauth2/**")
                        .permitAll()
                    .anyRequest()
                        .authenticated()
                    .and()
                .oauth2Login()
                    .authorizationEndpoint()
                        .baseUri("/oauth2/authorize")
                        .authorizationRequestRepository(cookieAuthorizationRequestRepository())
                        .and()
                    .redirectionEndpoint()
                        .baseUri("/oauth2/callback/*")
                        .and()
                    .userInfoEndpoint()
                        .userService(customOAuth2UserService)
                        .and()
                    .successHandler(oAuth2AuthenticationSuccessHandler)
                    .failureHandler(oAuth2AuthenticationFailureHandler);

        // Add our custom Token based authentication filter
        http.addFilterBefore(tokenAuthenticationFilter(), UsernamePasswordAuthenticationFilter.class);
    }
}
public interface MyService {
    void doSomething();
}
@Service
public class MyServiceImpl implements MyService {
    @Override
    public void doSomething() {
        System.out.println("hello Im Impl Service");
    }
}
이렇게 서비스가 있는경우를 생각해보자. Controller 에서는 Service를 두가지 방법으로 주입 받을 수 있다.
1. MyService 를 타입으로 하는 (인터페이스 타입) 빈주입 2. MyServiceImpl 을 타입으로 하는 (클래스 타입) 빈주입
application properties를 이용하여 spring.aop의 proxy-target-class를 false로 설정할 경우엔 클래스를 이용한 @Service 빈 주입을 할 수 없음을 상기하자
spring.aop.proxy-target-class=false
# spring의 기본 설정은 true이다.
결론부터 말하면 인터페이스 서비스로 빈 주입을 해야하는 이유는 spring proxy라고 할 수 있다.
spring proxy는 상속을 이용하여 프록시를 생성하는데, class service는 상속을 받아서 프록시를 만드는 과정에서 빈을 만들다가 에러가 난다.
사용자가 service class를 final로 설정해버리거나,
생성자를 private으로 생성하여 자식인 프록시가 부모 생성자를 찾지 못하는 경우
1. MyService 를 타입으로 하는 (인터페이스 타입) 빈주입
@Autowired
private MyService myService;
구현 상속 관계 : MyService ---> MyserviceImpl 프록시 상속 관계 : Myservice ---> ProxyMyService
따라서 ProxyMyService 가 인터페이스인 MyService를 상속받는다.
2. MyServiceImpl 을 타입으로 하는 (클래스 타입) 빈주입
@Autowired
private MyServiceImpl myService;
구현 상속 관계 : MyService ---> MyserviceImpl 프록시 상속 관계 : MyServiceImpl ---> ProxyMyService
이경우에 스프링이 생성하는 프록시가 MyServiceImpl 을 부모로하여 상속을 받는 구조인 것이다.
이런 구조를 가진 상황에서 final 혹은 private 생성자를 이용해서 프록시를 만들지 못하게 되고, 빈 생성시 에러가 난다 (sub classing 에러)
When using Spring Boot, most people inject @Service beans through interfaces. But I had been using this pattern without really understanding why — until I watched a YouTube video by Baek Ki-sun and it finally clicked.
public interface MyService {
    void doSomething();
}
@Service
public class MyServiceImpl implements MyService {
    @Override
    public void doSomething() {
        System.out.println("hello Im Impl Service");
    }
}
Let's consider a case where we have a service like this. In the Controller, you can inject the Service in two ways.
1. Bean injection using MyService as the type (interface type) 2. Bean injection using MyServiceImpl as the type (class type)
Keep in mind that if you set spring.aop's proxy-target-class to false in application properties, you won't be able to do @Service bean injection using the class type.
spring.aop.proxy-target-class=false
# spring의 기본 설정은 true이다.
To cut to the chase, the reason you should inject beans using an interface service is because of spring proxy.
Spring proxy creates proxies using inheritance. With a class service, errors can occur during bean creation while trying to create a proxy by inheriting from the class.
If the user marks the service class as final, or
If the constructor is made private, so the child proxy can't find the parent constructor
1. Bean injection using MyService as the type (interface type)
In this case, the proxy that Spring creates has a structure where it inherits from MyServiceImpl as its parent.
In this structure, if you use final or a private constructor, the proxy can't be created, and you'll get an error during bean creation (a sub-classing error).
@Valid 를 이용해 @RequestBody 객체 검증하기 | Validating @RequestBody Objects Using @Valid
쟈 미
728x90
Springboot를 이용해서 어노테이션을 이용한 validation을 하는 방법을 적으려 한다. RestController를 이용하여 @RequestBody 객체를 사용자로부터 가져올 때, 들어오는 값들을 검증할 수 있는 방법을 소개한다.
Jakarata Bean Validation API Packages에 있는 javax.validation.constraints package에 있는 기본적인 검증 어노테이션을 이용한다. @Valid를 이용하면, service 단이 아닌 객체 안에서, 들어오는 값에 대해 검증을 할 수 있다.
javax.validation.constraints 패키지를 보면 많은 어노테이션들이 존재한다. @Valid를 이용한 객체 검증 시 기본적으로 이 어노테이션을 이용한다. 사실 이름만 봐도 각각의 용도를 이해할 수 있다.
추가 : springboot가 버전업을 하면서 web 의존성안에 있던 constraints packeage가 아예 모듈로 빠졌다.
@Valid로 requestBody로 들어온 객체의 검증이 이루어지면서 위와 같이 BadRequest가 나가는 경우에 custom 한 errorhandling도 할 수 있다.
위에서 잘못된 객체 값이 나갔을 때 Springboot에 올라온 Log를 살펴보면 MethodArgumentNotValidException이 발생했음을 알 수 있어, 이 Exception을 사용하여 custom한 ErrorMessage를 response로 내보낼 수도 있다.
@ControllerAdvice를 이용한 전역 에러 핸들링, 혹은 @Controller단에서의 지역 에러 핸들링을 사용하면 된다. MethodArgumentNotValidException에 대한 @ExceptionHandler 어노테이션을 지정하여 커스텀 에러 핸들링을 해보자
@RestControllerAdvice
public class ApiControllerAdvice {
@ExceptionHandler(MethodArgumentNotValidException.class)
public ResponseEntity<Map<String, String>> handleValidationExceptions(MethodArgumentNotValidException ex){
Map<String, String> errors = new HashMap<>();
ex.getBindingResult().getAllErrors()
.forEach(c -> errors.put(((FieldError) c).getField(), c.getDefaultMessage()));
return ResponseEntity.badRequest().body(errors);
}
}
ResponseEntity 값으로, error가 난 field 값과, 에러 메시지를 Map 형태로 만들어서, Response로 넣어주었다. 이때 Map으로 선언하여 forEach를 한 이유는 @Valid를 사용할 때, 해당 객체에서 valid에 실패한 내용을 모두 리턴해주기 때문에, 모든 error 값을 수용하기 위해서이다.
이 상태로 다시 서버를 Run 시켜서 Postman으로 확인을 해본다. 이때는 @NotNull, @Email 모두 validation이 안되도록 requestBody를 작성하였다.
Response값을 살펴보면, BadRequest인 status값, @Valid를 통과하지 못한 모든 필드 값에 대한 어려와, 에러 내용을 커스텀하게 내려준 것이 잘 반영되었음을 알 수 있다.
@NotEmpty - Type :CharSequence(length of character)Collection(collection size)Map(map sizeArray(array length) -null 이거나 empty(빈 문자열)가 아니어야 한다.
@NotNull - Type : 어떤 타입이든 수용한다. -null 이 아닌 값이다.
@Null - Type :어떤 타입이든 수용한다. -null 값이다.
이 부분은 헷갈리는 부분이라 DTO와 Contoller를 만들어서 확인해보자.
@NoArgsConstructor
@Getter
@ToString
public class NotDto {
@NotNull
private String notNull;
@NotEmpty
private String notEmpty;
@NotBlank
private String notBlank;
}
결과는 아래와 같다. 각각의 error message를 통해 각 validation 방법을 확인 할 수 있다.
@NotNull : 반드시 값이 있어야 한다.
@NotEmpty : 반드시 값이 존재하고 길이 혹은 크기가 0보다 커야한다.
@NotBrank : 반드시 값이 존재하고 공백 문자를 제외한 길이가 0보다 커야 한다.
null
""
" "
@NotNull
Invalid
Valid
Valid
@NotEmpty
Invalid
Invalid
Valid
@NotBlank
Invalid
Invalid
Invalid
용도에 맞게 validation을 할 수 있도록 확인하자.
2. 최대 최소에 대한 검증
suppportType - BigDecimalBigIntegerCharSequencebyte, short, int, long, 이에 대응하는 Wrapper 클래스 - double, float는 rounding error 때문에 지원하지 않는다. - null도 valid로 간주된다.
Validation - @DecimalMax : 지정된 최대 값보다 작거나 같아야 한다. Require : String value => max 값을 지정한다. - @DecimalMin : 지정된 최소 값보다 크거나 같아야 한다. Require : String value => min 값을 지정한다. - @Max : 지정된 최대 값보다 작거나 같아야 한다. Require : int value => max 값을 지정한다. - @Min : 지정된 최소 값보다 크거나 같아야 한다. Require : int value => min 값을 지정한다.
suppportType - java.util.Datejava.util.Calendarjava.time.Instantjava.time.LocalDatejava.time.LocalDateTimejava.time.LocalTimejava.time.MonthDayjava.time.OffsetDateTimejava.time.OffsetTimejava.time.Yearjava.time.YearMonthjava.time.ZonedDateTimejava.time.chrono.HijrahDatejava.time.chrono.JapaneseDatejava.time.chrono.MinguoDatejava.time.chrono.ThaiBuddhistDate - null도 valid로 간주된다.
Validation - @Future : Now 보다 미래의 날짜, 시간이어야 한다. - @FutureOrPresent : Now 거나 미래의 날짜, 시간이어야 한다. - @Past : Now 보다 과거 의의 날짜, 시간이어야 한다. - @PastOrPresent: Now 거나 과거의 날짜, 시간이어야 한다.
Now의 기준 : ClockProvider의 가상 머신에 따라 현재 시간을 정의하며 필요한 경우 default time zone을 적용한다.
Usage
@NoArgsConstructor
@Getter
@ToString
public class TimeDto {
@Future
private Date future;
@FutureOrPresent
private Date futureOrPresent;
@Past
private Date past;
@PastOrPresent
private Date pastOrPresent;
}
4. 이메일 검증
suppportType - null도 valid로 간주된다.
Validation - @Email : 올바른 형식의 이메일 주소여야 한다. (@가 들어가야한다.)
Usage
@NoArgsConstructor
@Getter
@ToString
public class EmailDto {
@Email
private String email;
}
5. 자릿수 범위 검증
suppportType - BigDecimalBigIntegerCharSequencebyte, short, int, long, 이에 대응하는 Wrapper 클래스 - null도 valid로 간주된다.
Validation - @Digits : 허용된 범위 내의 숫자이다. Require : int integer => 이 숫자에 허용되는 최대 정수 자릿수 Require : int fraction =>이 숫자에 허용되는 최대 소수 자릿수
Usage
@NoArgsConstructor
@Getter
@ToString
@Builder
@AllArgsConstructor
public class DigitsDto {
@Digits(integer = 5, fraction = 5)
private Integer digits;
}
6. Boolean 값에 대한 검증
suppportType - Boolean, boolean
Validation - @AssertTrue : 값이 항상 True 여야 한다. - @AssertFalse : 값이 항상 False 여야 한다.
Usage
@NoArgsConstructor
@Getter
@ToString
public class BooleanDto {
@AssertTrue
private boolean assertTrue;
@AssertFalse
private boolean assertFalse;
}
7. 크기 검증
suppportType - CharSequence (length of character sequence) Collection (collection size) Map (map size) Array (array length) - null도 valid로 간주된다.
Validation - @Size : 이 크기가 지정된 경계(포함) 사이에 있어야 한다. Require : int max => element의 크기가 작거나 같다. Require : int min =>element의 크기가 크거나 같다.
Usage
@NoArgsConstructor
@Getter
@ToString
public class SizeDto {
@Size(max = 5, min = 3)
private String size;
}
@NoArgsConstructor
@Getter
@ToString
public class PatternDto {
//yyyy-mm-dd 형태를 가지는 패턴 조사
@Pattern(regexp = "^(19|20)\\d{2}-(0[1-9]|1[012])-(0[1-9]|[12][0-9]|3[0-1])$")
private String pattern;
}
4. @Valid 정리 표
@AssertTrue
Boolean, boolean
값이 항상 True 여야 한다.
@DecimalMax
실수 제외 숫자 클래스.
지정된 최대 값보다 작거나 같아야 하는 숫자이다.
String : value (max 값을 지정한다.)
@DecimalMin
실수 제외 숫자 클래스.
지정된 최소 값보다 크거나 같아야하는 숫자이다.
String : value (min 값을 지정한다.)
@Digits
BigDecimalBigIntegerCharSequencebyte, short, int, long, 이에 대응하는 Wrapper 클래스
허용된 범위 내의 숫자이다.
int : integer (이 숫자에 허용되는 최대 정수 자릿수) int : fraction (이 숫자에 허용되는 최대 소수 자릿수)
@Email
null도 valid로 간주된다.
올바른 형식의 이메일 주소여야한다.
@Future
시간 클래스
Now 보다 미래의 날짜, 시간
@FutureOrPresent
시간 클래스
Now의 시간이거나 미래의 날짜, 시간
@Max
실수 제외 숫자 클래스.
지정된 최대 값보다 작거나 같은 숫자이다.
long : value (max 값을 지정한다)
@Min
실수 제외 숫자 클래스.
지정된 최소 값보다 크거나 같은 숫자이다.
long : value (min 값을 지정한다)
@Negative
숫자 클래스
음수인 값이다.
@NegativeOrZero
숫자 클래스
0이거나 음수인 값이다
@NotBlank
null 이 아닌 값이다.공백이 아닌 문자를 하나 이상 포함한다
@NotEmpty
CharSequence,Collection, Map, Array
null이거나 empty(빈 문자열)가 아니어야 한다.
@NotNull
어떤 타입이든 수용한다.
null 이 아닌 값이다.
@Null
어떤 타입이든 수용한다.
null 값이다.
@Past
시간 클래스
Now보다 과거의 날짜, 시간
@PastOrPresent
시간클래스
Now의 시간이거나 과거의 날짜, 시간
@Pattern
문자열
지정한 정규식과 대응되는 문자열이어야한다. Java의 Pattern 패키지의 컨벤션을 따른다
String : regexp (정규식 문자열을 지정한다)
@Positive
숫자 클래스
양수인 값이다
@PositiveOrZero
숫자 클래스
0이거나 양수인 값이다.
@Size
CharSequence,Collection, Map, Array
이 크기가 지정된 경계(포함) 사이에 있어야한다.
int : max (element의 크기가 작거나 같다) int : min (element의 크기가 크거나 같다)
[@ValidAnnotation].List : 동일한 요소에 여러개의 @ValidAnnotation[] 제약조건을 정의한다.
I'm going to write about how to perform annotation-based validation using Spring Boot. This post introduces how to validate incoming values when receiving a @RequestBody object from the user via a RestController.
We'll use the basic validation annotations from the javax.validation.constraints package in the Jakarta Bean Validation API Packages. By using @Valid, you can validate incoming values within the object itself, rather than at the service layer.
If you look at the javax.validation.constraints package, there are many annotations available. These annotations are used by default when performing object validation with @Valid. Honestly, you can understand what each one does just by looking at the name.
Update: As Spring Boot has been upgraded, the constraints package that used to be inside the web dependency has been separated into its own module.
@RestController
@Slf4j
public class TestController {

    @PostMapping("/user")
    public ResponseEntity<String> savePost(final @Valid @RequestBody UserDto userDto) {
        log.info(userDto.toString());
        return ResponseEntity.ok().body("postDto 객체 검증 성공");
    }
}
By writing @Valid next to the @RequestBody annotation in the parameter, validation is performed on the incoming object from the RequestBody. The specific details of this validation must be defined inside the object.
@ToString
@Getter
@NoArgsConstructor
@AllArgsConstructor
@Builder
public class UserDto {

    @NotNull
    private String name;

    @Email
    private String email;
}
After defining the UserDto object as above, you simply use the appropriate annotation for each field.
@NotNull: Does not allow null values for the incoming field. @Email: The incoming value must be in a valid email format. For a detailed explanation of field annotations, scroll down to: 3. Understanding javax.constraint Annotations
To actually verify that validation is working using PostMan, let's try sending an invalid email value:
The response automatically goes out following the error template generated by Spring Boot in a certain format. In other words, just by using @Valid along with the validation annotations properly, you can catch errors at the object level.
You can verify whether the @Valid annotation works using a simple Controller test. The test code below assumes the case where name is set to null, according to the @NotNull annotation.
When validation is performed on the incoming requestBody object with @Valid and a BadRequest is returned as shown above, you can also do custom error handling.
If you look at the log in Spring Boot when an invalid object value was sent, you can see that a MethodArgumentNotValidException was thrown. You can use this Exception to send a custom ErrorMessage as the response.
You can use global error handling with @ControllerAdvice, or local error handling at the @Controller level. Let's try custom error handling by specifying the @ExceptionHandler annotation for MethodArgumentNotValidException.
@RestControllerAdvice
public class ApiControllerAdvice {

    @ExceptionHandler(MethodArgumentNotValidException.class)
    public ResponseEntity<Map<String, String>> handleValidationExceptions(MethodArgumentNotValidException ex){
        Map<String, String> errors = new HashMap<>();
        ex.getBindingResult().getAllErrors()
                .forEach(c -> errors.put(((FieldError) c).getField(), c.getDefaultMessage()));
        return ResponseEntity.badRequest().body(errors);
    }

}
As the ResponseEntity value, we created a Map containing the field that caused the error and the error message, and put it into the Response. The reason we declared a Map and used forEach is that when using @Valid, it returns all the contents that failed validation in the object, so we need to accommodate all error values.
Let's run the server again and check with Postman. This time, I wrote the requestBody so that both @NotNull and @Email validation would fail.
Looking at the Response, you can see that the BadRequest status value, the errors for all field values that failed @Valid, and the custom error content are all properly reflected.
3. Understanding javax.constraint Annotations
I've included a reference table at the very bottom. Refer to it when needed.
1. String Presence Validation (Differences between @NotBlank, @NotEmpty, and @NotNull)
@NotBlank -The value must not be null. - Must contain at least one non-whitespace character.
@NotEmpty - Type:CharSequence(length of character)Collection(collection size)Map(map sizeArray(array length) -Must not be null or empty (empty string).
@NotNull - Type: Accepts any type. -The value must not be null.
@Null - Type:Accepts any type. -The value must be null.
This part can be confusing, so let's create a DTO and Controller to verify.
@NoArgsConstructor
@Getter
@ToString
public class NotDto {
    @NotNull
    private String notNull;
    @NotEmpty
    private String notEmpty;
    @NotBlank
    private String notBlank;
}
The results are as follows. You can understand each validation method through their respective error messages.
@NotNull: A value must be present.
@NotEmpty: A value must exist and its length or size must be greater than 0.
@NotBlank: A value must exist and its length, excluding whitespace characters, must be greater than 0.
null
""
" "
@NotNull
Invalid
Valid
Valid
@NotEmpty
Invalid
Invalid
Valid
@NotBlank
Invalid
Invalid
Invalid
Make sure to use the appropriate validation for your use case.
2. Min/Max Value Validation
supportType - BigDecimalBigIntegerCharSequencebyte, short, int, long, and their corresponding Wrapper classes - double, float are not supported due to rounding errors. - null is also considered valid.
Validation - @DecimalMax: Must be less than or equal to the specified maximum value. Require: String value => Specifies the max value. - @DecimalMin: Must be greater than or equal to the specified minimum value. Require: String value => Specifies the min value. - @Max: Must be less than or equal to the specified maximum value. Require: int value => Specifies the max value. - @Min: Must be greater than or equal to the specified minimum value. Require: int value => Specifies the min value.
The difference between DecimalMax/Min and Max/Min is in the range of values. The range differs significantly depending on whether you use String or Integer.
3. Range Value Validation
supportType -BigDecimalBigIntegerCharSequencebyte,short,int,long, double,float and their corresponding Wrapper classes - null is also considered valid.
Validation - @Positive: The value must be positive. - @PositiveOrZero: The value must be zero or positive. - @Negative: The value must be negative. - @NegativeOrZero: The value must be zero or negative.
supportType - java.util.Datejava.util.Calendarjava.time.Instantjava.time.LocalDatejava.time.LocalDateTimejava.time.LocalTimejava.time.MonthDayjava.time.OffsetDateTimejava.time.OffsetTimejava.time.Yearjava.time.YearMonthjava.time.ZonedDateTimejava.time.chrono.HijrahDatejava.time.chrono.JapaneseDatejava.time.chrono.MinguoDatejava.time.chrono.ThaiBuddhistDate - null is also considered valid.
Validation - @Future: Must be a date/time in the future compared to Now. - @FutureOrPresent: Must be Now or a date/time in the future. - @Past: Must be a date/time in the past compared to Now. - @PastOrPresent: Must be Now or a date/time in the past.
Definition of Now: The current time is defined according to the virtual machine of the ClockProvider, and the default time zone is applied if necessary.
Usage
@NoArgsConstructor
@Getter
@ToString
public class TimeDto {
    @Future
    private Date future;
    @FutureOrPresent
    private Date futureOrPresent;
    @Past
    private Date past;
    @PastOrPresent
    private Date pastOrPresent;
}
4. Email Validation
supportType - null is also considered valid.
Validation - @Email: Must be a properly formatted email address (must contain @).
Usage
@NoArgsConstructor
@Getter
@ToString
public class EmailDto {
    @Email
    private String email;
}
5. Digit Range Validation
supportType - BigDecimalBigIntegerCharSequencebyte, short, int, long, and their corresponding Wrapper classes - null is also considered valid.
Validation - @Digits: Must be a number within the allowed range. Require: int integer => Maximum number of integer digits allowed for this number. Require: int fraction =>Maximum number of fractional digits allowed for this number.
Usage
@NoArgsConstructor
@Getter
@ToString
@Builder
@AllArgsConstructor
public class DigitsDto {
    @Digits(integer = 5, fraction = 5)
    private Integer digits;
}
6. Boolean Value Validation
supportType - Boolean, boolean
Validation - @AssertTrue: The value must always be True. - @AssertFalse: The value must always be False.
Usage
@NoArgsConstructor
@Getter
@ToString
public class BooleanDto {
    @AssertTrue
    private boolean assertTrue;
    @AssertFalse
    private boolean assertFalse;
}
7. Size Validation
supportType - CharSequence (length of character sequence) Collection (collection size) Map (map size) Array (array length) - null is also considered valid.
Validation - @Size: The size must be between the specified boundaries (inclusive). Require: int max => The element size must be less than or equal to this value. Require: int min =>The element size must be greater than or equal to this value.
Usage
@NoArgsConstructor
@Getter
@ToString
public class SizeDto {
    @Size(max = 5, min = 3)
    private String size;
}
8. Regex Validation
supportType - CharSequence - null is also considered valid.
Validation - @Pattern:The string must match the specified regular expression. It follows the conventions of Java's Pattern package. Require: String regexp =>Specifies the regex string.
Usage
@NoArgsConstructor
@Getter
@ToString
public class PatternDto {
    //yyyy-mm-dd 형태를 가지는 패턴 조사
    @Pattern(regexp = "^(19|20)\\d{2}-(0[1-9]|1[012])-(0[1-9]|[12][0-9]|3[0-1])$")
    private String pattern;
}
4. @Valid Summary Table
@AssertTrue
Boolean, boolean
The value must always be True.
@DecimalMax
Numeric classes excluding floating-point types.
The number must be less than or equal to the specified maximum value.
String : value (specifies the max value.)
@DecimalMin
Numeric classes excluding floating-point types.
The number must be greater than or equal to the specified minimum value.
String : value (specifies the min value.)
@Digits
BigDecimal, BigInteger, CharSequence, byte, short, int, long, and their corresponding Wrapper classes
The number must be within the allowed range.
int : integer (maximum number of integer digits allowed for this number) int : fraction (maximum number of fractional digits allowed for this number)
@Email
null is also considered valid.
Must be a properly formatted email address.
@Future
Date/time classes
A date or time in the future relative to Now
@FutureOrPresent
Date/time classes
A date or time that is Now or in the future
@Max
Numeric classes excluding floating-point types.
The number must be less than or equal to the specified maximum value.
long : value (specifies the max value)
@Min
Numeric classes excluding floating-point types.
The number must be greater than or equal to the specified minimum value.
long : value (specifies the min value)
@Negative
Numeric classes
The value must be negative.
@NegativeOrZero
Numeric classes
The value must be 0 or negative.
@NotBlank
The value must not be null. Must contain at least one non-whitespace character.
@NotEmpty
CharSequence, Collection, Map, Array
Must not be null or empty (empty string).
@NotNull
Accepts any type.
The value must not be null.
@Null
Accepts any type.
The value must be null.
@Past
Date/time classes
A date or time in the past relative to Now
@PastOrPresent
Date/time classes
A date or time that is Now or in the past
@Pattern
String
The string must match the specified regular expression. Follows the conventions of Java's Pattern package.
String : regexp (specifies the regex string)
@Positive
Numeric classes
The value must be positive.
@PositiveOrZero
Numeric classes
The value must be 0 or positive.
@Size
CharSequence, Collection, Map, Array
The size must be between the specified boundaries (inclusive).
int : max (the element size must be less than or equal to this) int : min (the element size must be greater than or equal to this)
[@ValidAnnotation].List : Defines multiple @ValidAnnotation[] constraints on the same element.
In practice, this doesn't seem to be used very often.
[Related Blog]
I've also uploaded the same content to our team blog.
이번 외주를 맡은 내용이 Google Cloud Storage를 이용해서 file을 업로드, 다운로드하는 API 기능을 구현해서 이 내용을 정리하고자 한다. Cloud Storage를 다루는 방법으로 Google Cloud Console, Cloud SDK를 이용한 command인 gsutil 등이 있지만, Springboot를 이용하여, Cloud Storage의 버킷 및 객체를 Client library 레벨에서 다루는 방법을 살펴보자.
1. Cloud Storage란?
Google Cloud에 객체를 저장하는 서비스이다. 이때 객체는 모든 형식의 파일을 의미하며, 버킷이라는 컨테이너에 객체를 저장한다. 모든 버킷은 프로젝트와 연결되어있으며, 프로젝트의 권한 지정을 통해 원하는 사용자가 storage안 데이터에 액세스 하도록 설정하는 것도 가능하다.
cloud storage의 구조
Organization : 쉽게 유저 계정이라 생각하자. (유저는 N개의 프로젝트를 만들 수 있다.)
Project : 각각의 프로젝트는 하나의 어플리케이션과 연관되어있으며, 각각의 프로젝트는 고유한 cloud storage api와 resource를 가진다.
Bucket : 각 프로젝트는 여러개의 bucket을 가질 수 있다. bucket은 object를 저장하는 컨테이너이다.
google cloud platform console에 접속 후 원하는 project를 생성한다. 프로젝트를 생성하지 않았다면, 프로젝트를 생성한다. 나는 daily-commit이라는 이름의 프로젝트를 사용했다. 왼쪽 상단의 탐색 바를 누른 후 Storage > browser 탭으로 들어간다.
스토리지 브라우저에 들어가서 버킷생성을 누르면 다음과 같이 버킷을 생성할 수 있다. 저장 위치, 데이터 클래스부터 시작해서 storage 라벨까지 고급설정을 세팅할 수 있다. 나는 javabom-storage라는 버킷을 생성했다.
버킷 생성을 위한 gsutil 명령어이다. -p, -c, -l, -b 옵션을 사용하여 버킷에 대한 상세 설정을 커맨드 라인에서 지정할 수 있다.
gsutil mb gs://[BUCKET_NAME]/
생성된 버킷에 들어가면, 현재 내 PC에 있는 파일, 폴더 업로드가 가능함을 알 수 있다. 또한 버킷잠금 탭을 가면 bucket의 생명주기 또한 세팅할 수 있는 기능이 있다. 이 곳에 나는 javaBomLogo.png 파일을 업로드한 상태이다. (드래그 드롭을 이용한 업로드도 가능하다.)
현재 객체의 공개 액세스 상태를 보면 공개아님으로 되어있어승인된 사용자만 객체에 접근할 수 있음을 알수있다. 공개 액세스 상태를 공개로 바꾼다면 모든 사용자가 URL을 이용해서 이 객체에 접근할 수 있겠지만, 현재는 그렇지 않다.
따라서 Springboot에서 내 프로젝트의 Cloud storage에 접근권한을 가질 수 있도록, Access Key를 받아 등록해야한다. 탐색 창을 켜서 IAM 및 관리자 > 서비스 계정 탭으로 들어가 서비스 계정 키를 생성하자.
서비스 계정에서 "+ 서비스 계정 만들기" 버튼을 선택하고, 아래와 같이 서비스 계정에 대한 설정을 완료해준다.
1. 서비스 계정에 대한 이름과 간단한 설명을 기술한다. 2. 내가 생성할 서비스 계정의 권한을 설정해준다. (이 서비스 계정으로 storage object와 관련한 권한을 추가했다. ) 3. key만들기를 선택하여 json 키를 생성하여, 이 json 키를 로컬에 저장한다.
서비스 계정 키를 로컬에 GOOGLE_APPLICATION_CREDENTIALS 환경변수로 설정하면 로컬 환경에서도 설정한 서비스 계정이 권한을 가진 GCP 서비스에 접근할 수 있다.
이제는 생성된 서비스 계정의 정보를 가진 json 키를 springboot에 넣어, springboot 내에서 GCS의 객체에 접근할 수 있게 만들 것이다.
key.json 파일 내용을 살펴보면 type, project_id, private_key_id, private_key 등 storage를 사용하는데 필요한 내용이 저장되어있다. 따라서 application.properties에 키 파일의 경로를 적어주면 스프링 부트는 키 파일의 내용을 바탕으로 stroage 변수에 자동으로 의존성을 부여한다.
3. File Download From Cloud Storage
key.json 파일의 내용을 담은 storage 객체 정보가 bean으로 등록되었으니, 변수 storage를 생성자 주입 혹은 @Autowired를 사용해서 의존성을 주입한다.
이후 아래와 같이 storage.get("버켓 이름", "버켓에서 다운로드할 파일 이름")으로 내 gcs에 있는 객체의 정보를 받아올 수 있다. 다운로드한 파일의 타입은 Blob인데, 이 Blob 타입은 Cloud Storage의 불변 객체이다. 문서를 찾아보니 바이트 배열로 이루어진 데이터이다. 이후 blob.downloadTo("로컬에 저장할 파일 이름"); 를 지정하여 다운로드를 시행한다.
public Blob downloadFileFromGCS() {
	Blob blob = storage.get("버켓이름", "버킷에서 다운로드할 파일 이름");
	blob.downloadTo(Paths.get("로컬에 저장할 파일 이름"));
	return blob;
}
따라서 아래와 같이 간단한 Http API를 만들어 실행해보자.
// GCSController.java

@RestController
@RequiredArgsConstructor
public class GCSController {

    private final GCSService gcsService;

    @PostMapping("gcs/download")
    public ResponseEntity localDownloadFromStorage(@RequestBody DownloadReqDto downloadReqDto){
        Blob fileFromGCS = gcsService.downloadFileFromGCS(downloadReqDto);
        return ResponseEntity.ok(fileFromGCS.toString());
    }
}

// GCSService.java

@Service
@RequiredArgsConstructor
public class GCSService {

    private final Storage storage;

    public Blob downloadFileFromGCS(String bucketName, String downloadFileName, String localFileLocation) {
        Blob blob = storage.get(bucketName, downloadFileName);
        blob.downloadTo(Paths.get(localFileLocation));
        return blob;
    }
}

// DownloadReqDto.java

@AllArgsConstructor
@Getter
public class DownloadReqDto {
    private String bucketName;
    private String downloadFileName;
    private String localFileLocation;
}
이 API를 이용하여 javabom-storage에 있는 JavaBomLogo.png 파일을 내 local에 저장해보도록 하겠다.
intellij 플러그인으로 확인한 내 cloud storage 객체 리스트 (좌), 다운로드 받을 파일인 JavaBomLogo.png 파일 (우)
아래와 같이 API를 호출하면, 현재 내 프로젝트에 download/java-bom.png 파일이 다운로드되어야 한다.
다만 가끔 에러가 터지는 경우가 있는데, 그 이유는 내 프로젝트 내에 download 폴더가 없기 때문이다. download 폴더를 추가하고 다운로드하면 잘 되므로 코드단에서는 Files 모듈을 사용해서 mkdir() 등을 해주는 로직으로 방어해주어야 한다.
download 폴더를 추가해준 후, API를 호출하니 내 로컬 프로젝트 안에 GCS에 있던 파일은 java-bom.png파일이 잘 다운로드됨을 확인할 수 있다.
4. File Upload To Cloud Storage
download 로직과 마찬가지로 storage를 생성자 주입 혹은@Autowired를 사용해서 의존성을 주입한다.
upload는 GCS에 Blob파일을 만드는 것이기 때문에, BlobInfo의 Builder를 이용하여 cloud storage에 객체를 생성해준다. download와 마찬가지로 객체를 생성할 버켓 이름, 버켓에 저장할 파일 이름을 적어주며, 로컬에서 업로드할 파일 이름도 적어주어야 한다.
이때 BlobInfo의 Builder를 이용해 Acl 설정을 통해 업로드할 객체의 권한을 코드로 설정할 수 있을 뿐 아니라 객체의 ContentsType 설정도 가능하다.
public BlobInfo uploadFileToGCS() throws IOException {

        BlobInfo blobInfo =storage.create(
                BlobInfo.newBuilder("버켓 이름", "버켓에 업로드할 파일 이름")
                        .setAcl(new ArrayList<>(Arrays.asList(Acl.of(Acl.User.ofAllAuthenticatedUsers(), Acl.Role.READER))))
                        .build(),
                new FileInputStream("로컬에서 업로드 할 파일이름"));

        return blobInfo;
}
마찬가지로 Http API를 작성해보자
// GCSController.java

@RestController
@RequiredArgsConstructor
public class GCSController {

    private final GCSService gcsService;

    @PostMapping("gcs/upload")
    public ResponseEntity localUploadToStorage(@RequestBody UploadReqDto uploadReqDto) throws IOException {
        BlobInfo fileFromGCS = gcsService.uploadFileToGCS(uploadReqDto);
        return ResponseEntity.ok(fileFromGCS.toString());
    }
}

// GCSService.java

@Service
@RequiredArgsConstructor
public class GCSService {

    private final Storage storage;

    @SuppressWarnings("deprecation")
    public BlobInfo uploadFileToGCS(UploadReqDto uploadReqDto) throws IOException {

        BlobInfo blobInfo =storage.create(
                BlobInfo.newBuilder(uploadReqDto.getBucketName(), uploadReqDto.getUploadFileName())
                        .setAcl(new ArrayList<>(Arrays.asList(Acl.of(Acl.User.ofAllAuthenticatedUsers(), Acl.Role.READER))))
                        .build(),
                new FileInputStream(uploadReqDto.getLocalFileLocation()));

        return blobInfo;
    }

}

// UploadReqDto.java

@AllArgsConstructor
@Getter
public class UploadReqDto {
    private String bucketName;
    private String uploadFileName;
    private String localFileLocation;
}
이 API를 이용하여 내 local 프로젝태 내에 있는 upload/jyamiLogo.png 파일을 GCS에 업로드하겠다.
내 프로젝트내 업로드할 파일 디렉터리 구조 (좌), 업로드할 파일인 jyamiLogo.png 파일 (우)
아래와 같이 API를 호출하면, 내 GCS 내에 있는 javabom-storage 버켓에 uploadGCS/jyamiLogo.png라는 폴더구조를 가진 객체가 생성되어야 한다.
구글 콘솔이나 인텔리제이 플러그인으로 storage를 확인하면 아래와 같이 파일이 잘 업로드됨을 확인할 수 있다.
콘솔 웹 (좌) / 인텔리제이 플러그인 (우)
구글에서 객체를 업로드할 때 파일명 자체를, [폴더 경로]/[파일명] 구조로 저장하기 때문에, 따로 GCS내에 폴더를 추가하는 로직 없이 업로드가 가능하다.
추가. intellij cloud code plugin
플러그인을 사용하면 웹 콘솔을 사용하지 않아도 편리하게 cloud storage의 내용을 확인할 수 있다.
For a recent freelance project, I implemented file upload and download API features using Google Cloud Storage, so I'd like to summarize what I learned. There are various ways to work with Cloud Storage, such as using the Google Cloud Console or the gsutil command via Cloud SDK, but let's take a look at how to manage Cloud Storage buckets and objects at the client library level using Spring Boot.
1. What is Cloud Storage?
It's a service for storing objects in Google Cloud. Here, objects refer to files of any format, and they are stored in containers called buckets. Every bucket is associated with a project, and by configuring project permissions, you can control which users have access to the data in storage.
Structure of Cloud Storage
Organization : Think of it simply as a user account. (A user can create N projects.)
Project : Each project is associated with a single application, and each project has its own unique Cloud Storage API and resources.
Bucket : Each project can have multiple buckets. A bucket is a container that stores objects.
1. Creating a Google Cloud Storage Bucket and Adding Objects
I used the Web Console for the Google Cloud Storage Bucket creation process. https://cloud.google.com/
After accessing the Google Cloud Platform console, create the project you want. If you haven't created a project yet, go ahead and create one. I used a project named daily-commit. Click the navigation bar in the upper left corner and go to Storage > browser tab.
Once you enter the storage browser and click "Create Bucket," you can create a bucket as shown below. You can configure advanced settings ranging from storage location and data class to storage labels. I created a bucket named javabom-storage.
Here's the gsutil command for creating a bucket. You can specify detailed bucket settings from the command line using the -p, -c, -l, and -b options.
gsutil mb gs://[BUCKET_NAME]/
When you enter the created bucket, you can see that it's possible to upload files and folders from your local PC. Also, if you go to the bucket lock tab, there's a feature to set the bucket's lifecycle as well. I've already uploaded a javaBomLogo.png file here. (Upload via drag and drop is also supported.)
If you look at the current public access status of the object, it's set to "Not public," which means only authorized users can access the object. If you change the public access status to public, all users could access this object via URL, but that's not the case right now.
Therefore, in order for Spring Boot to have access permissions to the Cloud Storage of my project, we need to obtain and register an Access Key. Open the navigation menu and go to IAM & Admin > Service Accounts tab to create a service account key.
In Service Accounts, click the "+ Create Service Account" button and complete the service account settings as shown below.
1. Enter a name and brief description for the service account. 2. Set the permissions for the service account you're creating. (I added permissions related to storage objects for this service account.) 3. Select "Create Key" to generate a JSON key, and save this JSON key locally.
If you set the service account key as the GOOGLE_APPLICATION_CREDENTIALS environment variable locally, you can access GCP services that the configured service account has permissions for, even in your local environment.
Now we're going to add the JSON key containing the created service account information into Spring Boot, so that we can access GCS objects from within Spring Boot.
For reference, Google Cloud Platform provides various Spring Boot dependencies, but the services available through Spring Boot Initializer are limited to GCP Storage, GCP Messaging, and GCP Support.
Simple project structure for implementation
Then, you need to register the key file in application.properties so that the Spring Boot project can access the storage. Place the JSON key file you downloaded earlier into the resources folder and register the classpath as shown below.
The name of the JSON key file I downloaded is daily-commit-265411-498dc92a620d.json.
If you look at the contents of the key.json file, it contains information needed to use storage such as type, project_id, private_key_id, private_key, etc. So when you specify the key file path in application.properties, Spring Boot will automatically inject the dependency into the storage variable based on the key file's contents.
3. File Download From Cloud Storage
Since the storage object information containing the key.json file contents has been registered as a bean, inject the dependency for the storage variable using constructor injection or @Autowired.
Then, as shown below, you can retrieve information about objects in your GCS using storage.get("bucket name", "file name to download from bucket"). The type of the downloaded file is Blob, which is an immutable object in Cloud Storage. Looking at the documentation, it's data consisting of a byte array. After that, specify blob.downloadTo("file name to save locally"); to perform the download.
public Blob downloadFileFromGCS() {
	Blob blob = storage.get("버켓이름", "버킷에서 다운로드할 파일 이름");
	blob.downloadTo(Paths.get("로컬에 저장할 파일 이름"));
	return blob;
}
So let's create a simple HTTP API as shown below and try it out.
// GCSController.java

@RestController
@RequiredArgsConstructor
public class GCSController {

    private final GCSService gcsService;

    @PostMapping("gcs/download")
    public ResponseEntity localDownloadFromStorage(@RequestBody DownloadReqDto downloadReqDto){
        Blob fileFromGCS = gcsService.downloadFileFromGCS(downloadReqDto);
        return ResponseEntity.ok(fileFromGCS.toString());
    }
}

// GCSService.java

@Service
@RequiredArgsConstructor
public class GCSService {

    private final Storage storage;

    public Blob downloadFileFromGCS(String bucketName, String downloadFileName, String localFileLocation) {
        Blob blob = storage.get(bucketName, downloadFileName);
        blob.downloadTo(Paths.get(localFileLocation));
        return blob;
    }
}

// DownloadReqDto.java

@AllArgsConstructor
@Getter
public class DownloadReqDto {
    private String bucketName;
    private String downloadFileName;
    private String localFileLocation;
}
I'll use this API to save the JavaBomLogo.png file from javabom-storage to my local machine.
Cloud Storage object list verified via IntelliJ plugin (left), JavaBomLogo.png file to download (right)
When you call the API as shown below, the file download/java-bom.png should be downloaded to my current project.
However, you might occasionally run into errors, and the reason is that the download folder doesn't exist in my project. It works fine once you add the download folder, so in your code you should add defensive logic using the Files module with something like mkdir().
After adding the download folder and calling the API, I can confirm that the file from GCS, java-bom.png, was successfully downloaded into my local project.
4. File Upload To Cloud Storage
Just like the download logic, inject the storage dependency using constructor injection or@Autowired.
Since upload is about creating a Blob file in GCS, we use BlobInfo's Builder to create an object in Cloud Storage. Similar to download, you need to specify the bucket name where the object will be created, the file name to save in the bucket, and the local file name to upload.
At this point, using BlobInfo's Builder, you can not only set the uploaded object's permissions through Acl configuration in code, but also configure the object's ContentType.
public BlobInfo uploadFileToGCS() throws IOException {

        BlobInfo blobInfo =storage.create(
                BlobInfo.newBuilder("버켓 이름", "버켓에 업로드할 파일 이름")
                        .setAcl(new ArrayList<>(Arrays.asList(Acl.of(Acl.User.ofAllAuthenticatedUsers(), Acl.Role.READER))))
                        .build(),
                new FileInputStream("로컬에서 업로드 할 파일이름"));

        return blobInfo;
}
Let's write the HTTP API as well.
// GCSController.java

@RestController
@RequiredArgsConstructor
public class GCSController {

    private final GCSService gcsService;

    @PostMapping("gcs/upload")
    public ResponseEntity localUploadToStorage(@RequestBody UploadReqDto uploadReqDto) throws IOException {
        BlobInfo fileFromGCS = gcsService.uploadFileToGCS(uploadReqDto);
        return ResponseEntity.ok(fileFromGCS.toString());
    }
}

// GCSService.java

@Service
@RequiredArgsConstructor
public class GCSService {

    private final Storage storage;

    @SuppressWarnings("deprecation")
    public BlobInfo uploadFileToGCS(UploadReqDto uploadReqDto) throws IOException {

        BlobInfo blobInfo =storage.create(
                BlobInfo.newBuilder(uploadReqDto.getBucketName(), uploadReqDto.getUploadFileName())
                        .setAcl(new ArrayList<>(Arrays.asList(Acl.of(Acl.User.ofAllAuthenticatedUsers(), Acl.Role.READER))))
                        .build(),
                new FileInputStream(uploadReqDto.getLocalFileLocation()));

        return blobInfo;
    }

}

// UploadReqDto.java

@AllArgsConstructor
@Getter
public class UploadReqDto {
    private String bucketName;
    private String uploadFileName;
    private String localFileLocation;
}
I'll use this API to upload the upload/jyamiLogo.png file from my local project to GCS.
Directory structure of the file to upload in my project (left), jyamiLogo.png file to upload (right)
When you call the API as shown below, an object with the folder structure uploadGCS/jyamiLogo.png should be created in the javabom-storage bucket in my GCS.
If you check the storage through the Google Console or IntelliJ plugin, you can confirm that the file was uploaded successfully as shown below.
Console web (left) / IntelliJ plugin (right)
Since Google stores the file name itself in a [folder path]/[file name] structure when uploading objects, you can upload without any additional logic to create folders within GCS.
Bonus: IntelliJ Cloud Code Plugin
Using the plugin, you can conveniently check Cloud Storage contents without using the web console.
크롤링 테스트를 위한 mock server test 구축 | Mock Server Test Setup for Crawling Tests
쟈 미
728x90
Java의 Jsoup을 이용해서 페이지를 크롤링을 하는 코드는 찾아보면 많지만, 크롤링을 테스트하는 코드는 찾기 어려웠다. 따라서 크롤링 테스트를 짜기 위해 직접 nginx 서버를 띄어서 그 서버를 크롤링 하기도 하는 등 JavaBom 스터디원과 구현해본 크롤링 테스트에 대한 포스팅을 하게되었다.
참고로 nginx 서버를 띄어서 크롤링 하는것은 실제 서버라서 크롤링 테스트의 의미가 없는 것 같다. 실제 서버가 죽으면 크롤링 테스트도 못하므로 결국은 @Ignore를 걸어야하는 테스트이기 때문이다.
내가 생각하기에 크롤링 테스트에서 쟁점은 2가지 이다.
1. Parsing 테스트
[ 목적 ] 페이지의 html 파일에서 크롤링을 통해 원하는 정보만을 가져왔는지 체크한다.
[ 구현 방식 ] 크롤링을 원하는 페이지를 ctrl+s 를 이용해서 .html 파일로 받아온 후, 해당 html 파일을 내 springboot project의 resource에 저장한다. 이후 이 파일을 받아와, 내가 만든 크롤링 코드를 돌려서, 내가 파싱한 정보가 원하는 대로 크롤링이 잘 되었는지 확인한다. ex ) 네이버 영화 html 에서 찾아온 영화 리스트의 항목이 10개가 맞는가 ex ) 크롤링 한 영화의 title이 "마션"이 맞는가 등등 (젤 좋아하는 영화ㅋ)
2. connect 테스트
[ 목적 ] 크롤링으로 해당 페이지를 받아오겠다는 요청을 보내고 응답을 받아 내가 만든 크롤링 코드가 잘 동작하는지를 체크한다.
[ 구현방식 ] test를 위한 Mockserver를 하나 생성한다. 우리가 보는 영화 페이지가 GET 메서드로 URL 요청을 보낼 경우 html 페이지를 리턴하는 것처럼, jsoup connect의 결과를 확인하기 위한 mock server를 만드는 것이다. 이 mock server 역시 내가 크롤링을 원하는 네이버 영화 페이지처럼 특정 URL 을 GET 메소드를 통해 호출할 경우 특정 html 파일을 보내도록 지정한다.
[ 기능 ] 1. 고정된 response를 만들고 return 할 수 있다. 2. request를 다른 서버에 forwarding 한다. 3. callbacks 실행이 가능하다. 4. request를 확인할 수 있다.
오늘 포스팅을 위해 사용할 크롤링 코드 + 페이지는 네이버 영화의 랭킹 페이지를 이용하려 한다.
// NaverMovieCrawler.java

public class NaverMovieCrawler {

    public static void main(String[] args) {
        Document document = new NaverMovieCrawler().getCrawlingResult("https://movie.naver.com/movie/sdb/rank/rmovie.nhn");
        TopMovieList topMovieList = new TopMovieList(document);
        System.out.println(topMovieList.toString());
    }

    // url 을 보내면, 해당 페이지를 크롤링하여 Document 타입을 리턴한다.
    public Document getCrawlingResult(String url){
        try {
            return Jsoup.connect(url)
                    .timeout(2000)
                    .get();
        } catch (IOException e) {
            throw new RuntimeException("crawling 실패");
        }
    }
}
스프링 부트로 API를 만들어도 좋지만, 일단은 간단하게 main을 만들어주고 돌려보았다. 여기서 중요한게 Jsoup.connect(url) 이부분인데, mockserver 테스트를 하는 이유라고 볼 수 있다. Jsoup의 connect() 메소드는 기본적으로 get 매핑을 요청하며, 이외에도 Jsoup에서 제공하는 다양한 메서드를 체이닝해서 좀 더 구체적인 요청을 보낼 수 있다.
그러나 크롤링하려는 네이버 영화 페이지의 html 파일을 받는 요청이므로 Get 메서드 + URL 매핑으로 간단하게 connect() 메소드를 마무리 할 수 있다.
@AllArgsConstructor
@Getter
public class TopMovieList {

    private List<Movie> topMovies = new ArrayList<>();

    public TopMovieList(Document document){
        this.topMovies = document.select("table.list_ranking tr").stream()
                .filter(x -> !x.select(".ac").isEmpty())
                .map(Movie::of)
                .collect(Collectors.toList());
    }

    @Override
    public String toString() {
        return topMovies.stream()
                .map(Movie::toString)
                .collect(Collectors.joining(", \n"));
    }
}
main에서 보면 알다싶이 나는 TopMovieList 라는 일급컬렉션 객체를 만들었다. Jsoup을 이용해 받아온 Document객체를 (html 전체를 리턴한다) 파싱하여 List<Movie>를 만든다. 이때 Movie 객체 하나하나를 만들기 위해서 네이버 영화 랭킹의 테이블 row를 하나씩 분리해서 Movie 객체의 of() 메서드를 이용해서 테이블 row 하나하나에서의 데이터를 분리하는 파싱은 Movie 객체에 맡긴다.
// Movie.java

public class Movie {
    private int rank;
    private String title;
    private String detailLink;

    @Builder
    private Movie(int rank, String title, String detailLink) {
        this.rank = rank;
        this.title = title;
        this.detailLink = detailLink;
    }

    public static Movie of (Element element){
        return Movie.builder()
                .rank(Integer.parseInt(element.select(".ac img").attr("alt")))
                .title(element.select(".title").text())
                .detailLink(element.select(".title a").attr("href"))
                .build();
    }

    @Override
    public String toString() {
        return "Movie{" +
                "rank='" + rank + '\'' +
                ", title='" + title + '\'' +
                ", detailLink='" + detailLink + '\'' +
                '}';
    }
}
Movie 객체에서는 List<Movie>의 생성자에서 받아온 네이버 영화 랭킹 테이블의 row 한 줄인 Element를 인자로 받아, 데이터를 바인딩해준다. 개발자도구를 이용해 내가 원하는 데이터만을 분리할 수 있도록 css selector를 적절히 사용한다.
가장 먼저 크롤링 하려는 네이버 영화 페이지로 가서 html을 다운받는다. 내가 request와 response를 지정한 mock-server가 네이버 영화 페이지의 html 파일을 리턴해야하기 때문이다.
나는 ranking_naver_move.html 이라는 이름으로 저장했다. 그리고 이렇게 다운 받은 파일을 test > resources 폴더 안에 넣는다. 추가로 초반에 말한 parsing test와 관련해서 테스트 코드를 구현하느라 나는 하나의 html 파일이 더 생기게되었다.
mock-server와 관련한 테스트를 할 경우에, 테스트 시작 전, mock-server를 열어주어야한다. 그리고 테스트가 끝나면 mock-server를 닫아주어야한다. 따라서 테스트코드의 시작과 전에 해당 메소드를 써준다.
// NaverMovieCrawlerTest.java

public class NaverMovieCrawlerTest {

    private static final int PORT = 9000;
    private static ClientAndServer mockServer;

    @BeforeEach
    void setUp() {
        mockServer = ClientAndServer.startClientAndServer(PORT);
        System.out.println("mock server start");
    }

    @AfterEach
    void tearDown() {
        mockServer.stop();
        System.out.println("mock server stop");
    }
@Test 어노테이션을 붙인 빈 테스트를 만들고 이 테스트를 돌려보면 아래와 같이 엄청난 로그가 뜬다. 몇몇 눈에 띄는 로그를 읽어보면 java version, cachesize 등을 자동으로 설정함을 알 수 있다.
또한, 인자로 PORT값 즉 9000을 넣은 것은 잠깐 뜨는 mock-server의 포트를 지정한 것인데, 실제로 sout을 찍은 부분 이후 즉, startClientAndServer 메소드가 실행된 이후, 9000포트로 mock-server가 설정되었다는 로그가 출력됨을 알 수 있다.
이제 mock-server의 자세한 세팅을 해보자. 내가 구현하려는 mock-server는 네이버 영화 랭킹 페이지와 같은 역할을 수행해야한다. 따라서 네이버 랭킹 페이지를 나타내는 path인 "/movie/sdb/rank/rmovie.nhn"을 입력할 경우 html 파일을 리턴하도록 mock-server의 기능을 설정해주어야 한다. 이는 아래 보다 싶이 .when()과 .response() 메소드를 이용해서 설정할 수 있다.
when 부분에는 mock-server에서 받을 request 그리고 respond 부분에는 when에서 정의한 request를 받았을 때 실행할 response 값을 설정해 준다.
가장 먼저 mock-server host인 localhost, 그리고 mock-server를 실행할 port를 적어준다. 이때 mock-server를 가장먼저 시작할 때 사용하는 메서드인 ClientAndServer.startClientAndServer() 에서 만든 mockserver의 port를 적어주었기 때문에, 이때 사용한 port와 똑같이 적어준다. 따라서 PORT(9000)을 할당하였다.
request로는 네이버 영화 랭킹 페이지의 URL인"/movie/sdb/rank/rmovie.nhn"를 GET 메소드로 호출하도록 정의하고, 이 경우에는 response는 statusCode 200과 함께 랭킹페이지 html을 넘겨주도록 지정하였다. (response 변수)
이때 response 변수는 아까 저장한 네이버 영화 랭킹 페이지의 html 파일이 리턴되어야 하므로, 아래와 같이 Stream 형태로 html 파일의 내용을 받아오는 로직을 짰다. (인자로는 리턴 받을 html 파일을 적어준다)
There are plenty of examples out there for crawling pages using Java's Jsoup, but it was hard to find code for testing the crawling. So I ended up writing this post about crawling tests that I implemented with the JavaBom study group — including spinning up an nginx server and crawling from it.
By the way, crawling from an nginx server doesn't really serve as a proper crawling test since it's an actual server. If the real server goes down, the crawling test can't run either, so you'd end up having to slap @Ignore on it anyway.
In my opinion, there are two key points when it comes to crawling tests.
1. Parsing Test
[ Purpose ] Verify that only the desired information was extracted from the page's HTML file through crawling.
[ Implementation ] Save the page you want to crawl as an .html file using ctrl+s, then store that HTML file in your Spring Boot project's resources. After that, load the file, run your crawling code against it, and verify that the parsed information matches what you expected. e.g.) Does the movie list extracted from the Naver Movie HTML have exactly 10 items? e.g.) Is the crawled movie title "The Martian"? etc. (my favorite movie lol)
2. Connect Test
[ Purpose ] Send a request to fetch the page via crawling, receive a response, and verify that your crawling code works correctly.
[ Implementation ] Create a mock server for testing. Just like how a movie page returns an HTML page when you send a URL request via GET method, we create a mock server to verify the result of Jsoup's connect. This mock server is configured so that when a specific URL is called via GET method — just like the Naver Movie page we want to crawl — it returns a specific HTML file.
[ Features ] 1. You can create and return a fixed response. 2. It can forward requests to another server. 3. It can execute callbacks. 4. You can inspect the requests.
For today's post, I'll be using the Naver Movie ranking page as the crawling target.
I used Jsoup for crawling and added Lombok to use the Builder pattern.
// NaverMovieCrawler.java
public class NaverMovieCrawler {
public static void main(String[] args) {
Document document = new NaverMovieCrawler().getCrawlingResult("https://movie.naver.com/movie/sdb/rank/rmovie.nhn");
TopMovieList topMovieList = new TopMovieList(document);
System.out.println(topMovieList.toString());
}
// url 을 보내면, 해당 페이지를 크롤링하여 Document 타입을 리턴한다.
public Document getCrawlingResult(String url){
try {
return Jsoup.connect(url)
.timeout(2000)
.get();
} catch (IOException e) {
throw new RuntimeException("crawling 실패");
}
}
}
It would be fine to build a Spring Boot API, but for now I just created a simple main method and ran it. The important part here is Jsoup.connect(url) — and this is essentially the reason we need mock server testing. Jsoup's connect() method basically sends a GET request, and you can chain various other methods provided by Jsoup to send more specific requests.
However, since we're just fetching the HTML file of the Naver Movie page, we can keep the connect() method simple with just a GET method + URL mapping.
@AllArgsConstructor
@Getter
public class TopMovieList {
private List<Movie> topMovies = new ArrayList<>();
public TopMovieList(Document document){
this.topMovies = document.select("table.list_ranking tr").stream()
.filter(x -> !x.select(".ac").isEmpty())
.map(Movie::of)
.collect(Collectors.toList());
}
@Override
public String toString() {
return topMovies.stream()
.map(Movie::toString)
.collect(Collectors.joining(", \n"));
}
}
As you can see in the main method, I created a first-class collection object called TopMovieList. It parses the Document object fetched via Jsoup (which returns the entire HTML) to build a List<Movie>. To create each individual Movie object, I split the table rows from the Naver Movie ranking table and delegate the parsing of each row's data to the Movie object's of() method.
// Movie.java
public class Movie {
private int rank;
private String title;
private String detailLink;
@Builder
private Movie(int rank, String title, String detailLink) {
this.rank = rank;
this.title = title;
this.detailLink = detailLink;
}
public static Movie of (Element element){
return Movie.builder()
.rank(Integer.parseInt(element.select(".ac img").attr("alt")))
.title(element.select(".title").text())
.detailLink(element.select(".title a").attr("href"))
.build();
}
@Override
public String toString() {
return "Movie{" +
"rank='" + rank + '\'' +
", title='" + title + '\'' +
", detailLink='" + detailLink + '\'' +
'}';
}
}
The Movie object takes an Element — a single row from the Naver Movie ranking table passed from the List<Movie> constructor — and binds the data. I used appropriate CSS selectors with the browser's developer tools to extract only the data I needed.
When you print the resulting List<Movie> object using toString() in the main method, you can see the output above, confirming that the crawling worked correctly.
2. Creating a MockServer
Add the modules needed for mock-server creation and testing. I used JUnit 5 for the tests.
First, go to the Naver Movie page you want to crawl and download the HTML. This is because the mock server — where we define our own request and response — needs to return the Naver Movie page's HTML file.
I saved it as ranking_naver_move.html. Then I placed the downloaded file inside the test > resources folder. Additionally, I ended up with one more HTML file because I implemented test code related to the parsing test I mentioned earlier.
When running tests related to the mock server, you need to start the mock server before each test and shut it down after each test. So we add those methods before and after the test code.
// NaverMovieCrawlerTest.java
public class NaverMovieCrawlerTest {
private static final int PORT = 9000;
private static ClientAndServer mockServer;
@BeforeEach
void setUp() {
mockServer = ClientAndServer.startClientAndServer(PORT);
System.out.println("mock server start");
}
@AfterEach
void tearDown() {
mockServer.stop();
System.out.println("mock server stop");
}
If you create an empty test with the @Test annotation and run it, you'll see a massive amount of logs like the ones below. Reading through some of the notable ones, you can see it automatically configures things like the Java version and cache size.
Also, the PORT value of 9000 passed as an argument specifies the port for the temporary mock server. After the sout line — that is, after the startClientAndServer method executes — you can see a log confirming that the mock server has been set up on port 9000.
Now let's do the detailed setup of the mock server. The mock server I'm building needs to perform the same role as the Naver Movie ranking page. So when the path "/movie/sdb/rank/rmovie.nhn" — which represents the Naver ranking page — is requested, it should return an HTML file. As you can see below, this can be configured using the .when() and .respond() methods.
The when part defines the request the mock server will receive, and the respond part defines the response to return when that request is matched.
First, specify localhost as the mock server host, and then the port to run the mock server on. Since we already specified the port when starting the mock server with the ClientAndServer.startClientAndServer() method, we use the same port here. So I assigned PORT(9000).
For the request, I defined it to call the Naver Movie ranking page URL "/movie/sdb/rank/rmovie.nhn" via GET method. In that case, the response is configured to return a status code of 200 along with the ranking page HTML. (the response variable)
The response variable needs to contain the HTML file of the Naver Movie ranking page that we saved earlier, so I wrote logic to read the HTML file contents as a Stream. (The argument specifies which HTML file to return.)
After finishing the mock server setup, if you run @Test with just the createNaverRankingPageServer() method, you'll see more logs — which, if you read through them, describe the mock server configuration you set up.
3. Parsing and Connect Tests Using MockServer
Now that the mock server setup is all done, let's write the crawling code to test. Call the createPathNoteServer() method we implemented earlier, which defines the mock server's request and response. (The argument represents the response value.)
Then, plug in the crawling code to fetch results from the mock server's address, port, and URL, and test the values.
[GET] http://localhost:9000/movie/sdb/rank/rmovie.nhn host localhost port 9000 path /movie/sdb/rank/rmovie.nhn
If you leave out "http" when writing the URL, it won't be recognized! Watch out for that.
 // NaverMovieCrawlerTest.java

    @BeforeEach
    void setUp() {
        mockServer = ClientAndServer.startClientAndServer(PORT);
        System.out.println("mock server start");
    }

    @Test
    public void naverMovieMockServerTest(){

        createNaverRankingPageServer("ranking_naver_movie.html");
        Document document = new NaverMovieCrawler().getCrawlingResult("http://localhost:9000/movie/sdb/rank/rmovie.nhn");
        TopMovieList topMovieList = new TopMovieList(document);
        assertThat(topMovieList.getTopMovies().size()).isEqualTo(50);

    }

    @AfterEach
    void tearDown() {
        mockServer.stop();
        System.out.println("mock server stop");
    }
After completing the code and running it, the test passed — confirming that the crawled data came through properly and parsing was completed successfully.
For the crawling parsing test, I used the Movie.test / TopMovieList.test files in the GitHub repo to verify that the crawling logic binds the data to objects exactly as I intended.
But the code is pretty straightforward, so I've omitted it here. Check out the GitHub repo :)
[Related Blog]
This post was written through the JavaBom study group, and we have a team blog :) The same content has been uploaded there as well.
java.lang.NoSuchMethodError:'com.google.api.client.http.HttpRequest com.google.api.client.http.HttpRequest.setResponseReturnRawInputStream(boolean)' at com.google.api.client.googleapis.services.AbstractGoogleClientRequest.buildHttpRequest(AbstractGoogleClientRequest.java:434) ~[google-api-client-1.30.4.jar:1.30.4]
외부 라이브러리로 .jar 파일을 추가하면서 정말 골치를 썩었던 문제였다.
분명, 내가 build.gradle에 추가한 dependency는 가장 상위버전이고, NoSuchMethodError 와 관련한 글을 구글링 해보았을 때 하위 버전에서 발생하는 문제이니 상위버전으로 version을 업데이트 하라는 해결을 준다.
그런데 intellij 상으로 아래 메세지를 보면 1.30.4 버전으로 가장 상위버전으로 표시가 된다.
이때 의심해야할 것은 외부 라이브러리에서도 똑같은 dependency를 사용하는데 외부 라이브러리의 버전이 낮을 경우이다.
이 경우에 classPath에 혼동이 생겨서 일어난 에러로 보인다. 내가 build.gradle에 추가한대로 현재 프로젝트의 classpath를 따라야하는데, 외부 라이브러리인 jar 파일의 classpath와의 충돌 때문인 것 같다.
Solution : 나는 이경우에 외부 라이브러리인 jar 파일을 압축 해제후, 해당 모듈을 지우고 다시 jar로 압축하는 방식을 사용했다.
jar 파일 압축 / 압축 해제
jar 파일을 라이브러리로 만드려는 과정에서, jar 파일안에 사용되는 라이브러리 gson, slf4j 두개가 내가 사용하는 springboot dependency와 충돌이 나는 상황이 있었다.
Once you add this to build.gradle and run build gradle, you'll be able to load and use the Java files inside the external .jar library you added, as shown below.
3. Adding a dependency by turning a local directory into a library
This is also a way to add the libs/something_local.jar file.
java.lang.NoSuchMethodError:'com.google.api.client.http.HttpRequest com.google.api.client.http.HttpRequest.setResponseReturnRawInputStream(boolean)' at com.google.api.client.googleapis.services.AbstractGoogleClientRequest.buildHttpRequest(AbstractGoogleClientRequest.java:434) ~[google-api-client-1.30.4.jar:1.30.4]
This was a really frustrating issue I ran into while adding an external .jar file as a library.
The dependency I added to build.gradle was clearly the latest version, and when I googled about NoSuchMethodError, the solutions all said it's an issue with older versions and to update to a newer version.
But looking at the message in IntelliJ below, it shows version 1.30.4, which is the latest version.
What you should suspect in this case is when the external library also uses the same dependency but with a lower version.
This error seems to be caused by confusion in the classPath. The current project should follow the classpath I specified in build.gradle, but it appears to conflict with the classpath of the external jar library.
Solution: In my case, I extracted the external jar file, removed the conflicting module, and then repackaged it as a jar.
Compressing / Extracting jar files
While trying to turn a jar file into a library, there was a situation where two libraries used inside the jar file — gson and slf4j — were conflicting with my Spring Boot dependencies.
So I initially tried to remove those two modules using the method below.
test {
    useJUnitPlatform()
}

dependencies {
    testImplementation 'org.springframework.boot:spring-boot-starter-test'
    testCompile("org.assertj:assertj-core:3.11.1")
}
1. assertAll
User user = new User();
assertAll(
    () -> asssertThat(user.getId()).isEqualTo(1L),    //1
    () -> asssertThat(user.getName()).isEqualTo("jyami"),    //2
    () -> asssertThat(user.getEmail()).isEqualTo("mor222293@gmail.com")    //3
);
이전의 Junit4에서는 assertEquals을 검증할 때, 위에부터 하나씩 실행하는데, 위에서 실패하면 아래에있는 assertEquals를 실행하지 않는다.즉, 주석의 1번의 assertEquals에서 실패했으면 2, 3번의 assertEquals는 실행하지 않는다. 그러나 assertAll을 사용하면, 1번에서 실패했어도 2번 3번도 실행한다.
2. @DisplayName
@DisplayName("유저 테스트")
public class UserTest {

    @DisplayName("유저의 이름을 테스트 해보자!")
    @Test
    void someTest() {
        User user = new User();
        assertThat(user.getName()).isEqualTo("jyami");
    }
이렇게 할 경우에는, DisplayName을 이용해서 test의 목적을 명확히 명시할 수 있다.
contains는 순서와 상관 없이 실제 그룹이 주어진 값들을 포함하고 있는지를 테스트한다. 그래서 위 두 줄의 테스트는 모두 통과한다.
2. containsExactly()
@Test
void containsExactlyTest() {
	List<Integer> integers = Arrays.asList(1, 2, 3);
	assertThat(integers).containsExactly(1, 2, 3);	//테스트 통과
	assertThat(integers).containsExactly(2, 1, 3);	//테스트 통과 X
	assertThat(integers).containsExactly(1, 2);	//테스트 통과 X
}
contains는 순서까지 고려해서 실제 그룹이 주어진 값들을 포함하고 있는지를 테스트한다 그래서 첫번째 줄의 테스트는 통과하지만, 두번째 줄의 테스트는 통과하지 못한다.
이때 주의할 점은 원소 하나라도 빠지면 테스트를 통과하지 못한다. 정말로 정확하게 일치하는 list여야 하는 것!
업데이트 예정인 게시글 입니다.
0. build.gradle
test {
    useJUnitPlatform()
}

dependencies {
    testImplementation 'org.springframework.boot:spring-boot-starter-test'
    testCompile("org.assertj:assertj-core:3.11.1")
}
1. assertAll
User user = new User();
assertAll(
    () -> asssertThat(user.getId()).isEqualTo(1L),    //1
    () -> asssertThat(user.getName()).isEqualTo("jyami"),    //2
    () -> asssertThat(user.getEmail()).isEqualTo("mor222293@gmail.com")    //3
);
In the previous JUnit4, when verifying with assertEquals, it executes them one by one from the top, and if one fails, it doesn't execute the ones below it. In other words, if assertEquals #1 in the comments fails, assertEquals #2 and #3 won't run. However, if you use assertAll, even if #1 fails, #2 and #3 still get executed.
2. @DisplayName
@DisplayName("유저 테스트")
public class UserTest {

    @DisplayName("유저의 이름을 테스트 해보자!")
    @Test
    void someTest() {
        User user = new User();
        assertThat(user.getName()).isEqualTo("jyami");
    }
By doing this, you can use DisplayName to clearly state the purpose of each test.
contains tests whether the actual group contains the given values regardless of order. So both lines of tests above will pass.
2. containsExactly()
@Test
void containsExactlyTest() {
	List<Integer> integers = Arrays.asList(1, 2, 3);
	assertThat(integers).containsExactly(1, 2, 3);	//테스트 통과
	assertThat(integers).containsExactly(2, 1, 3);	//테스트 통과 X
	assertThat(integers).containsExactly(1, 2);	//테스트 통과 X
}
containsExactly tests whether the actual group contains the given values while also considering the order. So the first line's test passes, but the second line's test does not.
One thing to note here is that if even a single element is missing, the test will fail. The list really has to match exactly!
This is a post that will be updated in the future.


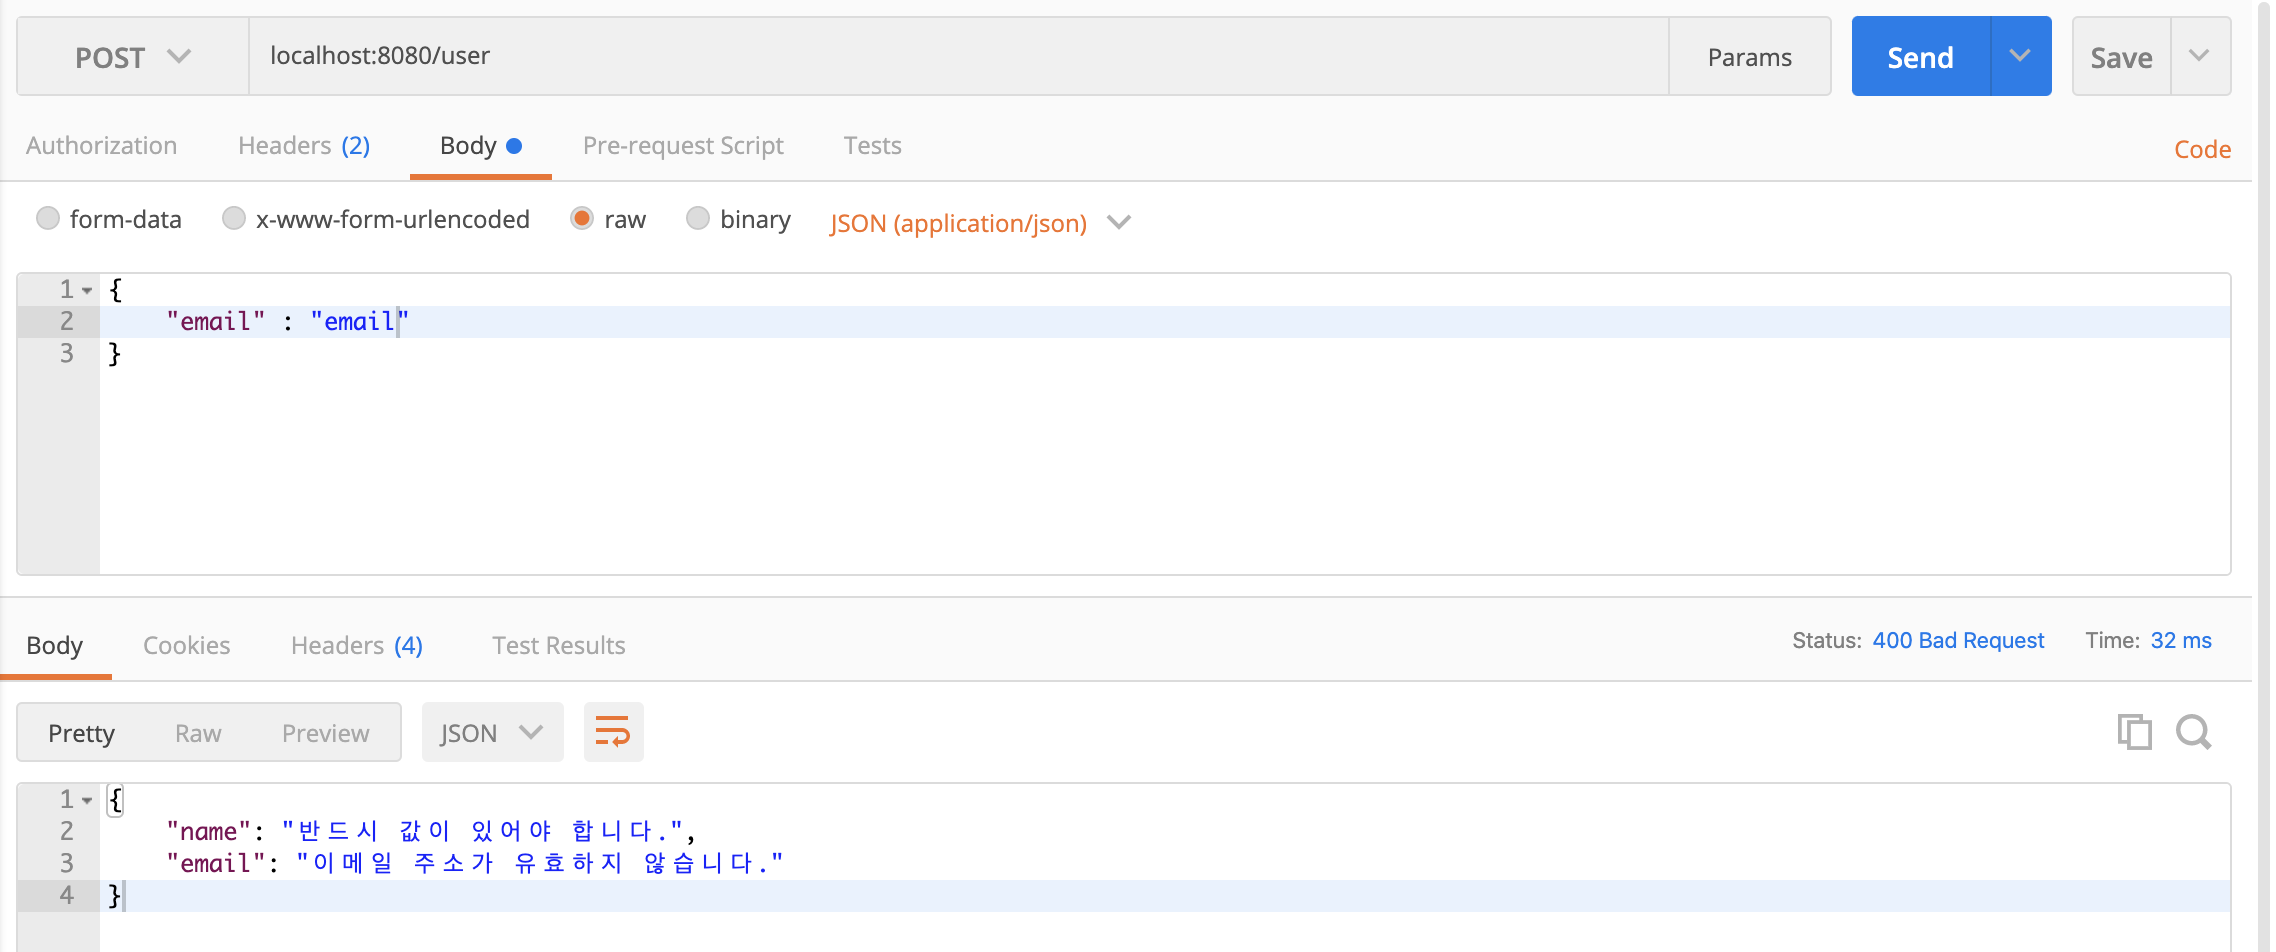
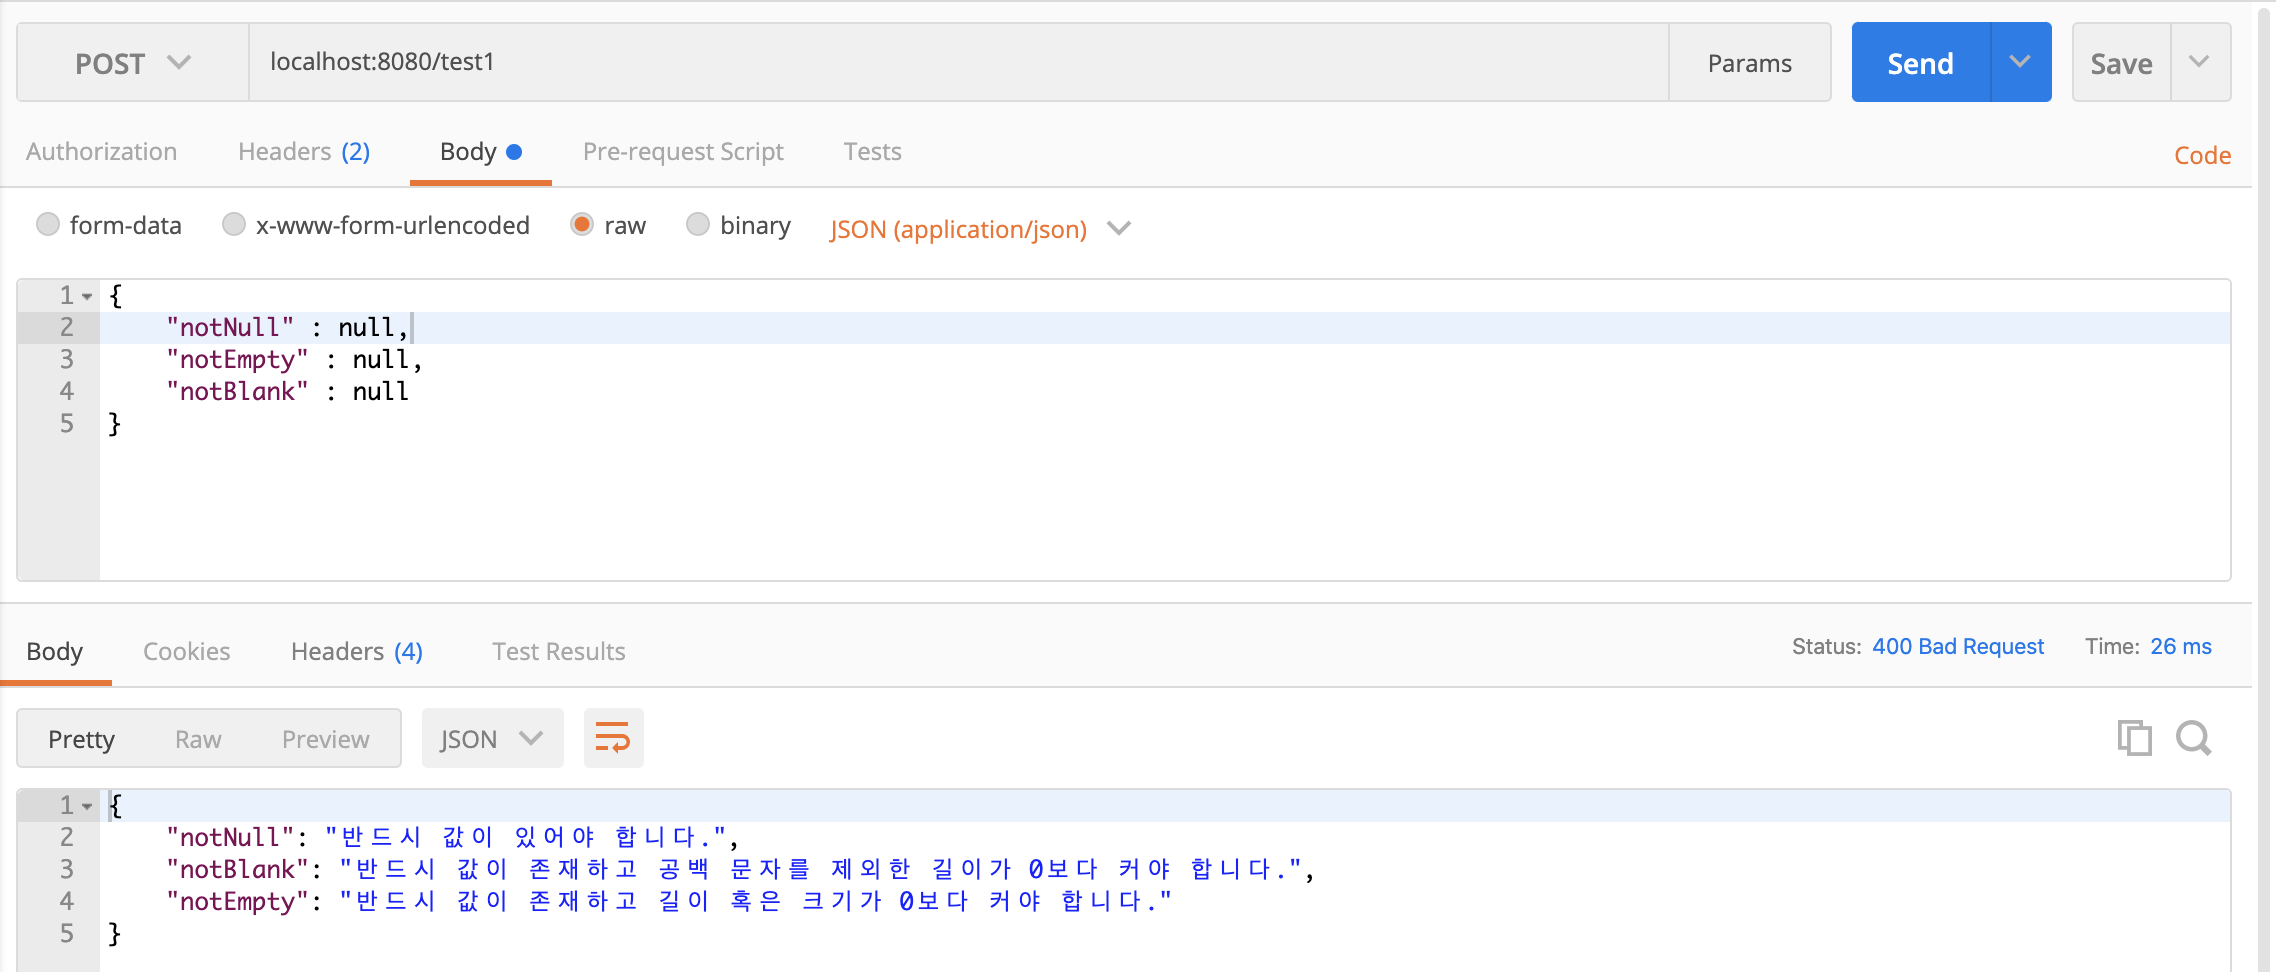


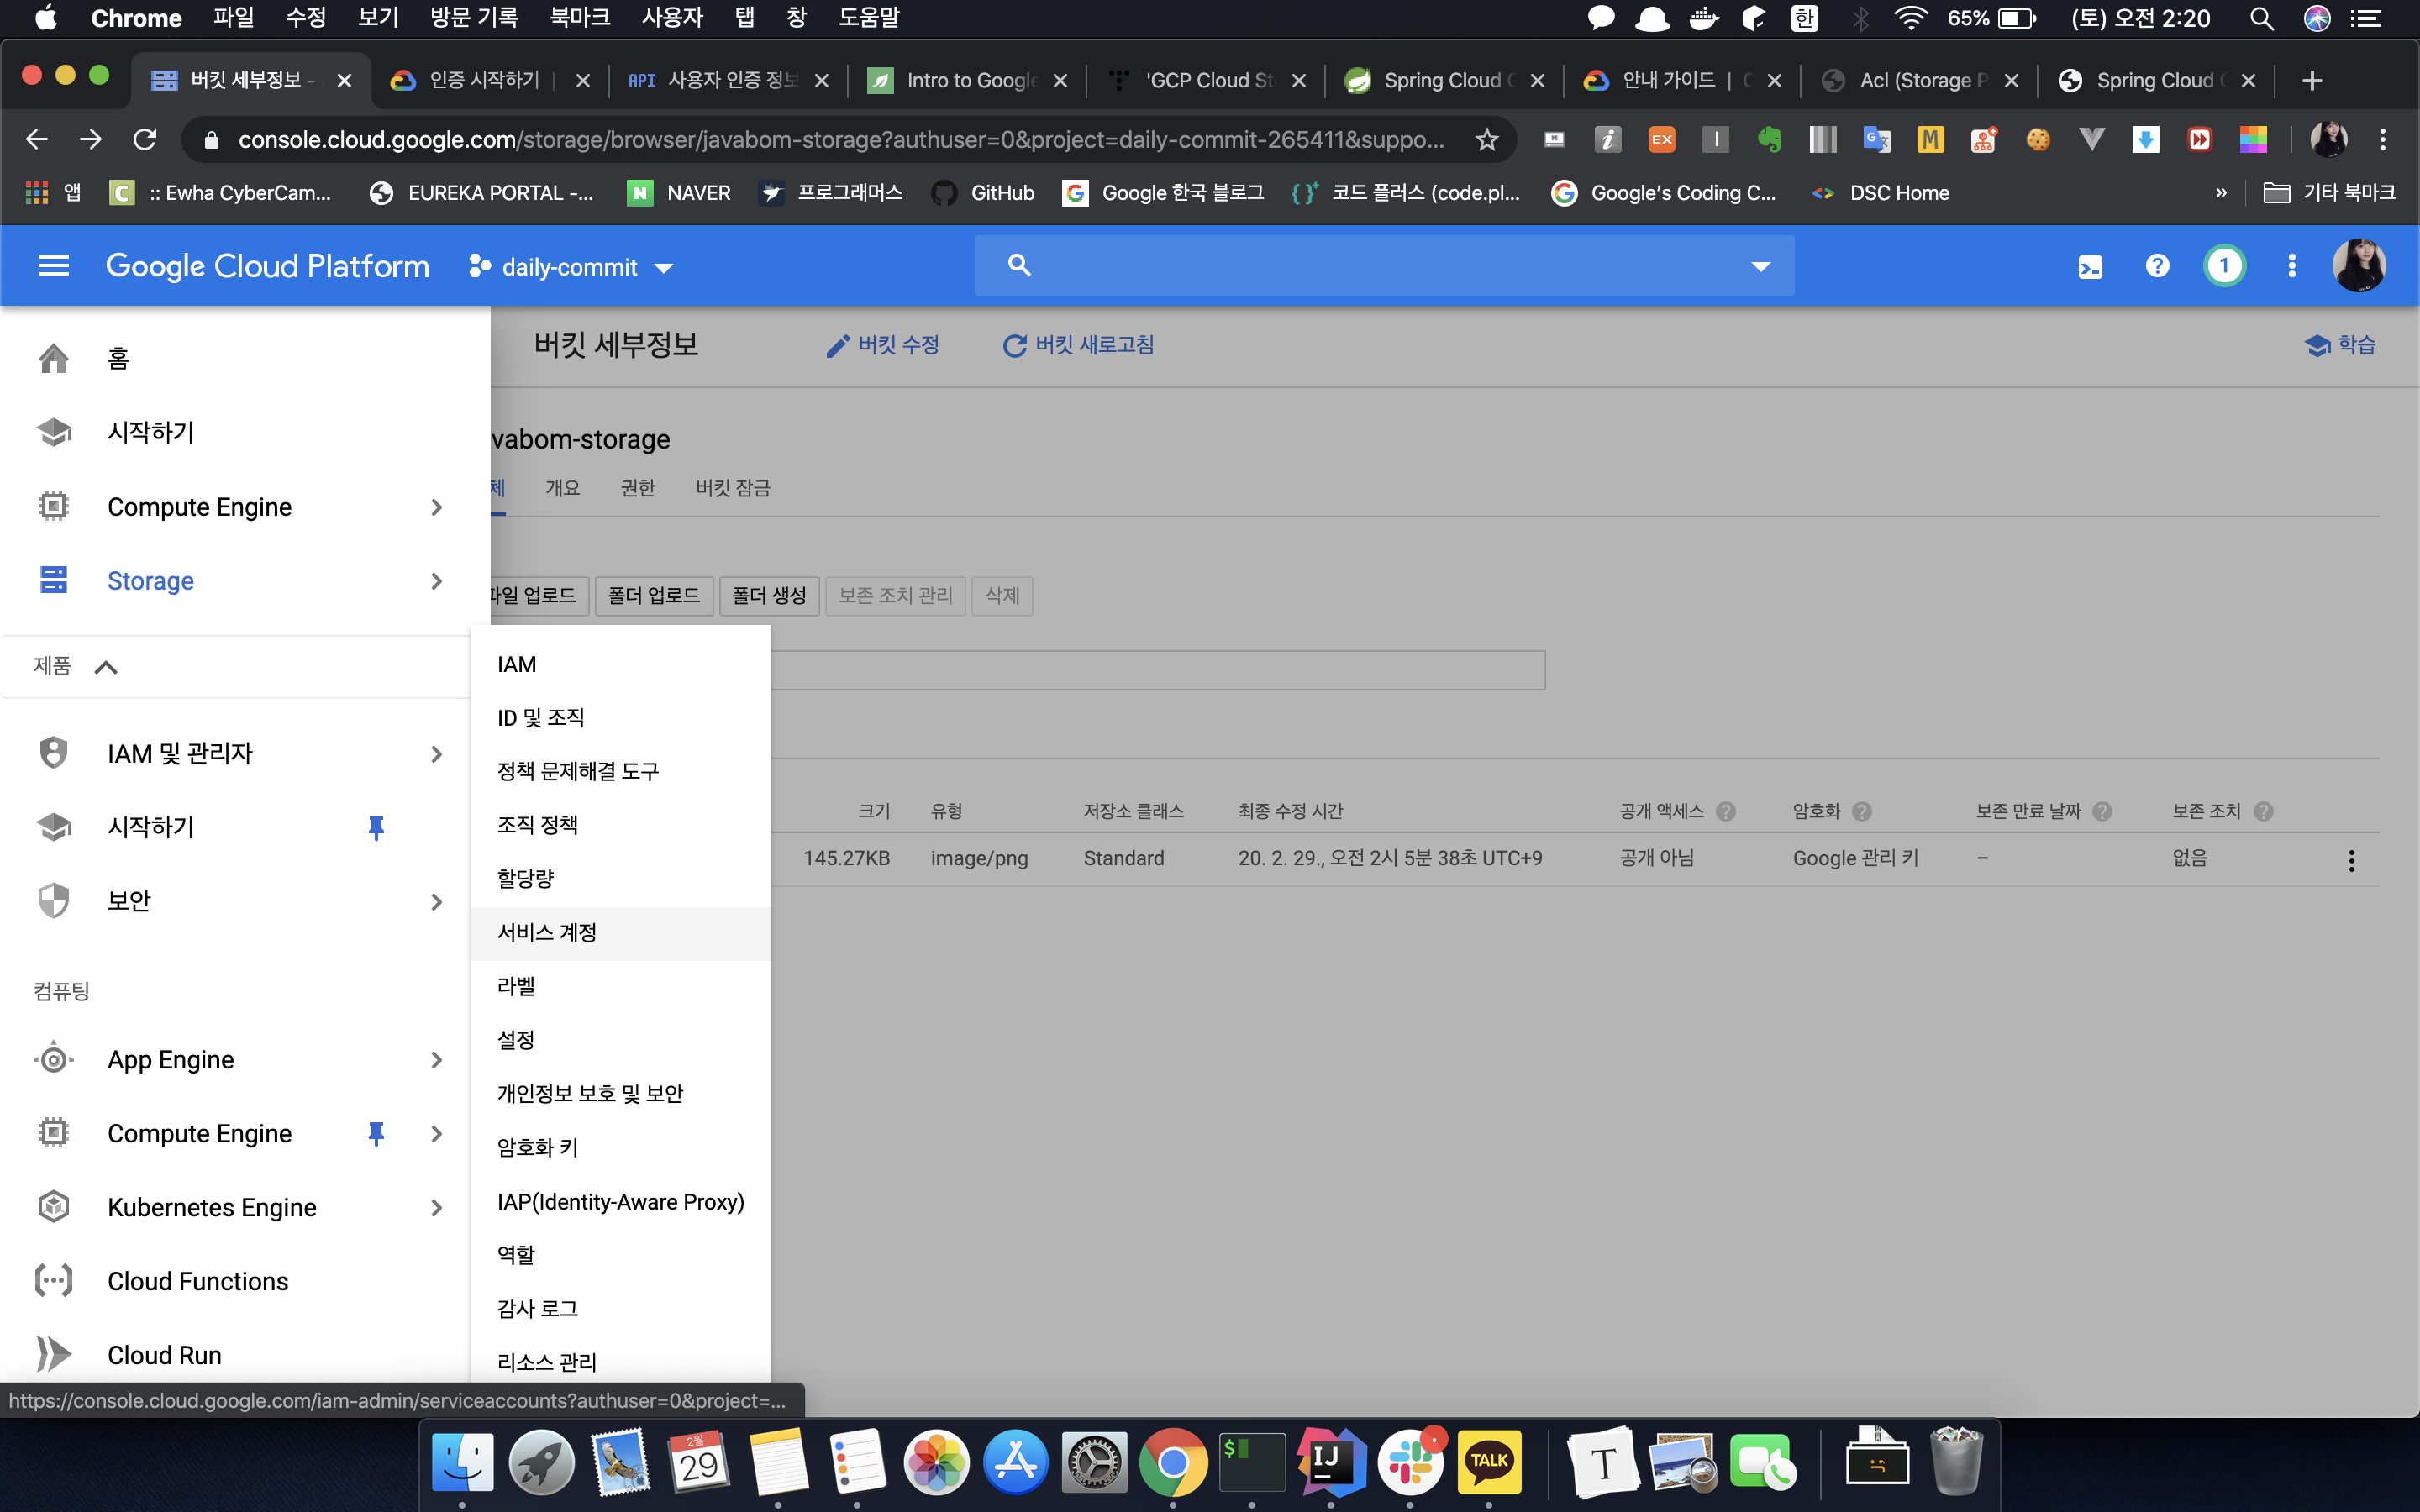

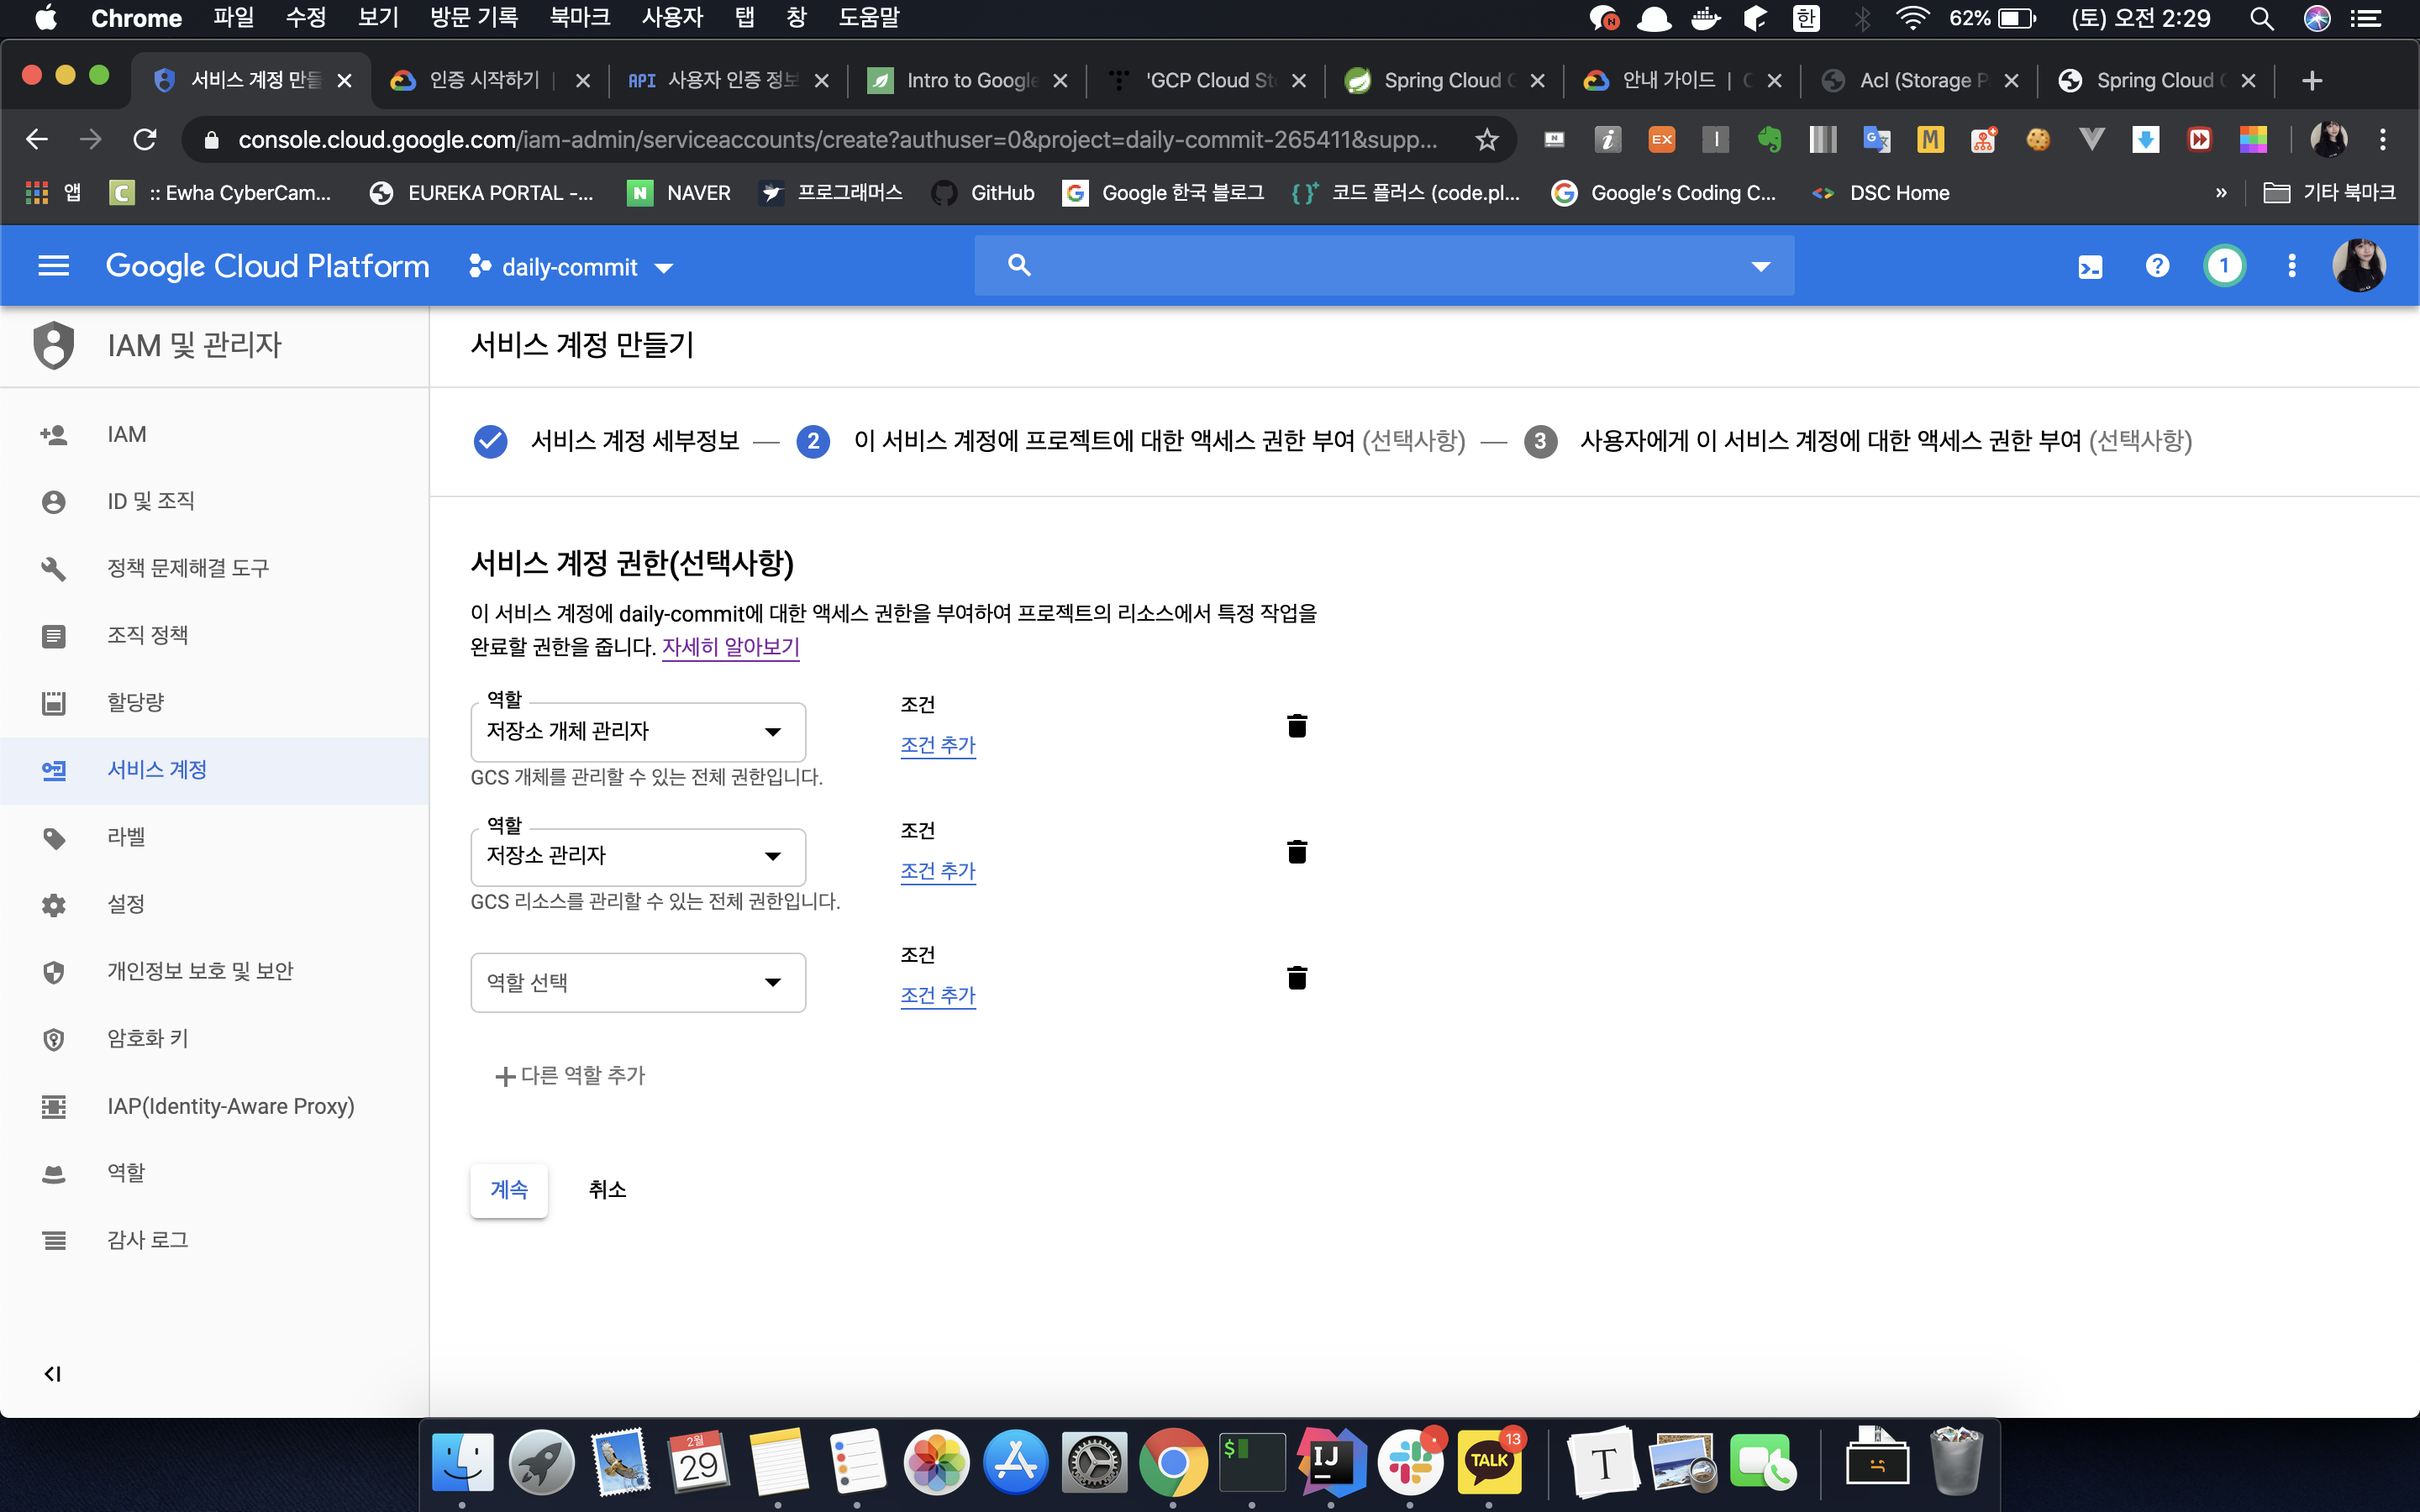
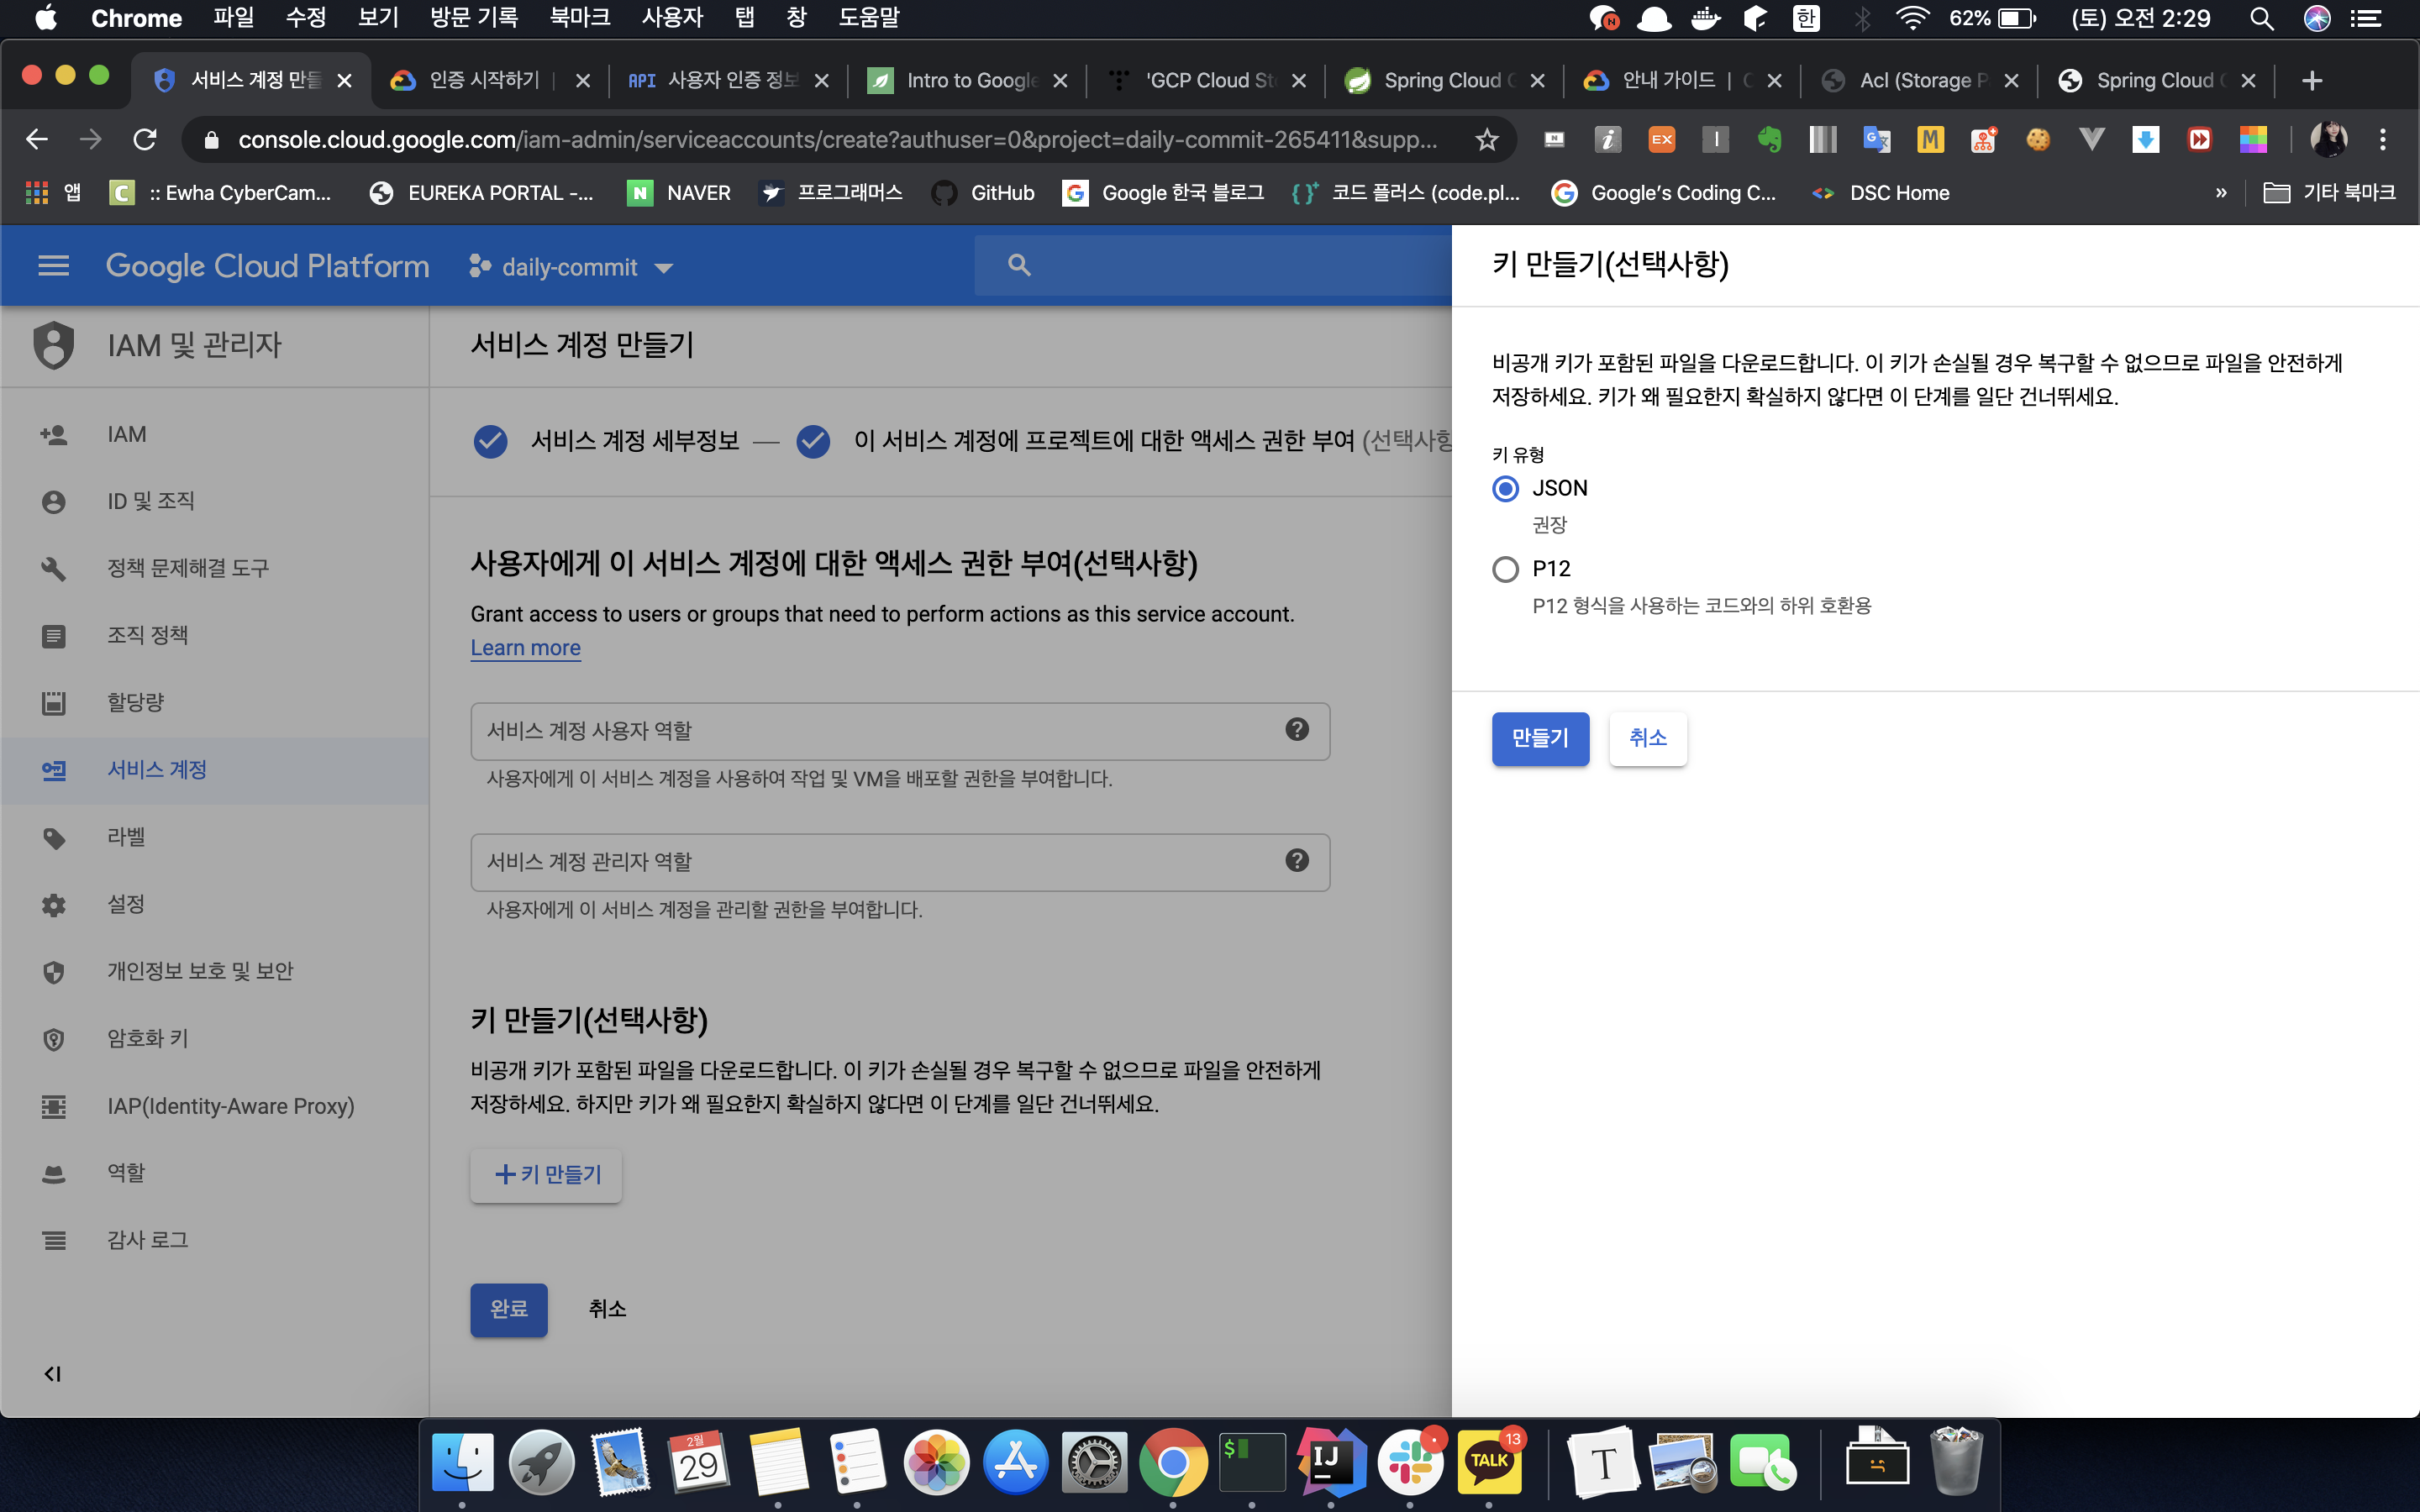


댓글
Comments