
GCP Cloud Storage + Springboot 연동하기 | GCP Cloud Storage + Spring Boot Integration
이번 외주를 맡은 내용이 Google Cloud Storage를 이용해서 file을 업로드, 다운로드하는 API 기능을 구현해서 이 내용을 정리하고자 한다. Cloud Storage를 다루는 방법으로 Google Cloud Console, Cloud SDK를 이용한 command인 gsutil 등이 있지만, Springboot를 이용하여, Cloud Storage의 버킷 및 객체를 Client library 레벨에서 다루는 방법을 살펴보자.
1. Cloud Storage란?
Google Cloud에 객체를 저장하는 서비스이다. 이때 객체는 모든 형식의 파일을 의미하며, 버킷이라는 컨테이너에 객체를 저장한다.
모든 버킷은 프로젝트와 연결되어있으며, 프로젝트의 권한 지정을 통해 원하는 사용자가 storage안 데이터에 액세스 하도록 설정하는 것도 가능하다.

- Organization : 쉽게 유저 계정이라 생각하자. (유저는 N개의 프로젝트를 만들 수 있다.)
- Project : 각각의 프로젝트는 하나의 어플리케이션과 연관되어있으며, 각각의 프로젝트는 고유한 cloud storage api와 resource를 가진다.
- Bucket : 각 프로젝트는 여러개의 bucket을 가질 수 있다. bucket은 object를 저장하는 컨테이너이다.
- Object : 각각의 파일을 의미한다.
Cloud Storage와 관련한 자세한 개념은 아래 링크에서 참고할 수 있다.
https://cloud.google.com/storage/docs/concepts?hl=ko
개념 | Cloud Storage | Google Cloud
Except as otherwise noted, the content of this page is licensed under the Creative Commons Attribution 4.0 License, and code samples are licensed under the Apache 2.0 License. For details, see the Google Developers Site Policies. Java is a registered trade
cloud.google.com
1. Google Cloud Storage Bucket 생성 및 Object 추가
Google Cloud Storage Bucket 생성 과정은 Web Console을 이용했다. https://cloud.google.com/
google cloud platform console에 접속 후 원하는 project를 생성한다. 프로젝트를 생성하지 않았다면, 프로젝트를 생성한다. 나는 daily-commit이라는 이름의 프로젝트를 사용했다. 왼쪽 상단의 탐색 바를 누른 후 Storage > browser 탭으로 들어간다.

스토리지 브라우저에 들어가서 버킷생성을 누르면 다음과 같이 버킷을 생성할 수 있다. 저장 위치, 데이터 클래스부터 시작해서 storage 라벨까지 고급설정을 세팅할 수 있다. 나는 javabom-storage라는 버킷을 생성했다.

버킷 생성을 위한 gsutil 명령어이다. -p, -c, -l, -b 옵션을 사용하여 버킷에 대한 상세 설정을 커맨드 라인에서 지정할 수 있다.
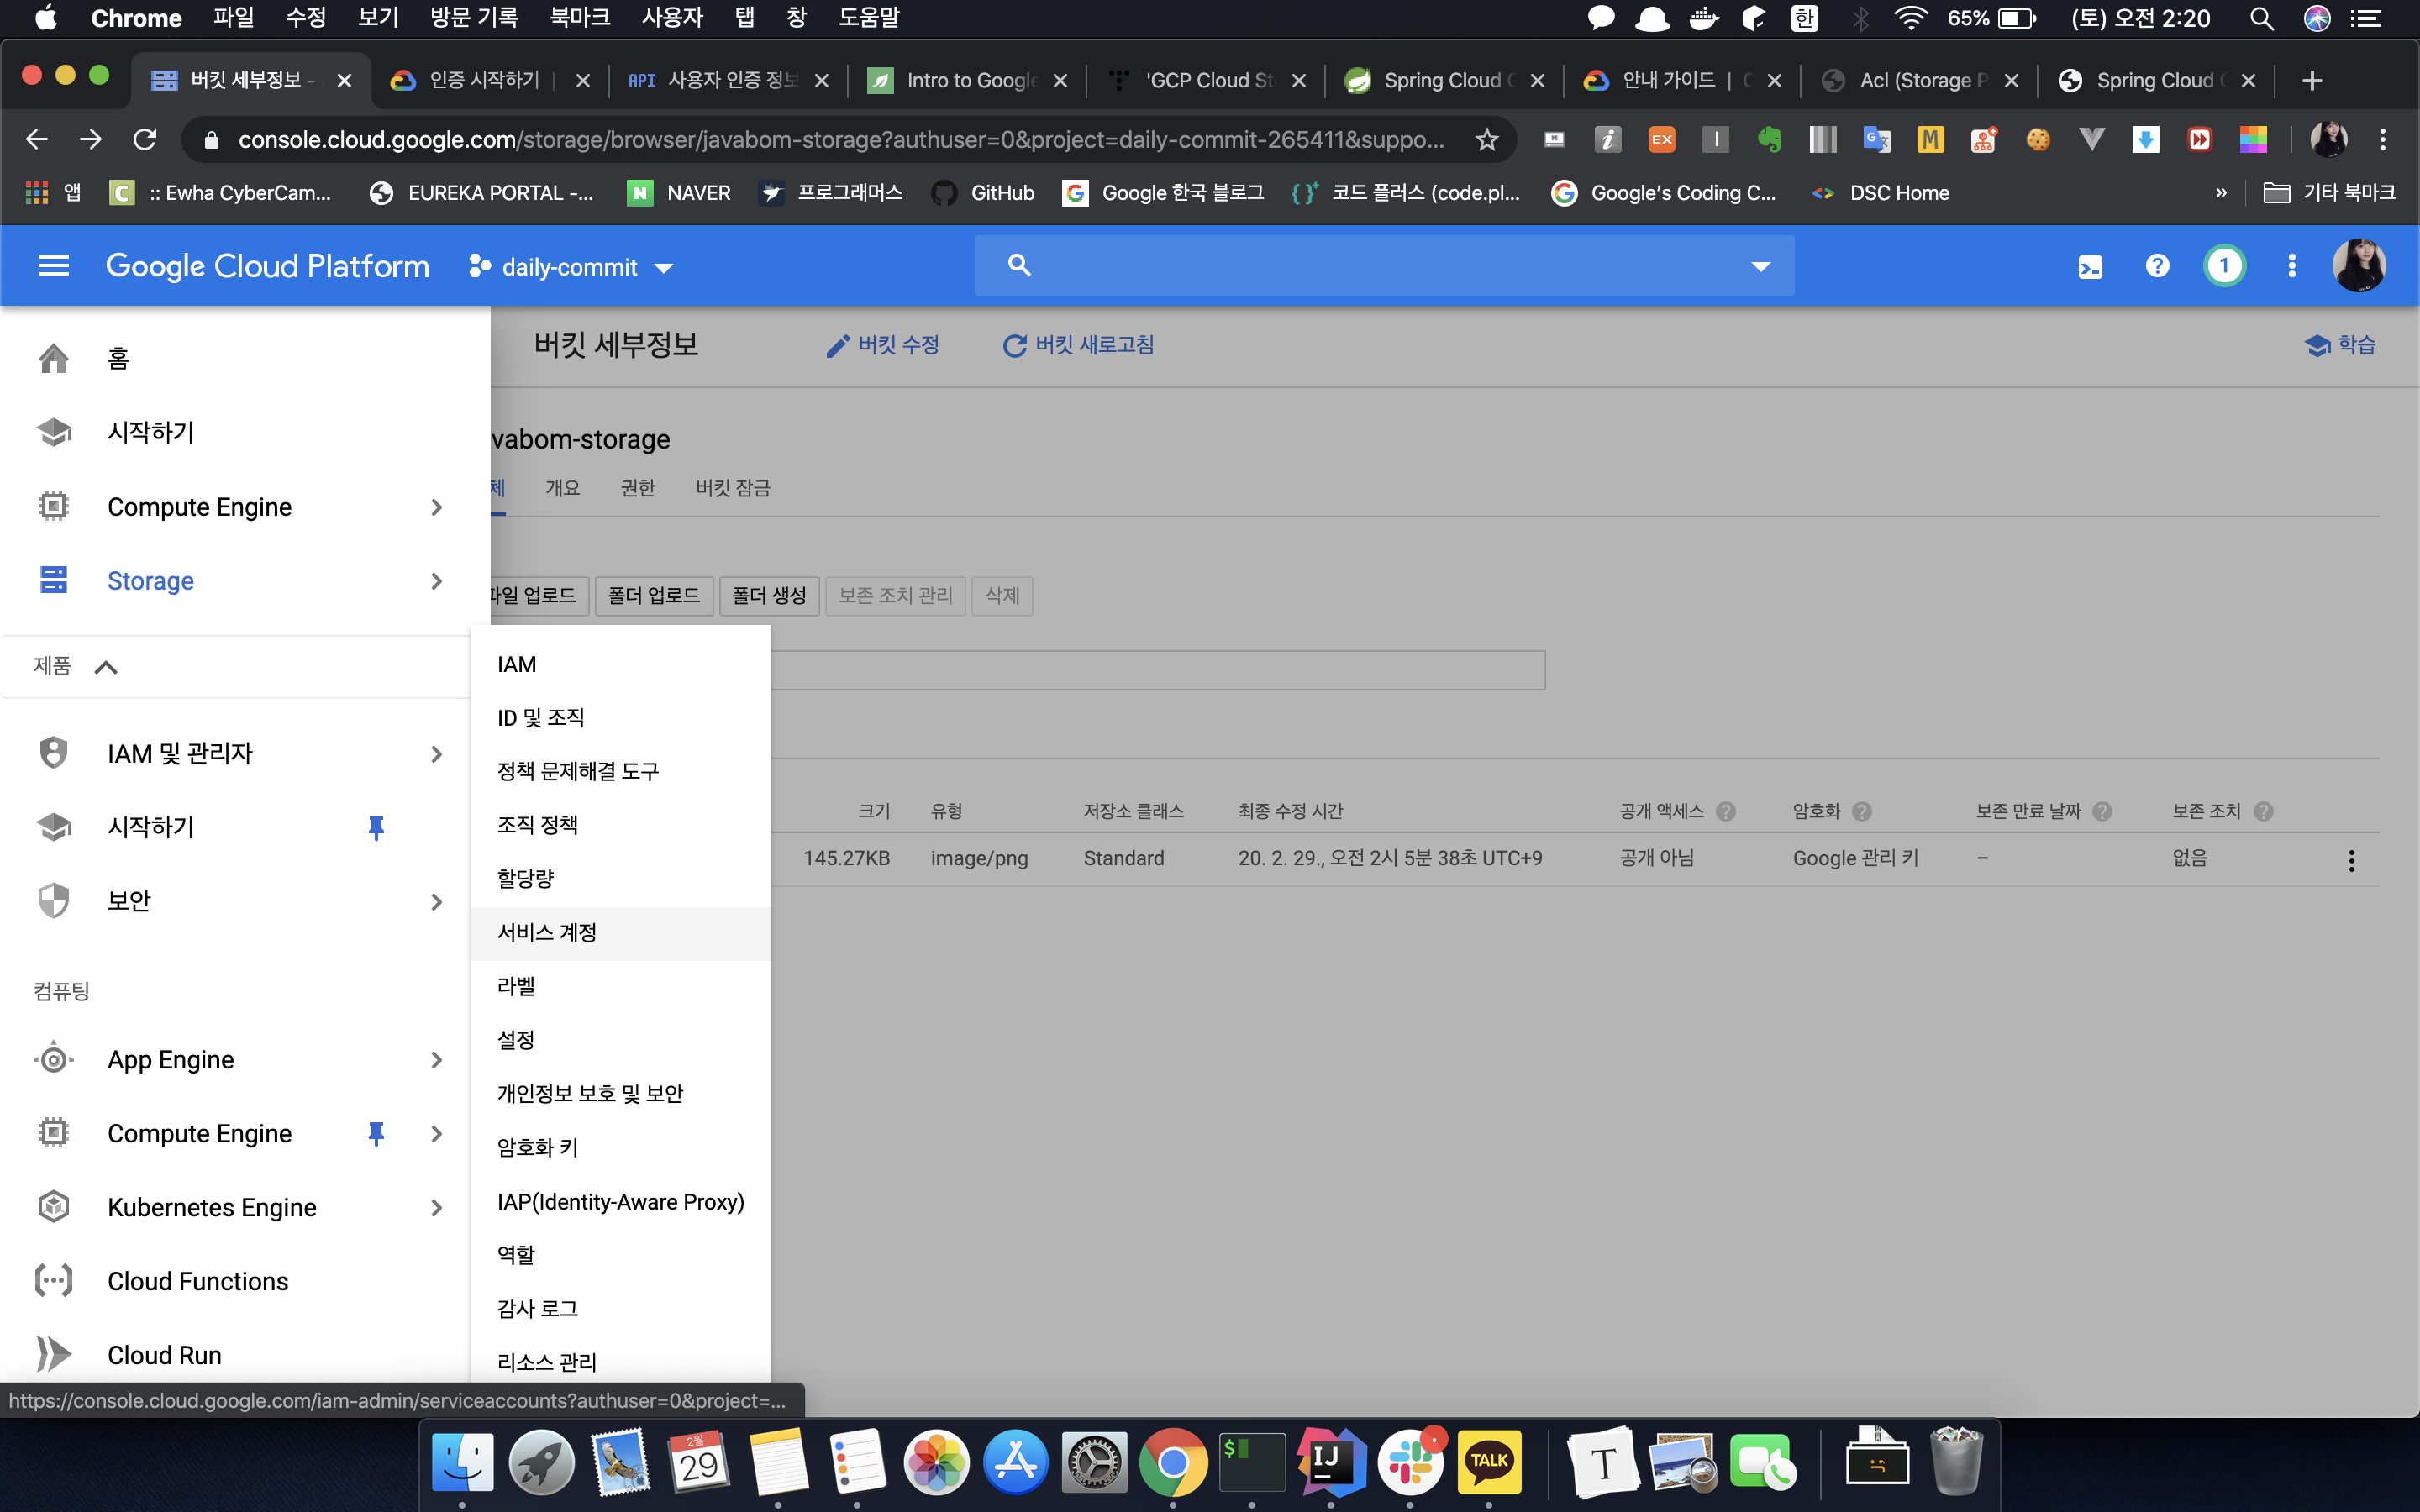
gsutil mb gs://[BUCKET_NAME]/생성된 버킷에 들어가면, 현재 내 PC에 있는 파일, 폴더 업로드가 가능함을 알 수 있다. 또한 버킷잠금 탭을 가면 bucket의 생명주기 또한 세팅할 수 있는 기능이 있다. 이 곳에 나는 javaBomLogo.png 파일을 업로드한 상태이다. (드래그 드롭을 이용한 업로드도 가능하다.)

현재 객체의 공개 액세스 상태를 보면 공개아님으로 되어있어 승인된 사용자만 객체에 접근할 수 있음을 알수있다. 공개 액세스 상태를 공개로 바꾼다면 모든 사용자가 URL을 이용해서 이 객체에 접근할 수 있겠지만, 현재는 그렇지 않다.
따라서 Springboot에서 내 프로젝트의 Cloud storage에 접근권한을 가질 수 있도록, Access Key를 받아 등록해야한다. 탐색 창을 켜서 IAM 및 관리자 > 서비스 계정 탭으로 들어가 서비스 계정 키를 생성하자.
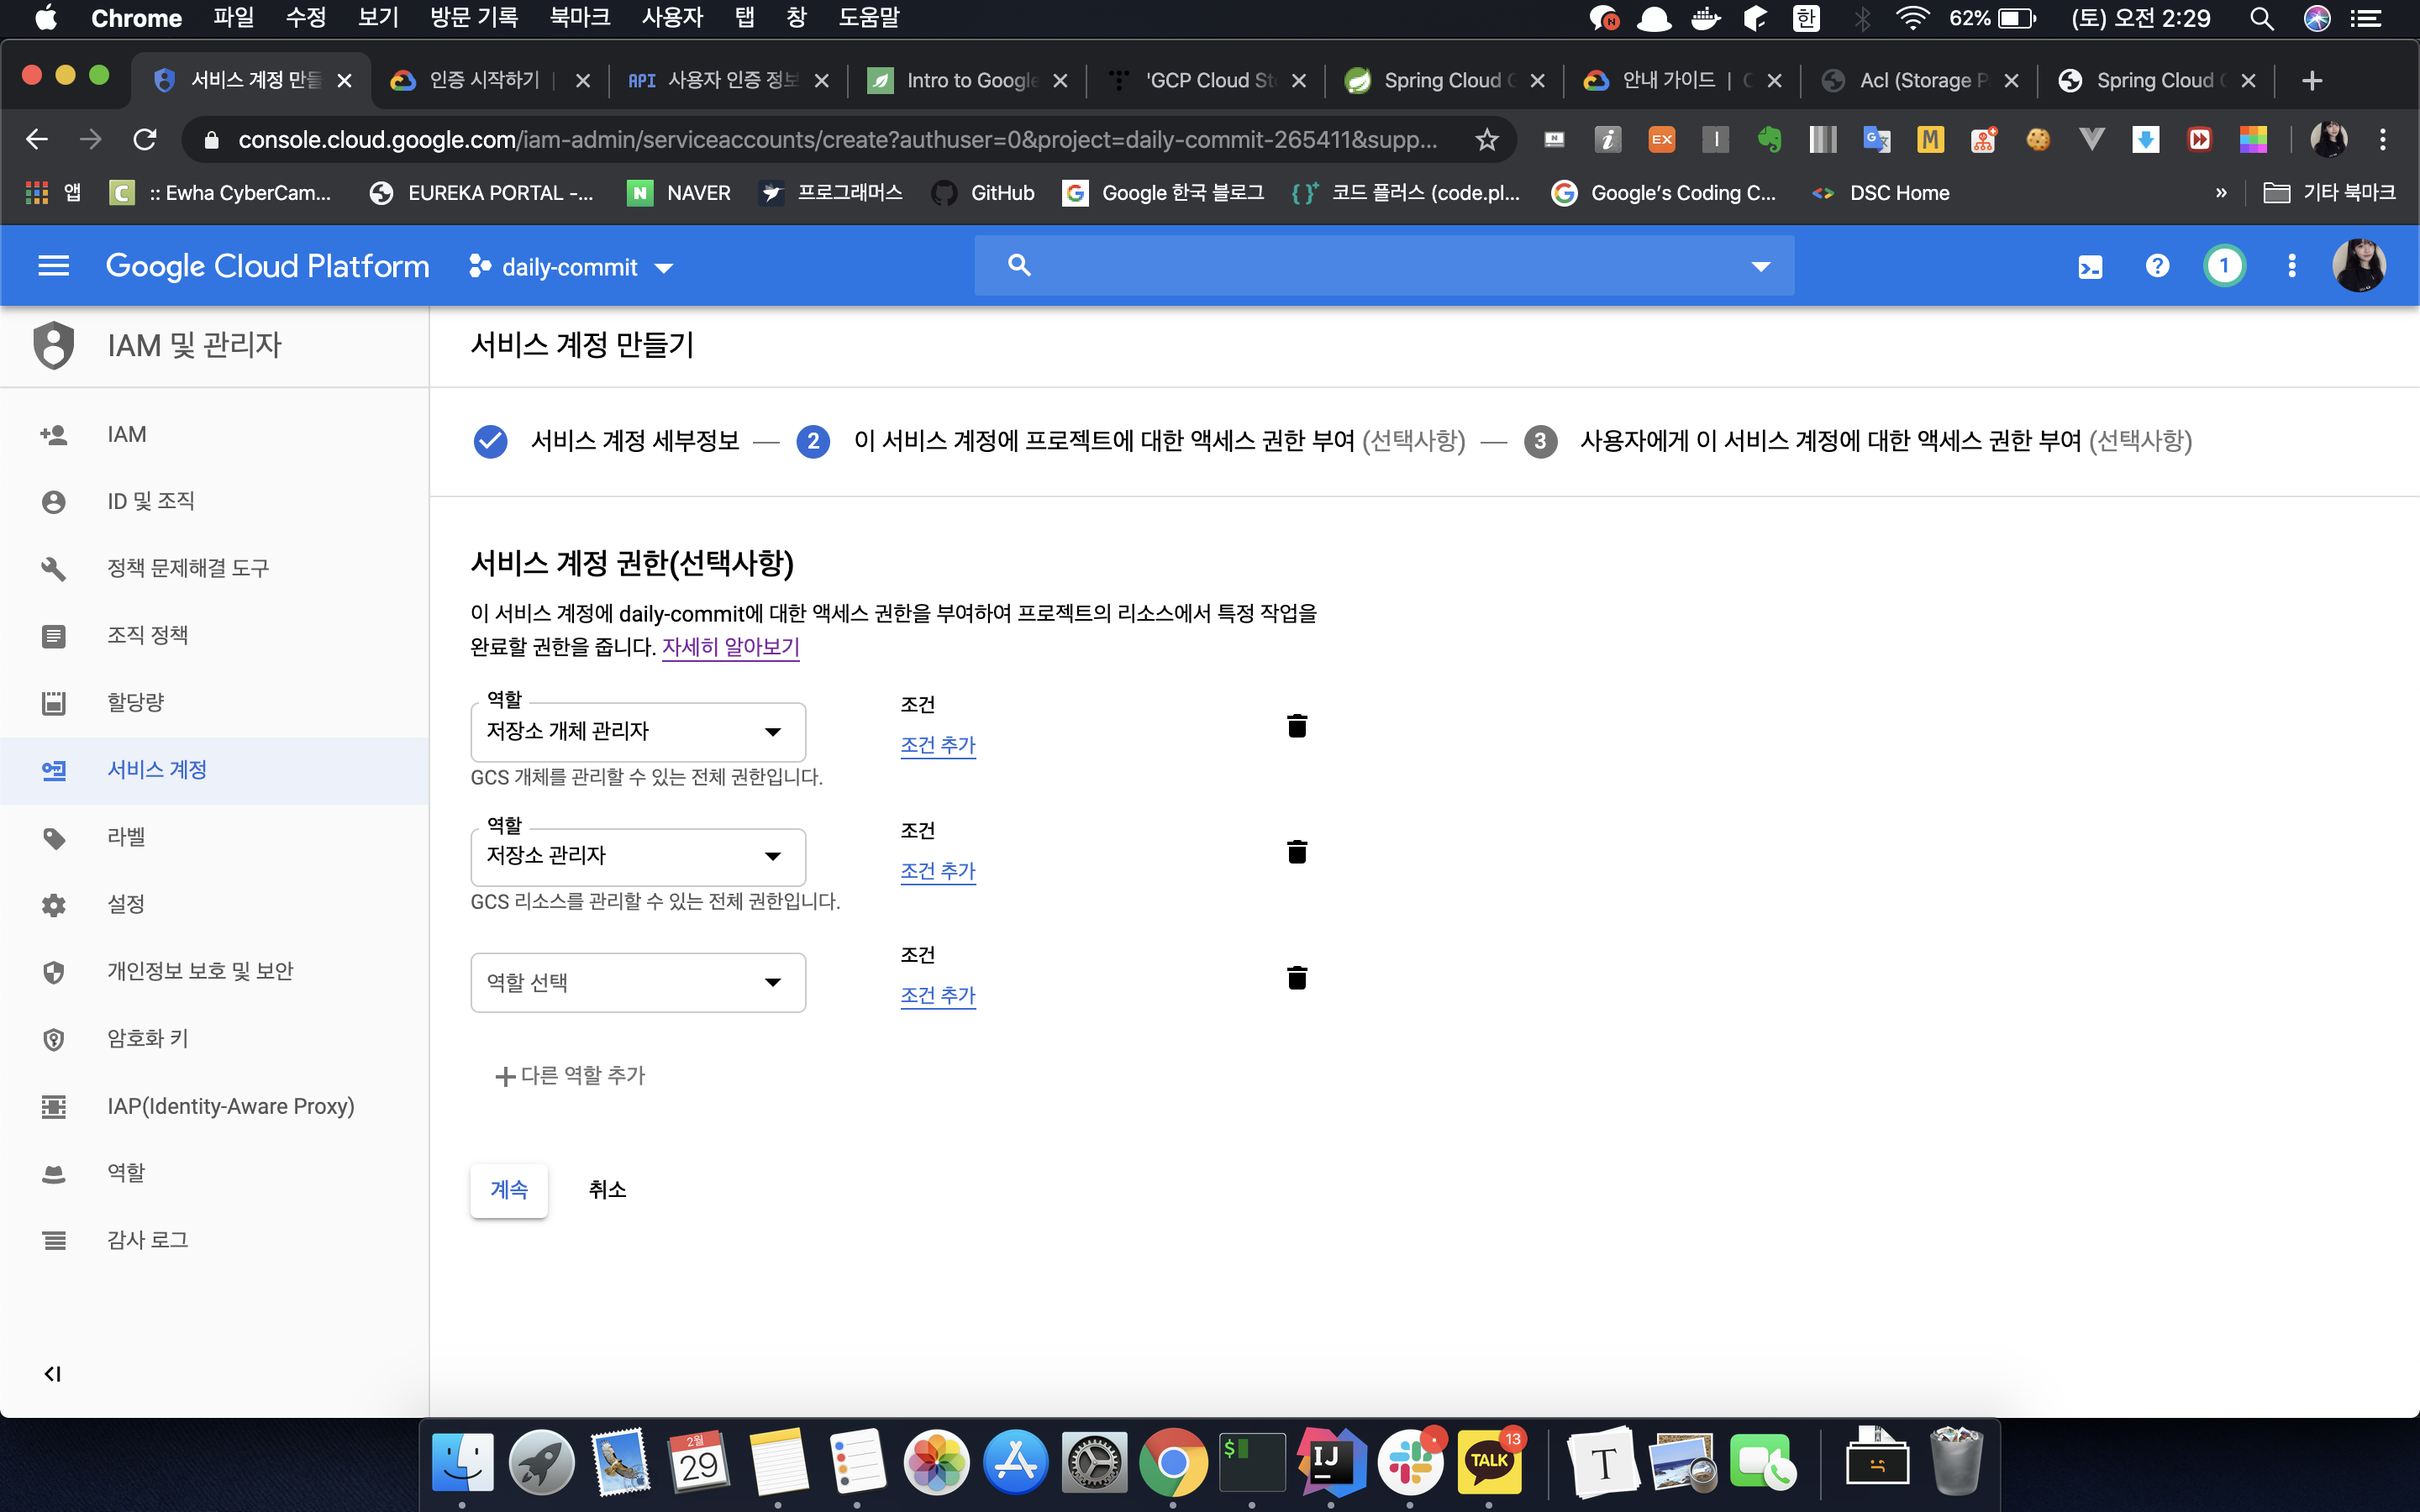
서비스 계정에서 "+ 서비스 계정 만들기" 버튼을 선택하고, 아래와 같이 서비스 계정에 대한 설정을 완료해준다.
1. 서비스 계정에 대한 이름과 간단한 설명을 기술한다.
2. 내가 생성할 서비스 계정의 권한을 설정해준다. (이 서비스 계정으로 storage object와 관련한 권한을 추가했다. )
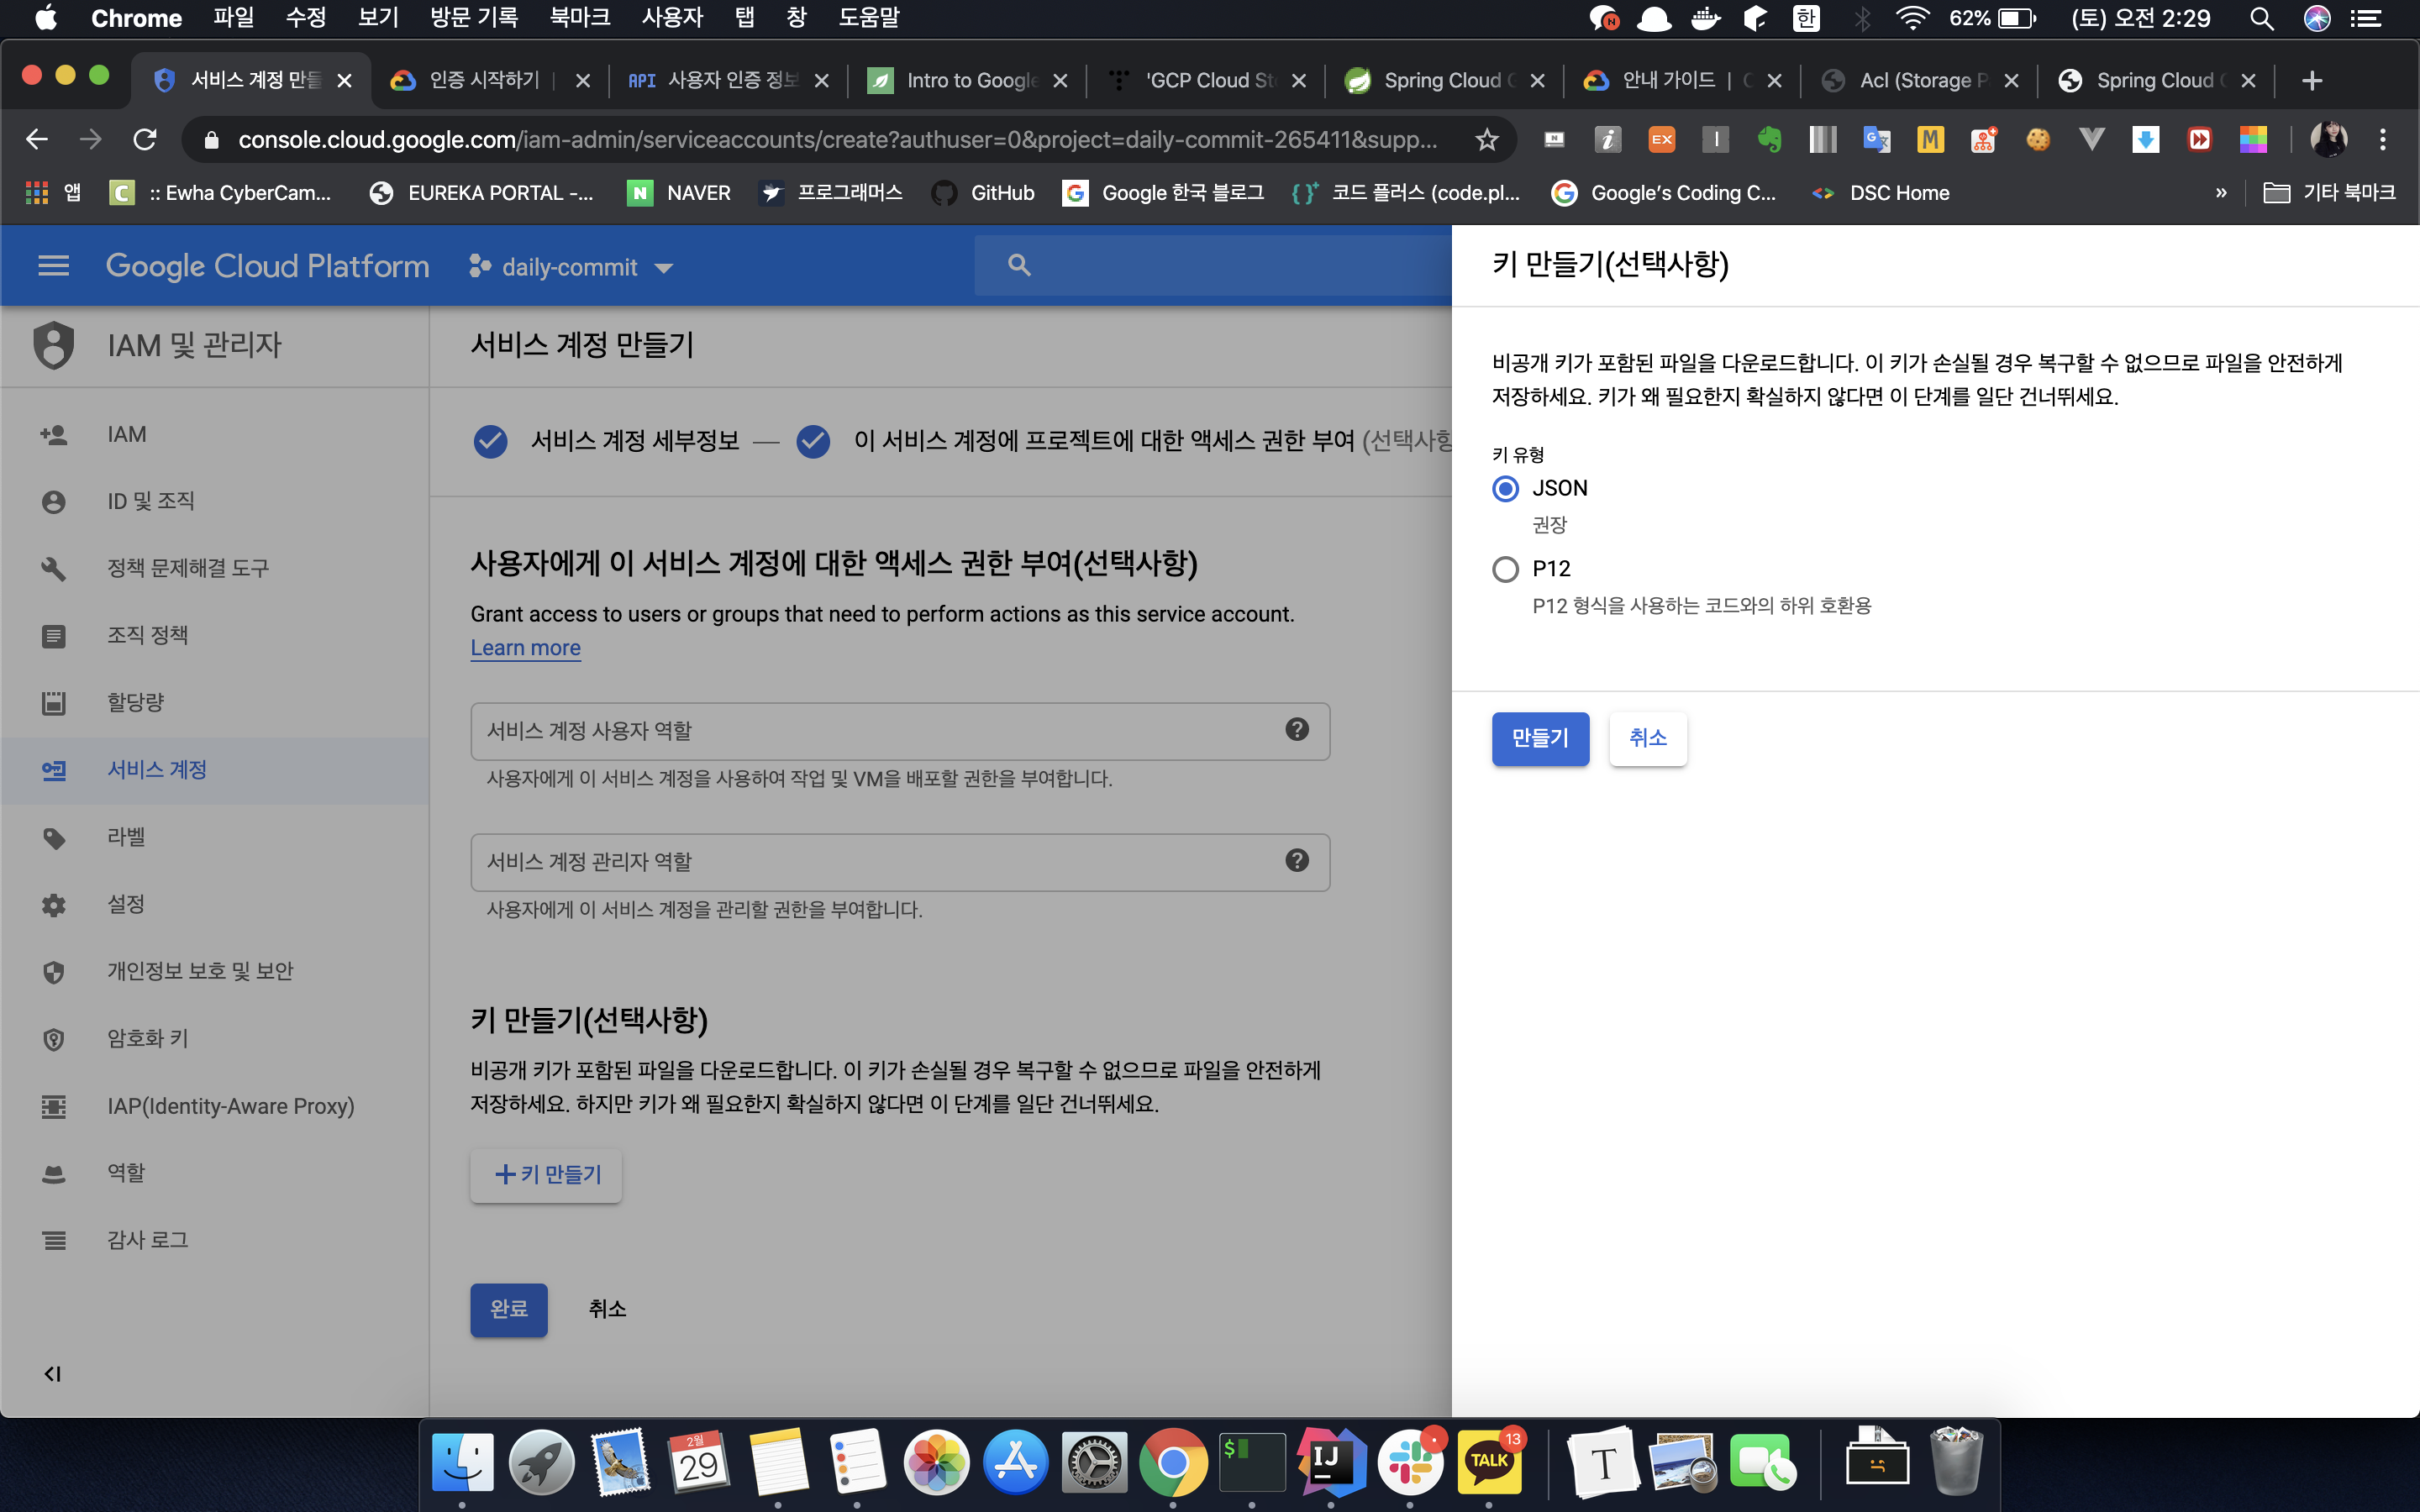
3. key만들기를 선택하여 json 키를 생성하여, 이 json 키를 로컬에 저장한다.

서비스 계정 키를 로컬에 GOOGLE_APPLICATION_CREDENTIALS 환경변수로 설정하면 로컬 환경에서도 설정한 서비스 계정이 권한을 가진 GCP 서비스에 접근할 수 있다.
이제는 생성된 서비스 계정의 정보를 가진 json 키를 springboot에 넣어, springboot 내에서 GCS의 객체에 접근할 수 있게 만들 것이다.
2. Springboot GCS Setup
build.gradle에 gcp storage 의존성을 추가한다.
# build.gradle

dependencies {
	implementation 'org.springframework.cloud:spring-cloud-gcp-starter-storage'
}
참고로 Google Cloud Platform에서는 다양한 springboot 의존성을 제공하지만, springboot initializer에서 제공하는 서비스는 GCP storage, GCP Messaging, GCP Support 세 가지이다.

그리고 스프링 부트 프로젝트에서 storage에 접근 할 수 있도록 application.properties에서 keyfile을 등록해주어야 한다. 위에서 다운로드한 json key file을 resources 폴더에 넣고, classpath를 아래와 같이 등록해준다.
내가 다운로드 받은 json 키파일의 이름은 daily-commit-265411-498 dc92a620d.json이다.
# application.properties

spring.cloud.gcp.storage.credentials.location=classpath:daily-commit-265411-498dc92a620d.json
key.json 파일 내용을 살펴보면 type, project_id, private_key_id, private_key 등 storage를 사용하는데 필요한 내용이 저장되어있다. 따라서 application.properties에 키 파일의 경로를 적어주면 스프링 부트는 키 파일의 내용을 바탕으로 stroage 변수에 자동으로 의존성을 부여한다.
3. File Download From Cloud Storage
key.json 파일의 내용을 담은 storage 객체 정보가 bean으로 등록되었으니, 변수 storage를 생성자 주입 혹은 @Autowired를 사용해서 의존성을 주입한다.
이후 아래와 같이 storage.get("버켓 이름", "버켓에서 다운로드할 파일 이름")으로 내 gcs에 있는 객체의 정보를 받아올 수 있다. 다운로드한 파일의 타입은 Blob인데, 이 Blob 타입은 Cloud Storage의 불변 객체이다. 문서를 찾아보니 바이트 배열로 이루어진 데이터이다. 이후 blob.downloadTo("로컬에 저장할 파일 이름"); 를 지정하여 다운로드를 시행한다.
public Blob downloadFileFromGCS() {
	Blob blob = storage.get("버켓이름", "버킷에서 다운로드할 파일 이름");
	blob.downloadTo(Paths.get("로컬에 저장할 파일 이름"));
	return blob;
}
따라서 아래와 같이 간단한 Http API를 만들어 실행해보자.
// GCSController.java

@RestController
@RequiredArgsConstructor
public class GCSController {

    private final GCSService gcsService;

    @PostMapping("gcs/download")
    public ResponseEntity localDownloadFromStorage(@RequestBody DownloadReqDto downloadReqDto){
        Blob fileFromGCS = gcsService.downloadFileFromGCS(downloadReqDto);
        return ResponseEntity.ok(fileFromGCS.toString());
    }
}

// GCSService.java

@Service
@RequiredArgsConstructor
public class GCSService {

    private final Storage storage;

    public Blob downloadFileFromGCS(String bucketName, String downloadFileName, String localFileLocation) {
        Blob blob = storage.get(bucketName, downloadFileName);
        blob.downloadTo(Paths.get(localFileLocation));
        return blob;
    }
}

// DownloadReqDto.java

@AllArgsConstructor
@Getter
public class DownloadReqDto {
    private String bucketName;
    private String downloadFileName;
    private String localFileLocation;
}
이 API를 이용하여 javabom-storage에 있는 JavaBomLogo.png 파일을 내 local에 저장해보도록 하겠다.


아래와 같이 API를 호출하면, 현재 내 프로젝트에 download/java-bom.png 파일이 다운로드되어야 한다.

다만 가끔 에러가 터지는 경우가 있는데, 그 이유는 내 프로젝트 내에 download 폴더가 없기 때문이다. download 폴더를 추가하고 다운로드하면 잘 되므로 코드단에서는 Files 모듈을 사용해서 mkdir() 등을 해주는 로직으로 방어해주어야 한다.

download 폴더를 추가해준 후, API를 호출하니 내 로컬 프로젝트 안에 GCS에 있던 파일은 java-bom.png파일이 잘 다운로드됨을 확인할 수 있다.

4. File Upload To Cloud Storage
download 로직과 마찬가지로 storage를 생성자 주입 혹은 @Autowired를 사용해서 의존성을 주입한다.
upload는 GCS에 Blob파일을 만드는 것이기 때문에, BlobInfo의 Builder를 이용하여 cloud storage에 객체를 생성해준다. download와 마찬가지로 객체를 생성할 버켓 이름, 버켓에 저장할 파일 이름을 적어주며, 로컬에서 업로드할 파일 이름도 적어주어야 한다.
이때 BlobInfo의 Builder를 이용해 Acl 설정을 통해 업로드할 객체의 권한을 코드로 설정할 수 있을 뿐 아니라 객체의 ContentsType 설정도 가능하다.
public BlobInfo uploadFileToGCS() throws IOException {

        BlobInfo blobInfo =storage.create(
                BlobInfo.newBuilder("버켓 이름", "버켓에 업로드할 파일 이름")
                        .setAcl(new ArrayList<>(Arrays.asList(Acl.of(Acl.User.ofAllAuthenticatedUsers(), Acl.Role.READER))))
                        .build(),
                new FileInputStream("로컬에서 업로드 할 파일이름"));

        return blobInfo;
}
마찬가지로 Http API를 작성해보자
// GCSController.java

@RestController
@RequiredArgsConstructor
public class GCSController {

    private final GCSService gcsService;

    @PostMapping("gcs/upload")
    public ResponseEntity localUploadToStorage(@RequestBody UploadReqDto uploadReqDto) throws IOException {
        BlobInfo fileFromGCS = gcsService.uploadFileToGCS(uploadReqDto);
        return ResponseEntity.ok(fileFromGCS.toString());
    }
}

// GCSService.java

@Service
@RequiredArgsConstructor
public class GCSService {

    private final Storage storage;

    @SuppressWarnings("deprecation")
    public BlobInfo uploadFileToGCS(UploadReqDto uploadReqDto) throws IOException {

        BlobInfo blobInfo =storage.create(
                BlobInfo.newBuilder(uploadReqDto.getBucketName(), uploadReqDto.getUploadFileName())
                        .setAcl(new ArrayList<>(Arrays.asList(Acl.of(Acl.User.ofAllAuthenticatedUsers(), Acl.Role.READER))))
                        .build(),
                new FileInputStream(uploadReqDto.getLocalFileLocation()));

        return blobInfo;
    }

}

// UploadReqDto.java

@AllArgsConstructor
@Getter
public class UploadReqDto {
    private String bucketName;
    private String uploadFileName;
    private String localFileLocation;
}
이 API를 이용하여 내 local 프로젝태 내에 있는 upload/jyamiLogo.png 파일을 GCS에 업로드하겠다.


아래와 같이 API를 호출하면, 내 GCS 내에 있는 javabom-storage 버켓에 uploadGCS/jyamiLogo.png라는 폴더구조를 가진 객체가 생성되어야 한다.

구글 콘솔이나 인텔리제이 플러그인으로 storage를 확인하면 아래와 같이 파일이 잘 업로드됨을 확인할 수 있다.


구글에서 객체를 업로드할 때 파일명 자체를, [폴더 경로]/[파일명] 구조로 저장하기 때문에, 따로 GCS내에 폴더를 추가하는 로직 없이 업로드가 가능하다.
추가. intellij cloud code plugin
플러그인을 사용하면 웹 콘솔을 사용하지 않아도 편리하게 cloud storage의 내용을 확인할 수 있다.
[Intellij] GCP Plugin - Cloud Code 사용하기 in GCS
GCP Storage를 연동하여 사용하는 글을 블로그에 포스팅 하려고 Spring initializer을 이용해서 프로젝트를 생성하면서 좋은 플러그인을 발견하여 기록하려 한다. 위와 같은 dependency로 새로운 프로젝트를 설정..
jyami.tistory.com
[참고 문서]
- [ Google Cloud 공식 문서 ] https://cloud.google.com/storage/docs/how-to?hl=ko
- [ Spring 공식 문서 ] https://cloud.spring.io/spring-cloud-gcp/reference/html/#google-cloud-storage
- [ Java DOC ] https://googleapis.dev/java/google-cloud-storage/latest/index.html
- [ Baeldung 페이지 문서 ] https://www.baeldung.com/java-google-cloud-storage
For a recent freelance project, I implemented file upload and download API features using Google Cloud Storage, so I'd like to summarize what I learned. There are various ways to work with Cloud Storage, such as using the Google Cloud Console or the gsutil command via Cloud SDK, but let's take a look at how to manage Cloud Storage buckets and objects at the client library level using Spring Boot.
1. What is Cloud Storage?
It's a service for storing objects in Google Cloud. Here, objects refer to files of any format, and they are stored in containers called buckets.
Every bucket is associated with a project, and by configuring project permissions, you can control which users have access to the data in storage.
- Organization : Think of it simply as a user account. (A user can create N projects.)
- Project : Each project is associated with a single application, and each project has its own unique Cloud Storage API and resources.
- Bucket : Each project can have multiple buckets. A bucket is a container that stores objects.
- Object : Refers to individual files.
You can find more detailed concepts about Cloud Storage at the link below.
https://cloud.google.com/storage/docs/concepts?hl=ko
Concepts | Cloud Storage | Google Cloud
Except as otherwise noted, the content of this page is licensed under the Creative Commons Attribution 4.0 License, and code samples are licensed under the Apache 2.0 License. For details, see the Google Developers Site Policies. Java is a registered trade
cloud.google.com
1. Creating a Google Cloud Storage Bucket and Adding Objects
I used the Web Console for the Google Cloud Storage Bucket creation process. https://cloud.google.com/
After accessing the Google Cloud Platform console, create the project you want. If you haven't created a project yet, go ahead and create one. I used a project named daily-commit. Click the navigation bar in the upper left corner and go to Storage > browser tab.
Once you enter the storage browser and click "Create Bucket," you can create a bucket as shown below. You can configure advanced settings ranging from storage location and data class to storage labels. I created a bucket named javabom-storage.
Here's the gsutil command for creating a bucket. You can specify detailed bucket settings from the command line using the -p, -c, -l, and -b options.
gsutil mb gs://[BUCKET_NAME]/When you enter the created bucket, you can see that it's possible to upload files and folders from your local PC. Also, if you go to the bucket lock tab, there's a feature to set the bucket's lifecycle as well. I've already uploaded a javaBomLogo.png file here. (Upload via drag and drop is also supported.)
If you look at the current public access status of the object, it's set to "Not public," which means only authorized users can access the object. If you change the public access status to public, all users could access this object via URL, but that's not the case right now.
Therefore, in order for Spring Boot to have access permissions to the Cloud Storage of my project, we need to obtain and register an Access Key. Open the navigation menu and go to IAM & Admin > Service Accounts tab to create a service account key.
In Service Accounts, click the "+ Create Service Account" button and complete the service account settings as shown below.
1. Enter a name and brief description for the service account.
2. Set the permissions for the service account you're creating. (I added permissions related to storage objects for this service account.)
3. Select "Create Key" to generate a JSON key, and save this JSON key locally.
If you set the service account key as the GOOGLE_APPLICATION_CREDENTIALS environment variable locally, you can access GCP services that the configured service account has permissions for, even in your local environment.
Now we're going to add the JSON key containing the created service account information into Spring Boot, so that we can access GCS objects from within Spring Boot.
2. Springboot GCS Setup
Add the GCP storage dependency to build.gradle.
# build.gradle

dependencies {
	implementation 'org.springframework.cloud:spring-cloud-gcp-starter-storage'
}
For reference, Google Cloud Platform provides various Spring Boot dependencies, but the services available through Spring Boot Initializer are limited to GCP Storage, GCP Messaging, and GCP Support.
Then, you need to register the key file in application.properties so that the Spring Boot project can access the storage. Place the JSON key file you downloaded earlier into the resources folder and register the classpath as shown below.
The name of the JSON key file I downloaded is daily-commit-265411-498dc92a620d.json.
# application.properties

spring.cloud.gcp.storage.credentials.location=classpath:daily-commit-265411-498dc92a620d.json
If you look at the contents of the key.json file, it contains information needed to use storage such as type, project_id, private_key_id, private_key, etc. So when you specify the key file path in application.properties, Spring Boot will automatically inject the dependency into the storage variable based on the key file's contents.
3. File Download From Cloud Storage
Since the storage object information containing the key.json file contents has been registered as a bean, inject the dependency for the storage variable using constructor injection or @Autowired.
Then, as shown below, you can retrieve information about objects in your GCS using storage.get("bucket name", "file name to download from bucket"). The type of the downloaded file is Blob, which is an immutable object in Cloud Storage. Looking at the documentation, it's data consisting of a byte array. After that, specify blob.downloadTo("file name to save locally"); to perform the download.
public Blob downloadFileFromGCS() {
	Blob blob = storage.get("버켓이름", "버킷에서 다운로드할 파일 이름");
	blob.downloadTo(Paths.get("로컬에 저장할 파일 이름"));
	return blob;
}
So let's create a simple HTTP API as shown below and try it out.
// GCSController.java

@RestController
@RequiredArgsConstructor
public class GCSController {

    private final GCSService gcsService;

    @PostMapping("gcs/download")
    public ResponseEntity localDownloadFromStorage(@RequestBody DownloadReqDto downloadReqDto){
        Blob fileFromGCS = gcsService.downloadFileFromGCS(downloadReqDto);
        return ResponseEntity.ok(fileFromGCS.toString());
    }
}

// GCSService.java

@Service
@RequiredArgsConstructor
public class GCSService {

    private final Storage storage;

    public Blob downloadFileFromGCS(String bucketName, String downloadFileName, String localFileLocation) {
        Blob blob = storage.get(bucketName, downloadFileName);
        blob.downloadTo(Paths.get(localFileLocation));
        return blob;
    }
}

// DownloadReqDto.java

@AllArgsConstructor
@Getter
public class DownloadReqDto {
    private String bucketName;
    private String downloadFileName;
    private String localFileLocation;
}
I'll use this API to save the JavaBomLogo.png file from javabom-storage to my local machine.
When you call the API as shown below, the file download/java-bom.png should be downloaded to my current project.
However, you might occasionally run into errors, and the reason is that the download folder doesn't exist in my project. It works fine once you add the download folder, so in your code you should add defensive logic using the Files module with something like mkdir().
After adding the download folder and calling the API, I can confirm that the file from GCS, java-bom.png, was successfully downloaded into my local project.
4. File Upload To Cloud Storage
Just like the download logic, inject the storage dependency using constructor injection or @Autowired.
Since upload is about creating a Blob file in GCS, we use BlobInfo's Builder to create an object in Cloud Storage. Similar to download, you need to specify the bucket name where the object will be created, the file name to save in the bucket, and the local file name to upload.
At this point, using BlobInfo's Builder, you can not only set the uploaded object's permissions through Acl configuration in code, but also configure the object's ContentType.
public BlobInfo uploadFileToGCS() throws IOException {

        BlobInfo blobInfo =storage.create(
                BlobInfo.newBuilder("버켓 이름", "버켓에 업로드할 파일 이름")
                        .setAcl(new ArrayList<>(Arrays.asList(Acl.of(Acl.User.ofAllAuthenticatedUsers(), Acl.Role.READER))))
                        .build(),
                new FileInputStream("로컬에서 업로드 할 파일이름"));

        return blobInfo;
}
Let's write the HTTP API as well.
// GCSController.java

@RestController
@RequiredArgsConstructor
public class GCSController {

    private final GCSService gcsService;

    @PostMapping("gcs/upload")
    public ResponseEntity localUploadToStorage(@RequestBody UploadReqDto uploadReqDto) throws IOException {
        BlobInfo fileFromGCS = gcsService.uploadFileToGCS(uploadReqDto);
        return ResponseEntity.ok(fileFromGCS.toString());
    }
}

// GCSService.java

@Service
@RequiredArgsConstructor
public class GCSService {

    private final Storage storage;

    @SuppressWarnings("deprecation")
    public BlobInfo uploadFileToGCS(UploadReqDto uploadReqDto) throws IOException {

        BlobInfo blobInfo =storage.create(
                BlobInfo.newBuilder(uploadReqDto.getBucketName(), uploadReqDto.getUploadFileName())
                        .setAcl(new ArrayList<>(Arrays.asList(Acl.of(Acl.User.ofAllAuthenticatedUsers(), Acl.Role.READER))))
                        .build(),
                new FileInputStream(uploadReqDto.getLocalFileLocation()));

        return blobInfo;
    }

}

// UploadReqDto.java

@AllArgsConstructor
@Getter
public class UploadReqDto {
    private String bucketName;
    private String uploadFileName;
    private String localFileLocation;
}
I'll use this API to upload the upload/jyamiLogo.png file from my local project to GCS.
When you call the API as shown below, an object with the folder structure uploadGCS/jyamiLogo.png should be created in the javabom-storage bucket in my GCS.
If you check the storage through the Google Console or IntelliJ plugin, you can confirm that the file was uploaded successfully as shown below.
Since Google stores the file name itself in a [folder path]/[file name] structure when uploading objects, you can upload without any additional logic to create folders within GCS.
Bonus: IntelliJ Cloud Code Plugin
Using the plugin, you can conveniently check Cloud Storage contents without using the web console.
[IntelliJ] Using GCP Plugin - Cloud Code in GCS
GCP Storage를 연동하여 사용하는 글을 블로그에 포스팅 하려고 Spring initializer을 이용해서 프로젝트를 생성하면서 좋은 플러그인을 발견하여 기록하려 한다. 위와 같은 dependency로 새로운 프로젝트를 설정..
jyami.tistory.com
[References]
- [ Google Cloud Official Docs ] https://cloud.google.com/storage/docs/how-to?hl=ko
- [ Spring Official Docs ] https://cloud.spring.io/spring-cloud-gcp/reference/html/#google-cloud-storage
- [ Java DOC ] https://googleapis.dev/java/google-cloud-storage/latest/index.html
- [ Baeldung Article ] https://www.baeldung.com/java-google-cloud-storage


댓글
Comments